Hello everyone, I am back, I
wasn’t sure if I was going to be able to continue writing a blog with all the
crazy events going on in my life. There are still lots of stressful and
non-stressful things and events happening over the next couple of months but I
found I really missed my creative life.
I didn’t feel like myself without being in my studios creating and
sharing all my projects and adventures with you. I have so many summer painting projects
planned for the house and outdoor garden area, not to mention all the great
colorful sewing projects waiting on my sewing counters. There is going to be so much to share with
you, I will just have to figure out how to find the time to create and write
around all the rest of the craziness of my life. I thought I would start off with the outdoor
shed project we did at the beginning of spring, the one I kept promising to
share with you, there are a ton of photos, enjoy.
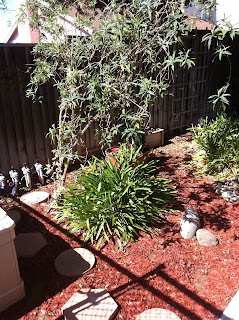
This was the area we chose to
place the shed, it was a pretty space but one which could not be seen from the
backyard or out the windows, kind of a blind spot. I hated to demolish it but it was the only
spot large enough to hold the shed and not create an eyesore when looking out
any of the windows.
The first thing we did was to
remove the storage box, then dig holes on the hill so we could transplant the
tree and plants up there instead of dumping them into the green-waste
container; the hill is beginning to fill in nicely with all the extra plants, no
more baron land. Then it was time to level out the area, but first my husband
had to remove a bunch of very hefty roots with a pick ax, they were a good two
inches in diameter from the tree next door.
They were heading under the concrete towards the foundation of our home,
yikes, that was not a good thing, problem solved.
All leveled with top soil and
ready to go.
Floor and outside shed frame
are going up, a snap and lock kind of thing with a few nuts and bolts to hold
it all together. A super quick process
when you go by the numbers.
Here the walls are going up
starting with the back wall, then each side, leaving the front open for the
doors. The blue tape had the numbers on it for easier piecing, kind of like making
a giant jigsaw puzzle.
Time for the roof and doors
to be installed by my husband and son-in-law.
I was able to help until we got to the roof, way to heavy and I was too
short to lift it up so we recruited some help for this part, thank goodness my
son-in-law had a few minutes to come over.
My very happy husband with
his new storage shed up and ready to use, did I mention he assembled it in an
hour and a half, wow! I think that is a
new record or something, I was a very proud wife. Now we have all the storage we need for our
outdoor furniture, cushions, umbrellas, pillows and extra folding patio chairs,
finally. Our new home was a little short
on storage, I was very happy we were able to find the space and solution and
get it done so quickly. Another problem
solved, just a few hundred more to go.
Thanks for letting me share
our spring shed project with you as I return to my creative life again. I hope you enjoyed all the photos and it
inspired you to tackle a problem solving project of your own. I am not sure what is up next so I guess you
will have to keep and eye out to see what else I may be sewing, planting,
painting or decorating. See you soon.
Laurette


No comments:
Post a Comment