I finally got to work on one
of the painting projects I have been trying to get completed the last couple of
weeks, re-painting my rusted and faded patio plant stands. The projects were simple but took a bit of
prep time since I needed to sweep and vacuum my outdoor studio floors to reduce
any dust and dirt before breaking out the paints. Because my outside studio cats sleep there at
night and during bad weather the cat hair can really mount up no matter how
much I clean, it can be a real chore to get it ready for painting. Once the
clean up was complete, down went the brown craft paper secured with blue
painters tape, to protect the floors from too much over-spray, time to get to
work making over my plant stands.
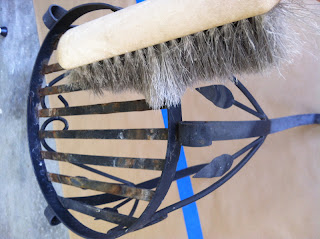
This little number was
originally a vibrant deep black color which had faded and rusted over the last
couple of years. Time for a good
cleaning with a soft brush and a soft cloth to remove dust, dirt and those
pesky spider webs.
In order to get the paint to
stick to the metal and to reduce rust I sanded down all of the metal with a
medium grit sanding block to remove the rust and any loose paint which had
started to crack and peel. Roughing up
the paint on the rest of the stand allows the paint to adhere to the smooth
surface creating a better bond.
This plant stand was in dire
need of a new paint job as well; it started out a cute shabby chic antique
white but rusted over time. I re-sprayed
it white several times over the years when I had white wicker outdoor
furniture on my little front yard patio.
Alas, I no longer have that furniture and my tastes have gone away from
shabby chic to something more colorful and fun. The stand received the same
cleaning and sanding treatment to make it ready for its new coat of paint.
All set and ready for the new
color, Key Lime by RUST-OLEUM, I love using this paint the coverage is
fantastic and I rarely get any dripping unless I stay in one spot too long and
don’t keep a constant sweeping movement with the spray can. I chose this color because of the new fabrics
I will be using to recover my patio furniture cushions which includes the
colors of blues and vibrant greens.
I always turn my pieces upside
down and spray the underside first including the inside of the legs. I let them completely dry before adding a
second and or third coat of paint depending on how well it is covering
everything. Once it is all dry I flip
them over and spray the top side with several coats until I get full coverage
in all the nooks and crannies. It is
best to use light coats each time instead of one heavy coat which will cause an
uneven looking surface.
All done and looking fresh
and new dressed in their pretty lime coats of paint, what a difference. These plant stands should be just the bright
pop of color I am looking for on the patio to go with the new fabrics. If I decide I don’t like the color I can
always repaint them, I just love spray paint it is so quick and easy to do,
another one of those simple changes for the price of a can of spray paint.
Thanks for letting me share
my Key Lime painting project with you, I have another paint project to share
with you this week, let me give you a hint, it matches my front door.
See you soon.
Laurette
If you enjoyed reading this
post you might also like:
The Red Door
Sewing The Blues
Pumpkin Bling - 2011
The Paisley Crazy Room
Makeover- 2011


No comments:
Post a Comment