In April I shared with you
about the darling Anne Michelle shoes I scored for only $5.00, while I was on
vacation in Pismo
Beach
I turned the shoe upside down
so I would not get glue all over the outside as I handled it. I used Krazy Glue
because I did not want the stones to fall off if the shoes ever got worn. The smallest stones were hard to handle so I
used bent nosed tweezers to pick them up and dip them into the glue then placed
the gems onto the shoes.
I kept getting glue and
finger prints all over the shoes so I pulled an old soft sock over the shoes
which kept them clean and from moving around all over my work counter.
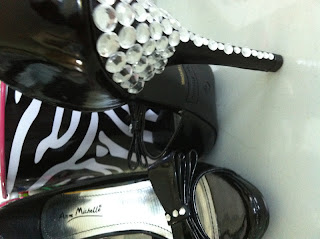
This photo shows my first
finished shoes with tiny spaces between the gems running down the high heel of
the shoe. I was not completely happy
with the look of the heels, I let them sit for a while trying to decide what to
do next. I love the three stones on the
little bows, I could have gone crazy with the crystals and covered the whole
thing which is what I intended to do originally, but I thought I should just
keep it simple, at least for now.
After looking at the shoes
for awhile the spaces kept bugging me, I finally decided to add the smallest
crystal gems in the package to see if I would like that look any better. It is somewhat more pleasing to the eye but I
cannot say I am in love with the final product. I think these shoes will remain a work in
progress; I will probably end up covering the entire heel and bow with crystals
on each shoe, which was my original plan for over the top bling, just like the
designers are showing this season.
Thanks for letting me share
my newest bling project with you; I hope to get back to a few more bling projects
throughout the summer months, I miss all that sparkle.
See you soon.
Laurette
If you enjoyed reading this
post you might also like:
Bling Those Shoes - Part 1
Black and White Bling -
2011
A Bit of Bling - 2011
Buttons Bows & Bling -
2011


No comments:
Post a Comment