Showing posts with label bling. Show all posts

Monday, January 27, 2014

Guest Bath Bling Reveal!

If you have been faithfully following my guest bath facelift you know I wanted to do a little something with that room featuring some of the accessories leftover from my studio re-org/makeover.  At this point in time I do not have time to paint the room or add new fixtures but we do plan to attempt that process later this spring or in the fall.  If you have not been following along and you are a first time reader, check out all the archives for January 2014 to catch up on the inspiration, process and DIY projects used for this finished project.  Are you ready for the reveal......OK, here we go, no words just photos.


Wow!!! What do you think, pretty glamorous, right?!?  I am totally in love with this very elegant, lady-like room and enjoy doing my make-up and hair in my new bling bathroom.  I pretty much took over the room all for me, no men allowed, unless we are having guests, giggles!

**            **           **         **          **          **         **          **         **

I just had a thought...ah oh!!!...........
The new guest bling bath and my studio makeover got me to thinking about our guest room and how it is no longer working for us since I removed my office from it. There is a huge space where the desk and printer sat and all the furniture which tied everything together is gone leaving kind of a gap in my original design.  I created that room makeover several years ago when I needed to have a place to write my blog and handle a few business details with the guest room designed around that purpose.  Now that I have a full office in another space I am pretty unhappy with the look, feel and purpose of the current floor plan and decor.  Guess what…it is time to give the room new purpose and a new makeover!!!!  Woohoo…more design opportunities with no painting necessary since I am very happy with the current wall color!  I am really excited to get started looking for fun inspiration and purpose, follow along and see where I go from here. 

Thanks for letting me share my guest bath bling reveal with you, I hope it inspires you to create a little facelift in your guest or master bath, give it a try, anyone can do it!  Oh by the way… the outdoor projects are coming along but will not be completed for another week or so but I will share those as soon as I can.
See you soon.


Laurette

Thursday, January 23, 2014

Glam It Up!


I had a few accessories leftover from my studio makeover which did not have a home so I decided to use them as the jumping off point for the re-style of our upstairs guest bath.  After playing with the layout of the accessories I realized I needed a few more things to tie everything together.  I wanted to use several things I already had on hand before going out and buying anything new, all I had to do was glam them up with a bit of bling! Here are a few simple projects I did to achieve the look I wanted.

I have a lot of black, white and crystal embellishments in my paper crafting stash so I thought why not use some of those to add that bit of black and sparkle to a few items I could use in the bathroom.

My first project was to bring a little pizazz to a basic soft blue candle.  I used some stick on crystals and black & silver adhesive stickers and stuck them on the side of the candle, so cute!

For this project I wanted to glam up some basic bath salts so I tied some narrow black satin ribbon around the neck of the bottle and added a small black crystal adhesive sticker to the center of the bow.  It was still a little blah so I used another one of the stickers from the same pack as the candle and placed it in the center of the jar; much more elegant now.

I had two glass jars already on the counter but they were just not up to the same glammie standards as the rest of the accessories, too much silver and no bling.  I wanted them to match a pretty glass candle holder from the studio I wanted to re-purpose as a holder for pretty soaps.  I grabbed some black ribbon and some bling buttons to match the candle holder and went to work.  Aren’t they gorgeous, I just love their elegant bows and pretty sparkle in the light!

For my final project, I took a fabulous card my daughter had given me and put it in a basic black frame.  The card had all the elements of the room in it and would tie everything together when placed on a small décor shelf on the wall.  So easy and very effective!

Thanks for letting me share my glammed up projects with you, I hope it inspires you to add a bit of easy sparkle to your life; every girl needs a bit of bling!  More to come about the guest bath bling facelift keep checking in often to see what project is next before the reveal.
See you soon.

Laurette


Tuesday, January 21, 2014

Guest Bath Bling

I have a couple of fun posts coming up starting with this one.  As you may have already guessed I have a thing for decorating with black, white & bling, usually all together in one room but sometimes the bling shows up with other colors too, I love my bling. My entire studio is decorated in that combo and my future walk-in-closet will also be in similar décor colors so I thought to myself why not do the same things in the guest bath right next to the studio?  I had been looking for inspiration but just could not settle on anything until I found myself with quite a few leftover accessories from my studio makeover; the guest bath was the perfect place for them. All those black, white and bling accessories would be my jumping off point for that room.


I just wanted a quick little project to do while waiting for my hubby who was getting started on a much bigger project outside which I would not be doing very much work on, with the exception of the design decisions as he went along. Anyway…. back to my project, I will share that other project soon.  I knew I was not going to paint or change out any fixtures at this time, maybe later this spring, oops!.... don’t tell my hubby that! I was only going to have three or four days to do a little styling/makeover/face lift. Now that I had a jumping off point I needed a design direction so I pulled out some of my resource books, magazines and Pinterest boards.  I have close to a hundred resource materials which can make putting together design/inspiration boards a pretty lengthy but fun process. Here is some of what I chose for my design inspiration and why.

What drew me to this picture are the black and white shower curtains, the crystal chandelier, the bold yellow accents and the green plant in the tub.

This photo was close to the wall color currently in the bath with white trim work, and black and white art prints. The accessories I wanted to use would work well with all the hard surfaces already in place.


These next three photos were ultimately where I wanted the walls and accessories to go once they were painted and decorated sometime in the near future.

I was totally attracted to the wallpaper in this shot and the beautiful mirror and white woodwork.  I would not be doing wallpaper but I needed some inspiration for the valance for the bathroom window next to our tub/shower.

Even though I loved the yellow accents in the first photo my favorite colors are in the blue family so this photo shows them all tied together and just what I was going to be using for my pops of color.

Now I was ready to create my design boards, you are probably wondering why I use them, the truth is I not only use them to inspire me but I also use them to remind me of all the little details I want to incorporate into the project; my memory is not what it use to be these days and this way I would not forget and get off track.  Whenever I see something visual that speaks to me in an advertisement, magazine or book I cut it out or make a copy and put it in a box or in one of my inspiration binders so I can use it later when I finally get to the project I want to create, then onto a board it goes.  These boards have a little of everything on them including physical elements I want to incorporate into the project.

Once my boards were completed I pulled fabrics from my fabric wall and trims, ribbons and bits of bling from my stash and I got down to some real design work; I was off and running.  You will have to read future blog posts to see what comes next.

**The reason I shared all of this is because many times I am asked about my creative process and how I decide what goes into a room. So here it is and something you will see on my blog from now on as I go along creating new projects all year long.

Thanks for letting me share my creative process with you; I hope you will check in often to see what décor projects I created to go in my new bling guest bath and of course to see the before and after photos and the final reveal.  Oh...I almost forgot!!! There are also the big outdoors projects which we are currently working on, lots to see, stay tuned!
See you soon.

Laurette


Wednesday, October 16, 2013

Storage For Your Bling

I have a quick sparkly little post for you involving bling! Today’s post is not about sewing but it is about organization for your daily bling which is part of the title of this blog so it is going on this page; here we go.

Like most of you I have all kinds of jewelry I forget about because it is out of sight so therefore it is also out of mind.  More then once while riding in the car I would think to myself, why am I not wearing some fabulous necklace or bracelet with my outfit???  Probably because it was tucked into some drawer, jewelry box or other closed storage item never to be seen again. I have tons of jewelry, from my days as a color/image consultant, sitting in boxes waiting for chunky jewelry to be worn again, the time has finally arrived. I have been scoping out all kinds of stores looking for the right storage solutions to appear but only found a few nice looking options and only bought one of them.

The only piece I purchased was this elegant black velvet three tier bracelet holder from Michael’s for 50% off, such a deal, but still pricey since it is meant for semi professional use in a booth or retail store.  I absolutely love the way my jewelry sparkles when placed side by side on the velvet bars. While writing this post I kept running back and forth to my room and adding more and more pieces and rearranging all the jewelry I wanted out. (This post took forever to write because I kept remembering great pieces I wanted on display and it snowballed out of control…giggles!)

While organizing I found two other items I decided to re-purpose into necklace storage.  The hangers originally hung behind the front door to hold our guests umbrellas and scarves during the winter time and became decorative pieces during the summer months.  The only problem with the pretty holders was they would occasionally fall off the wall if a scarf or umbrella became tangled on the hook then down everything came, total disaster.  We recently put up a new more stable coat rack with lots of hooks and no danger of an accident, leaving the decorative holders without a home.

Into my bedroom they went right next to my pretty dressing table close to my velvet bars; this way the jewelry I wanted to wear most often was on display and ready to use.  I have to say that ever since I put up the velvet bars I have been consistently wearing the jewelry I had stored on it.  Now with the other pieces I just added to it and the holders with the necklaces on the wall I will wear even more pieces this winter and into the spring.  I am very happy with all that bling on my dressing table and wall adding a bit of sparkle to my bedroom, what more could a girl ask for!

Thanks for letting me share my bit of bling decorating with you, I hope it inspires you to dig out some of that seldom worn jewelry, find attractive storage solutions for and put it on display someplace you will see and wear it.  There are a lot more projects finished and ready to share on both my blogs as soon as I can sit down long enough to write them.
See you very soon.

Laurette

Watch for a new furniture painting project, using some exciting new products, which I am in the process of creating over on my other blog. It should be on the blog in the next day or so, keep checking daily to see what I am working on now.


Wednesday, September 26, 2012

Fall Windowpane Quilt


Some of the items I use to decorate my home for fall are fabric table runners, a few are just simple fabric runners while others are pieced quilt style fabric table runners. They do not always end up on the table, some are placed on the entry hall table, shelves and on top of the granite island; I switch them up several times each season.  They add lots of color and set the tone for the color pallet and decorations in that room.  In order to get the look I wanted I had to make my own table runners since the stores just do not carry what I like.  The featured table runner for today is my own design titled; Fall Windowpane.

This pretty little quilt was made up of leftover fall fabrics from two very large Thanksgiving table runners.  I ended up with a bunch of large triangles I had no idea what to do with; I was going to make pot holders for my kitchen.  I sewed two triangles long flat sides together to create a square, once they were sewn together and laid out on my cutting table I saw a table runner.  All I needed was something to create the windowpane effect with; there was nothing in my stash large enough or in the right colors so off to the fabric store I went. I ended up with a completely different fabric then I originally went in for, a green with gold highlights to pull out the green in the leaves, kind of hard to see in the photos but it is there.  I was very pleased with how the table runner came out, this year it sits on the entry hall table, very pretty to look at when you come in the front door.

Thanks for letting me share my Fall Windowpane table runner with you.  I still have more fun fall projects to share as I finish them, in the meantime I will be showing more of those quick and easy projects.

Side Note:  It is the 1 Year Anniversary of the Buttons, Bows & Bling Blog. WOOHOO!!!!!!  It has been a year of total learning and great fun, I have really enjoyed sharing all my creative ventures from my studio with each and everyone of you.  Thank you so much for sticking it out with me, I am grateful for each and everyone of my faithful readers. I am not sure where my blog will go from here or what I will be sharing but I truly hope you will keep reading to see what I am up to next.
See you soon.

Laurette


You might also like:

Falling In Love With Fall
Pumpkin Bling
Fall Floral Arrangements


Saturday, August 25, 2012

Blue Box Bling


I have a short bling post to share with you today about these small blue boxes which I used on my desk in one of my old studios. I did not think I would have room to use them in my current studio until I moved things around on my work counter and found room for one of them. The boxes were kind of basic looking, not very impressive and definitely did not have any bling factor.  Because my studio has icy blue walls with a lot of black & white accessories I try to keep everything pretty consistent and not bring in too many other colors.  Here is what I did to make the little box fit in with the other accessories on my counter.


The box started out a shiny basic light blue, not much to look at so I went to my stash of stickers and pulled out some with black scroll work on them, I placed them on the front and sides.  I did not put any on the top because I usually put little things on the top of the box.


It was still missing something so I got out two different kinds of stick-on crystals and applied those creating the finishing touch for the little blue box.
All done and ready to put on my work counter where it will get plenty of use holding my Post-it notes and other small office supplies.

I am going to be away from my computer for a few days so watch for my guest blogger on Tuesday, that is if we can work things out with Google/ Blogger. It seems I have used up my allotment of photos allowed or some such nonsense, which means I may have to close down my blog with Blogger and go to another host.  I will try to post and let you know if I can, unless they just totally shut me down altogether, which would make me totally mad.  Fingers crossed we can work things out; I would really miss writing for all of you.
Hope to see you soon.

Laurette

Thursday, August 23, 2012

Guest Blogger


I have some exciting news for you, I am having a guest blogger next week, her name is Jolene from ajewelddesign.blogspot.com, she writes a great blog and she has agreed to post for me sometime in the beginning of the week while I am away for a few days. It will be fun to have someone else write for me, let’s see how she does, please look for her and let me know what you think.  I will still be posting for a few more days so watch for those as well.


For today’s mini post I wanted to share photos of the Strawberries with cream cheese filing I made for a party.  They were totally yummy and went quick, they were super easy to make as well.  I can not take credit for the idea; I saw them on Pinterest and had to make them right away.  I have a fun bling project to share with you tomorrow so look for that one.
See you soon.

Laurette

Friday, July 27, 2012

Under Construction


Hello everyone, I wanted to give you a quick update and let you know my blog is under some technical construction while we do some updates and make some small changes, most of which you will not even notice.  A couple of new items will appear, hot buttons for Facebook, Twitter and a few other social networking sites will now be available so you can" Like Us" on those sites, those should appear at the bottom of each new posting. We would all be thrilled if you did that whenever you like a photo, pattern, project or post, don't be shy.  We also have a " comment " button you can click on and make a comment on the post you just saw, if you take the time to comment I will do my best to read it and respond back to you as soon as I can, we love to hear from you. (please note: these hot buttons, appear very small so you will really have to look for them, the size is not in our control).  We at Buttons, Bows & Bling strive to do our very best for our readers so we have joined the social networking scene to have the latest up to date information and ideas, we hope you will join with us in moving us forward in that arena.

Construction should be finished this weekend, I will return with a new posting which I hope will be waiting for you Monday morning, fingers crossed.  Thanks for hanging in there with us this past year as we made our way through a new frontier, we have been having a great time and we can't wait to share more creative projects with you as summer winds down and fall begins.
See you soon.

Laurette

Wednesday, June 20, 2012

Sweatshirt To Jeweled Jacket - Tutorial


One of the creative things I like to do is take old or unused clothing and re-purpose them into beautiful new garments or decorative items.  The most recent upcycling project was an olive green sweatshirt which I loved the color of but not the fit, it was brand new and never worn; I kept moving it from house to house thinking I would do something with it someday. After much debate I finally settled on transforming the ordinary sweatshirt into a stunning short jacket for fall.  For those of you who sew, this is a great project you can do with just about any sweater or shirt with just a few tweaks, follow along with my tutorial and you will be all set to make one of your own.
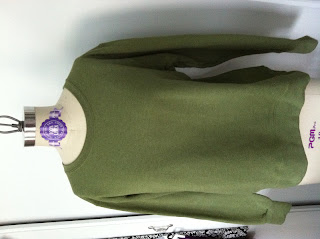


Pictured is the sweatshirt, I am going to makeover, in its original form. The first thing I did was to take my dressmakers chalk and draw a line down the middle of the shirt, measuring from each side to the center until I got it even. Once the line was drawn I cut a nice straight line down the middle to create the jacket opening, all set and ready to stitch up once I finished cutting off all the unnecessary parts.


I really did not like the cuffs on the sleeves due to the fact they were very wide and tight, they were totally uncomfortable. Once I had them measured for the new sleeve length, I cut off the cuffs and began pinning up a new hem.

I moved onto the bottom of the shirt measuring and very carefully cutting off the bottom band of the sweatshirt.  It was a really well made knit band with a fine tight weave which I set aside to use later in an unusual, surprising way.
Note:  I like to do all my cutting and pinning at once, then go to my sewing machine instead of popping up and down every five minutes, it saves a lot of time and moves the project along quickly.


The first thing I did was to start stitching the hem of my new jacket, I decided on three layers of stitching to make it decorative instead of just a simple ¼” seam.  Because the fabric is knit the edges did not need to be folded under or any kind of finishing stitches on the raw edges.  I sewed each set of stitches ¼” apart for a nice uniform look, I chose a double row of stitches for the cuff finish.  Once the bottom hem was completed I moved onto stitching up a small placket down the front of the jacket, just a single row of stitches since I had other plans for the opening.


It was finally time for the neck opening, it took me a while to figure out what I wanted to do with it, and I had a lot of ideas which took me forever to settle on one design. As soon as I cut off the band from the bottom of the shirt I knew right away I was going to use it on the neck to change the lines.  I draped it across one shoulder which I liked, then I considered evenly sewing it around the neck and using the long ends to make a self tie or bow, my final choice was to lay it on collar style which felt more like the jacket I originally had in mind.


This was the tricky part, getting the band around the neck without causing a lot of stretching and ruining the shape of the jacket.  I chose to leave the original collar intact in case I wanted to alter it again in the future.  When I removed the banding from the bottom of the shirt I cut about two inches away from the original hem seam so I would have extra fabric to work with, it turned out to be a good choice.  I was able to place the neck edge up against the existing band hem seam and pin it just below the old collar hem, I used a good number of pins to make sure everything stayed in place while I stitched it up. Stitching along the original collar line would allow for the new collar to lay down over the old one concealing it and giving the whole area more stability and no sagging or stretching.  I could have added some stitching in the ditch or other stabilizing stitches but I wanted to be able to remove the collar at some point in time without a lot of fuss.

Before:

After:


My olive green fall jacket it complete with one photo showing it without the jewels running down the front and the second photo showing the gems, I hand sewed into place, sparkling in the light giving the illusion of the crystal jewels being larger then they are and slightly uneven.  I can assure you they are evenly spaced with hook and eye closures just behind the stones.  Plain sweatshirt turned custom trendy jeweled jacket without a trip to the designer showrooms. How much fun is that!

Thanks for letting me share my jeweled jacket makeover, I hope you enjoyed my tutorial and you are inspired to make one of your own.  Did I mention the sweatshirt was part of a set, can you guess what I am going to make out of the poorly fitting sweatpants?  I guess you will have to watch for that makeover to appear in a future post, it is already in progress.
See you soon.

Laurette

You might also like:

Bling Those Shoes – Part 1
Bling Those Shoes – Part 2


Related Posts Plugin for WordPress, Blogger...