Showing posts with label makeover. Show all posts

Thursday, October 10, 2013

Hooded Sweater To Cardigan - Tutorial

I have a really great post for you today, a very easy sweater upcycle project I stitched up in just a little over an hour; you have to try this! In the last couple of years I have fallen in love with cardigan sweaters, they are great over blouses, tank tops, dresses, other sweaters and misc. tops.  Lately I have been seeing a number of open knit orange sweaters and thought, wow, I need one of those. Two weeks ago while doing a closet re-org project I came across an orange open knit sweater just like the ones I saw on Pinterest except mine was a pullover with a hood and not a cardigan.  It was a sweater I rarely wore because it just never fit right and drove me nuts because the hood was heavy which pulled the top backwards, it was fairly expensive so I never got rid of it thinking someday I would do something with it.  Off the shelf and out of the closet it came and into the dryer, set on air, to knock out the dust, no need to wash it since I knew it was already clean just dusty.  Once it was dust free it was time to thread my sewing machine and get to work, here is what I did.


This is my pretty orange sweater, an open weave semi cable knit, as you can see it is open enough that I always had to wear something under it or show off all my goodies.  If I made it into a cardigan I would not have to worry about that since it would always have some kind of top or dress under it, problem number one solved.

The first thing I did was run pins down the front of the sweater to indicate where I wanted to stitch and ultimately cut open the top, the pins would be my guide line. I chose the center cable as my cutting and stitching point.

The first thing you should know about working with any kind of open cotton knit is they quickly ravel if you cut them or if you get a hole in them due to their chain stitches.  To prevent that from happening on my sweater I knew I had to stitch down a line of thread on each side of where I wanted to make my center cut.  I could have chosen to just use a straight stitch but I knew a tight zig zag stitch would give extra stability and keep the knit intact when I cut it.  The only drawback is that it does cause the edges to ripple a bit and pucker up; you could try larger straight stitches and see what that does, I may do that next time.


Time to cut hoping I did the right thing, if not I just trashed an expensive sweater.  I chose to put the sweater back on my dress form to keep from accidentally cutting anything other then the front of the top. Once I cut the top it released the tension of the stitches and I got a slight ruffle down each side of the new cardigan. 


I could either leave the slight ruffle down the front or turn it under about half an inch on each side to give it some weight and lessen the wave.  I chose to pin it back and stitch it down for a bit more substance in case I wanted to add buttons.  I was very happy I chose to turn it under and give it a more polished finish, I love how it looks.


Almost all of my cardigans have buttons so I pulled out my rather large button collection to see if I had enough of any one kind of button to use all the way down the front.  Not just any button would do, I did not want brown or tan or white or black, I wanted orange to match the sweater, that way I could wear it with anything and not have them clash with my outfit.  I only found two orange ones so I decided I would put one on each side so I could use a fabric loop to close it if I wanted to.  All done and ready to wear, how cute is that!  I know the sweater will now get lots of use all winter long.  I have one just like it in black I have not been wearing; I think it will get a makeover too, only the black one will have a bit of a romantic twist. I guess you will just have to keep checking in to see what I am going to do to make a hooded sweater more feminine and romantic.

Thanks for letting me share my newest tutorial with you, what a great way to re-purpose an unused item of clothing and stretch a dollar, no shopping needed here for a new cardigan sweater or two.
See you soon.
Laurette


Saturday, October 20, 2012

Toy Room Makeover - Day 2


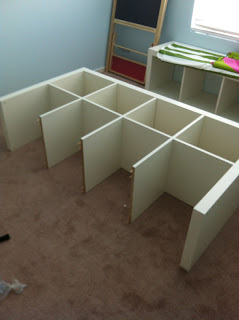
Day 2 was all about putting together the bookcase/bench units we purchased at IKEA several weeks ago.  We purchased two single IKEA EXPEDIT bookcases which could be used in a number of different configurations; ours would be turned on their sides to create very sturdy benches for the adults to sit on while they played with the kids.  Several shoppers at IKEA tested them out with us to make sure they would be safe to sit on, it was lots of fun. That place is a mad house on the weekends, don’t ever go there then, go during the week, totally a crazy but fun experience I would not repeat anytime soon.


These wonderful EXPEDIT bookcases came in very heavy six foot long boxes.  They are the build it yourself style furniture using wooden pegs and an Allen wrench. I must say they are very well built, the pieces are substantial and everything lines up perfectly unlike some of the other build it yourself furniture out there, my husband was impressed with the easy installation of the pieces.


The first two single bookcases went together pretty quickly and before we knew it we had our two corner bench pieces ready to put into place.  Don’t they look great, sturdy too!


Up next were the double bookcases which we planned to put on each side of an existing bookcase we already own and planned to use in the room once it was given a new paint color.  The double bookcases went together the same way just taking a bit longer with double the pieces.


Once we had the bookcases assembled they were much bigger then we thought they would be in width but not as tall as we needed to keep little hands out of the big girl toys they were not ready to play with yet. What to do????  We tried several different configurations but ultimately ended up turning them on their sides and stacking them to gain about four inches in height, which should do the trick.  The bottom two rows are for the toddlers and the top two rows for the 6 year old, an even split.  We had to leave out our existing bookcase and send it to storage for the time being, one less project to paint.

Thanks for letting me share day 2 of our toy room makeover, day three is the beginning of the fun part, decorating the room. There will also be sewing projects and painting projects some of which will have to wait until we return, after our new grandson is born.
See you soon.

Laurette

You might also like:

Toy Room Makeover – Day 1


Thursday, October 18, 2012

Toy Room Makeover - Day 1


My husband and I recently decided to turn our very small 5th bedroom into a dedicated playroom/toy room for our three grandchildren.  So much of our home is not particularly child friendly since just the two of us live here, hence the need for a really safe place for the grandchildren to play.  The room has been moved around and been several things in the last two years, I planned to make it into a beautiful boutique style closet for all my clothing and accessories but we felt for now we needed the playroom more.  Oh well they won’t be small forever and we designed the movable elements in such a way as to be able to use the storage in my boutique closet later. Come along with us on our journey to creating a very cool kid space, here is what we did.


I really detested the wall color and finish on the walls in that tiny little room every time I walked in there.  The color was painted a dirty/pinkish beige with very splotchy textured walls which was applied to cover up a ton of damage and stains, not something we did it was that way when we moved in. No matter what I did to the room to brighten it up with colorful fabrics, toys and furniture it just looked awful.


I am not sure we can do justice to the mess the walls were in with these photos but I gave it a try.  The first thing we did was to take sanding blocks and try to sand down the really rough patches, we found if we went to far the damage and stains started to appear so we could only sand the top layer without getting into re-plastering all four walls, Yikes!  That particular part of the project was a long one because we had to brush down the walls afterwards and vacuum twice. We were smart enough to move everything out of the room first.  Once the room was prepped with blue painters tape we began the real work of cutting in around the baseboards and corners, a long process; once that was done, out came the rollers.  My husband also painted the ceiling which really created a light bright room, the walls are not as smooth as we wanted but we did the best job we could taking into consideration the past damage. With art work, a mural, furniture and curtains not much wall should be showing anyway.

Can you guess what color we chose for the room, we asked my oldest granddaughter what color she wanted to see in there, pale yellow or a light blue?  She chose an icy blue to go with all the other fabrics for the curtains, pillows, bench cushions and furniture we were adding to the color scheme.


I could not get a good photo of the room color just yet but you will see it as we work on it day by day, sorry about that. Not much color in this post, I can guarantee there is plenty of it in all the rest of the posts to come.

Thanks for letting me share day one of our toy room makeover; furniture construction is up next, what a difference those pieces made to an empty space.
See you very soon.

Laurette

I am sorry for the strange font sizes in the pint, sometimes the blogger program goes bonkers on me and there is little I can do to change it without erasing the whole thing. Yikes!****

Monday, September 3, 2012

Retro Laundry Room


I am back from my August Break and my week off to celebrate my birthday and our 35Th Wedding Anniversary.  It is unofficially the close of summer and the beginning of the fall season with the conclusion of the long Labor Day Weekend.  It is now time to get back to creating fun projects to share with all of you over the up coming fall and winter holidays.  I managed to work on a few projects and pieces while I was away from my blog, up first is my laundry room makeover. 

The laundry room was just a simple boring beige color with lots of holes in the walls and one cabinet over the washing machine, I absolutely detested that room and I was always embarrassed whenever the door was left open and company came to visit.  I love color and beige was not going to cut it so we went out and looked for something to inspire the makeover.  We went to Target where I found the basic pieces I would use as my jumping off point.  I chose the era and room colors of retro turquoise blue and tomato red from the art piece which hangs front and center in the room.  Here are some photos of the laundry room prior to painting it and the rest are the after shots broken down into segments.

Before:


After:


From all the photos you can see I used only small accents of the tomato red spread throughout the room, the other accents were the oak cabinets and the small wooden laundry wall hanger.  The rest of the accents were all in white with the turquoise blue being the predominant wall color.  The laundry room is now such a bright fun room too walk into, with lots of new storage and great new lighting replacing the old, loud fan light.  I am very happy we spent some of our vacation time working on the laundry room which is part retro but mostly colorful and updated, I love it.

Thanks for letting me share my new laundry room with you, I hope it inspires you to take a look at the space where you do your laundry and consider updating it and making it a fun place to work in.  Remember even a laundry closet, basement or garage could use a bright coat of paint to bring some sunshine into your laundry space no matter how large or small it is. Watch for more new projects all week long, I have some really easy ones anyone can do.
See you soon.

Laurette


Wednesday, June 20, 2012

Sweatshirt To Jeweled Jacket - Tutorial


One of the creative things I like to do is take old or unused clothing and re-purpose them into beautiful new garments or decorative items.  The most recent upcycling project was an olive green sweatshirt which I loved the color of but not the fit, it was brand new and never worn; I kept moving it from house to house thinking I would do something with it someday. After much debate I finally settled on transforming the ordinary sweatshirt into a stunning short jacket for fall.  For those of you who sew, this is a great project you can do with just about any sweater or shirt with just a few tweaks, follow along with my tutorial and you will be all set to make one of your own.


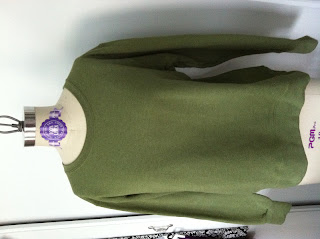
Pictured is the sweatshirt, I am going to makeover, in its original form. The first thing I did was to take my dressmakers chalk and draw a line down the middle of the shirt, measuring from each side to the center until I got it even. Once the line was drawn I cut a nice straight line down the middle to create the jacket opening, all set and ready to stitch up once I finished cutting off all the unnecessary parts.


I really did not like the cuffs on the sleeves due to the fact they were very wide and tight, they were totally uncomfortable. Once I had them measured for the new sleeve length, I cut off the cuffs and began pinning up a new hem.

I moved onto the bottom of the shirt measuring and very carefully cutting off the bottom band of the sweatshirt.  It was a really well made knit band with a fine tight weave which I set aside to use later in an unusual, surprising way.
Note:  I like to do all my cutting and pinning at once, then go to my sewing machine instead of popping up and down every five minutes, it saves a lot of time and moves the project along quickly.


The first thing I did was to start stitching the hem of my new jacket, I decided on three layers of stitching to make it decorative instead of just a simple ¼” seam.  Because the fabric is knit the edges did not need to be folded under or any kind of finishing stitches on the raw edges.  I sewed each set of stitches ¼” apart for a nice uniform look, I chose a double row of stitches for the cuff finish.  Once the bottom hem was completed I moved onto stitching up a small placket down the front of the jacket, just a single row of stitches since I had other plans for the opening.


It was finally time for the neck opening, it took me a while to figure out what I wanted to do with it, and I had a lot of ideas which took me forever to settle on one design. As soon as I cut off the band from the bottom of the shirt I knew right away I was going to use it on the neck to change the lines.  I draped it across one shoulder which I liked, then I considered evenly sewing it around the neck and using the long ends to make a self tie or bow, my final choice was to lay it on collar style which felt more like the jacket I originally had in mind.


This was the tricky part, getting the band around the neck without causing a lot of stretching and ruining the shape of the jacket.  I chose to leave the original collar intact in case I wanted to alter it again in the future.  When I removed the banding from the bottom of the shirt I cut about two inches away from the original hem seam so I would have extra fabric to work with, it turned out to be a good choice.  I was able to place the neck edge up against the existing band hem seam and pin it just below the old collar hem, I used a good number of pins to make sure everything stayed in place while I stitched it up. Stitching along the original collar line would allow for the new collar to lay down over the old one concealing it and giving the whole area more stability and no sagging or stretching.  I could have added some stitching in the ditch or other stabilizing stitches but I wanted to be able to remove the collar at some point in time without a lot of fuss.

Before:

After:


My olive green fall jacket it complete with one photo showing it without the jewels running down the front and the second photo showing the gems, I hand sewed into place, sparkling in the light giving the illusion of the crystal jewels being larger then they are and slightly uneven.  I can assure you they are evenly spaced with hook and eye closures just behind the stones.  Plain sweatshirt turned custom trendy jeweled jacket without a trip to the designer showrooms. How much fun is that!

Thanks for letting me share my jeweled jacket makeover, I hope you enjoyed my tutorial and you are inspired to make one of your own.  Did I mention the sweatshirt was part of a set, can you guess what I am going to make out of the poorly fitting sweatpants?  I guess you will have to watch for that makeover to appear in a future post, it is already in progress.
See you soon.

Laurette

You might also like:

Bling Those Shoes – Part 1
Bling Those Shoes – Part 2


Related Posts Plugin for WordPress, Blogger...