Showing posts with label Sewing. Show all posts

Saturday, January 25, 2014

French "Rustic Toile" Valance

As you know I have been working on a little “facelift” for our guest bath; creating all kinds of projects to give it some elegant glamour and I finally just finished the last of my projects.  Woohoo!!!  My final project was to make a new valance to go over the bathroom window, something to tie everything all together.  I searched through all of my resources and did not find any inspirational ideas for valance style; however, they did help me to decide on the fabric type, color and pattern I wanted to use.  I chose (from my fabric stash) a nice home decor heavy weight fabric in a black and white toile print. Take a look.

This is the plain window with 2” wooden blinds already up and a basic white shower curtain, nothing special to look at here.

This is the fabric I had several pieces of in my stash, wonderful remnants I got at the fabric store for a steal, super pricey otherwise. The fabric is “Rustic Toile” by Waverly Fabrics from the home décor line, about 1 yard long. When I am working with an expensive piece of fabric which is going into a room where it may not stay for a long time I try to sew it up in a way which allows me to re-use it later.  Instead of cutting the fabric I used the whole piece by pressing the selvages under on the sides then folding it in half to create a self lining and turning down the top edges to make the rod casing and using the largest stitch allowance my machine would sew.  The long stitches are easy to take out if I ever want to turn the valance into whole fabric again.

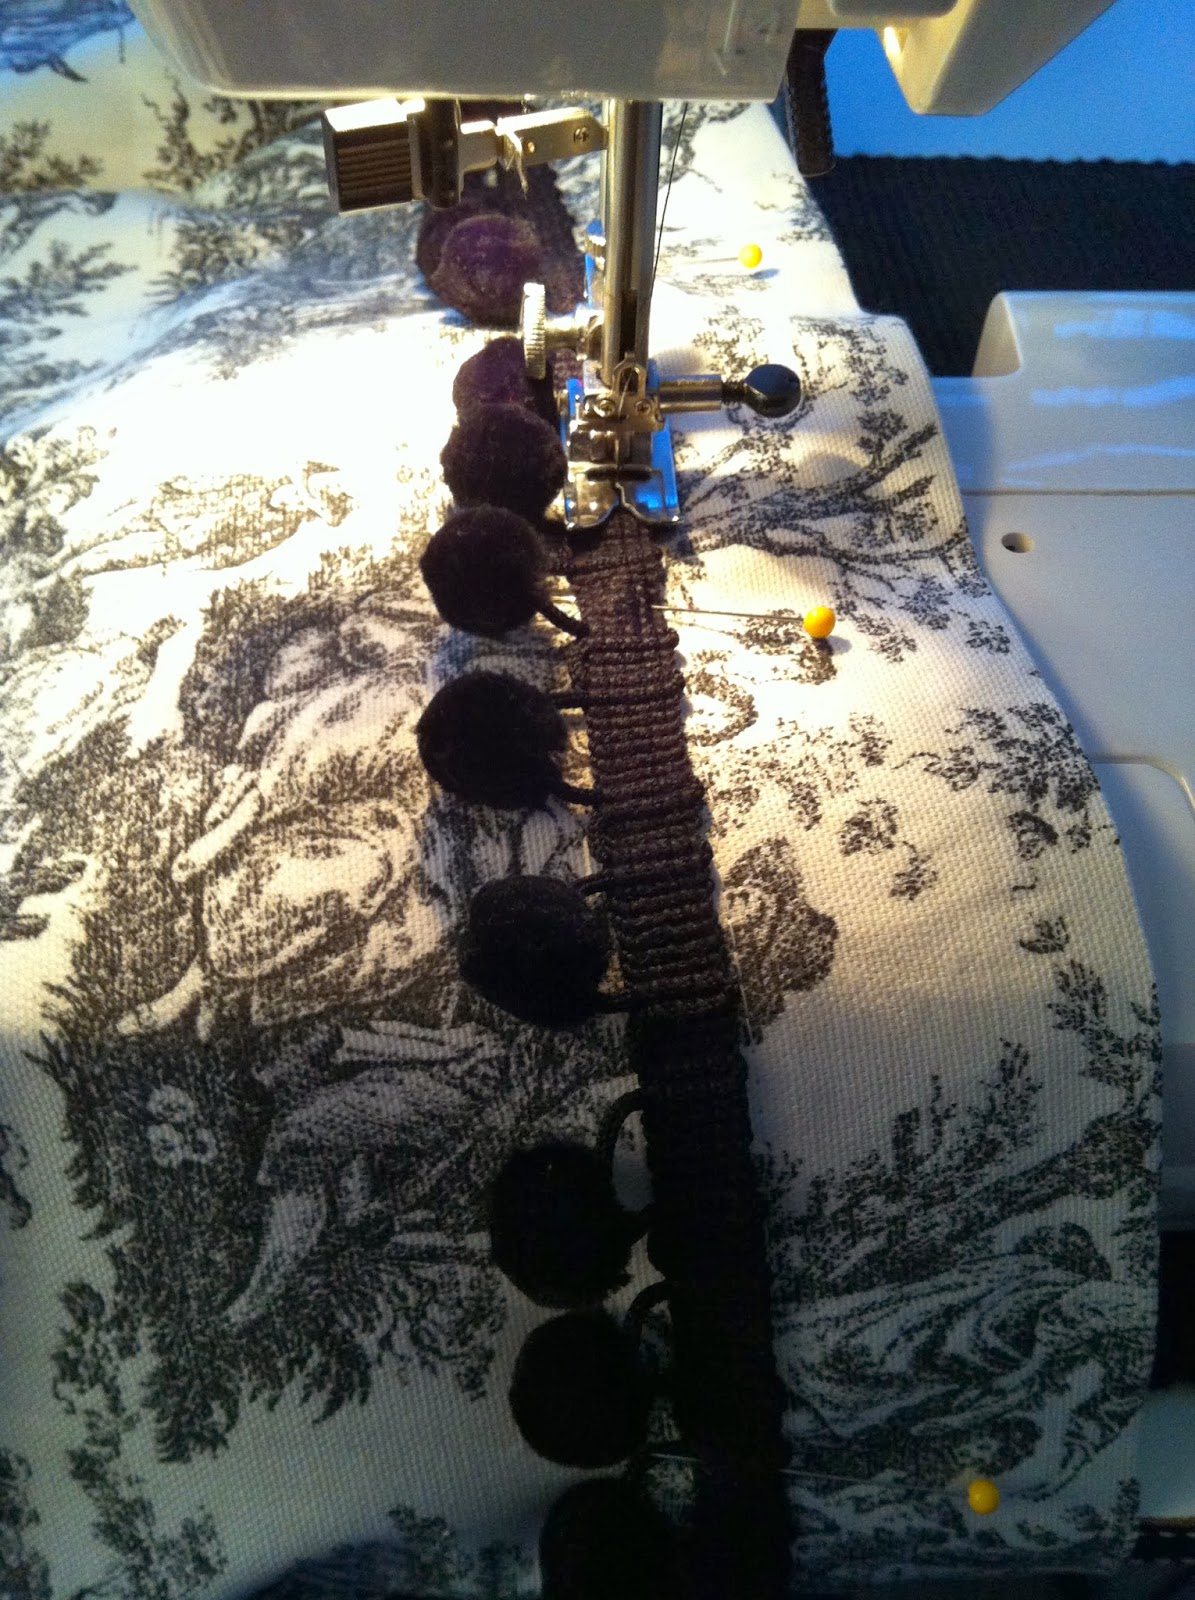
Once I had the casing finished I hug the valance giving it a bit of pouf but I felt it was missing something.  I went to my notions stash and looked for something to give it a pop of black because the light print faded into the very white shower curtain right next to it creating a lack of contrast.  I found some really pretty French jet black pom-pom trim which seemed to pull out the black and give it more definition.  I simply used the same stitch length to sew it just below the casing stitching, easy to remove later down the line if I wanted to re-use either of the items.

Here we are all done and already hanging up right over the window.  I just love me some toile, I would put it everywhere if I could get away with it! I cannot show you how well it adds contrast with the shower curtain right now… you have to wait to see the whole thing in the reveal in my next post. Hehe!!!

Thanks for letting me share my final bling project for the guest bath facelift; I am very pleased with the results so far, I cannot wait to see what you all think.
See you soon.


Laurette

Thursday, January 9, 2014

Organization & Reveal

I was not sure if I wanted to show you the studio in progress or just the reveal but after thinking about it I decided to show you a little bit of my process.  I am very visual so I usually start with pictures from a large variety of sources then I think about it for a little while, then do a ton of measurements and finally I start to move things around to see if what is in my head is really going to work or if I have totally lost my mind.  Good thing for me what I saw in my head was going to work well because some of the furniture and organizing units were awkward to move by myself and also kind of heavy.  First up was packing up all the “stuff” on my sewing/craft counter; there was more there then I thought taking longer then I hoped. From there I moved over to the window wall to remove things from the top of the cube storage units.  The only thing I could not move by myself was the flat screen TV and all the electronics; I had to wait for my husband so we could move everything in unison.  In the meantime while waiting for him I wrestled down the 8 feet of counter top nearly giving myself a hernia, that was a dumb idea, I had no idea how heavy and awkward that was going to be, Yikes!!!  OK, time for the photos of the rest of my progress, don’t laugh too hard, this was hard work and would have been ridiculous to watch if I had video taped it.
 
Oh by the way…. Please excuse the poor quality of my photos, some were taken at night and others with the bright sun streaming in from three big windows, also I seem to be getting shaky hand syndrome and I need a new camera so these are not the best.  Here they are anyway…..you get the idea.


The great migration of the three cabinets and some plastic storage units from under the counter being shimmied/rocked, still full of supplies, across the room to the window wall…Ugh!

First set of cubes empty and moved to the old counter wall waiting for the TV and electronics to be moved back on top of it. The cabinets are set in place waiting for a very heavy counter top to be put in place.


Here we go…electronics in place, cubes in place, cabinets and counter top in place ready to be loaded up. I set some decorative pieces on top of the counters to get a feel for the space.  Almost looks like I am done until you turn your head and look down the room and see this….


Yikes!!! What a mess and the second half of the counter top is missing and there is stuff everywhere!  From here on out it was a huge project to drag the tall storage cubes out of the closet and put them into place so I could add the second 6 foot counter on top of them.  Tons and tons of organization and purging went on in the closet and with all the supplies and décor piled up on the cutting table and on the floors and in the other rooms…Wow!!! It took four intensive days to get it all sorted out and put into place.  Talk about being sore and tired but it was well worth it.


The hubby and I worked in separate rooms building the two new storage pieces for my sewing counter.  I bought several more but found I did not need them and I did not want to clutter up my space with too much stuff, only what I really needed, back to Michael’s they go.


Here they are; my two new storage units; aren’t they grand!!! I am totally in love with them both, perfect for my sewing notions, book and patterns. Everything is nice and neat and easy to see and use! 

And last but not least….. Ta da…. everything in place!!! Take a look.


These are the nighttime photos I shot when I finished, starting from left to right. Did I mention I now have fourteen feet of creative space to sew and craft in!?!


Wow, look at all that daylight coming in those three big windows!!!  The room looks so much larger and less cluttered, I am one happy camper and I got exactly the room I set out to create.  What more could a creative gal ask for!?!

Well… there you have it, the new configuration and organization of my creative studio.  I hope you enjoyed taking a peak into my new work space; I can not wait to get in there and do a little detail clean up and sew up some curtains to cover up the storage cubes and all the storage under my work counters.  When I get those done I will share the before and after photos of the whole studio side by side so you can see the transformation all in one place.  Time to finally take down all my Christmas décor and get it to storage then take a little rest before tackling the next project; we have so many I have no idea what is next, I guess you will have to check in to see what we are up to.
See you soon.

Laurette


Wednesday, January 8, 2014

Studio Inspiration

Before I show you the studio reveal I though I would share with you some of the inspiration photos which set the whole project in motion and what I saw when I looked at them.  Everyone gets inspired by something different, for some it is color, for others it may be composition or graphics or how a room makes them feel upon entering it, for me it is all of those things that help me decide what direction I will go in during any given project like this.  Here is a bit of what inspires me and why.

When I first saw this photo I loved the bold pops of color and the work surface facing the window which bathed the room in bright white light.

This particular room had wall color similar to my studio and had the double long work surface facing a large bank of windows just like my space.  This was what I wanted for my own creative room and really inspired me to just go for it.

Total eye candy with the turquoise and pops of red with large windows in front of long work counters.  This sewing room caused me to consider putting my counters into an L configuration instead of one long 14 foot counter and maybe adding bright pops of hot pink to my black, white and ice blue color scheme.

I loved the bright white and clean lines of this sewing room, the simplicity spoke to me.  My studio was so cluttered with small keepsakes and full counters I wanted something different.

A very clean streamlined room hosting three windows and one long work counter with two work stations, just what I was looking for, right on target even though I knew I would never get my space that clutter free, but I sure was going to try to clean it up a lot.  As you can see all of these rooms are different but with common threads throughout; multiple windows with work stations placed in front of them with long counter tops and dual work stations.

Now you have a pretty good idea of what types of photos inspired me to organize and reconfigure my studio; these were only a few of the hundreds of images I viewed of creative rooms and storage/organization ideas before I got down to work.  If you are looking for inspiration of your own you can view my Pinterest boards by clicking on the large red PINTEREST word on the right side bar of my blog where it says follow me.  You do not have to join Pinterest to view my boards, just click and view to your hearts content; there are over 80 boards to drool over and keep you inspired for years to come. Enjoy!

Thanks for letting me share a bit inspiration with you today, you know what comes next so keep an eye out for the progress of the studio transformation, it is coming right up.
See you soon.


Laurette

Saturday, January 4, 2014

A Time To Organize

It is once again that time of year when we look around our homes and think to ourselves… it is time to reorganize all those pesky areas and rooms that never got done or spaces that just didn’t function well for us all year long. After all it is a new year which can mean new beginnings and why not start with the old flawed and problem areas plaguing us; create a new, clean and organized home we can enjoy everyday without all the frustrations of not being able to find the things we need and want.


I have such a space, actually a whole room and a huge closet in my design studio.  For those of you who have been a reader since the very beginning you might remember I did a full studio clean up and organization in January of 2012.  It was a big improvement to what I started with after moving into our new home and just shoving all my creative supplies and fabrics into the room to make it all fit.  After living and working in our home for over three years I finally know what is working and what is not.  Little by little each room and space is being reworked to create better flow and storage.

Pretty to look at but facing the wall!

Final Office Layout 

The re-org of 2012 worked well for about a year then suddenly I found myself not working in my studio but not understanding why.  After looking through several of my Pinterest boards it became obvious why I was working everywhere but in my studio, it had become overrun with projects and keepsakes creating a claustrophobic environment…. Yikes!!! When had that happened?!?  The other conclusion I came to happened while setting up a full office to write and work in, I do not like facing a wall while I work, sew or create a project….yuck!  Guess what my sewing and craft counters face… you got it right if you guessed the walls!  I never realized how much I hated that until I had to move my office around three times finally putting my desk smack in front of the window in order to want to be productive.  Now I really love my new office and it is a pleasure to work in there for hours at a time.

I have three big beautiful windows on the second floor facing out to the backyard and they are being partially blocked by my storage units. What a waste of light and a great potential space for my sewing and craft counters, fourteen feet of light filled creative space blocked by storage cubes.  I usually think out of the box but for some reason I just never thought to put my counters there, what a ding dong I am!


The other nemesis in the room is my large closet which does not function due to giant closet doors that you can only open a third of at a time blocking the other two thirds with the other two doors.  Oh… and did I mention the closet is very shallow and dark with two of the doors always closed; it is hard to see what is in there and actually get it out around all those doors.  Needless to say the organization in there is not what it should be and needs a complete revamp once the studio is moved around and I see what additional storage I might need. 

We are talking a very big move around and reorganization of a lot of furniture, storage units and supplies but…. I am going to do it and I am going to be blogging about it all the way.  I hope you will join me as I move along through the process of thinking out this HUGE project and putting it into action.  I can’t wait to get started!!!
See you very soon.


Laurette

Thursday, October 10, 2013

Hooded Sweater To Cardigan - Tutorial

I have a really great post for you today, a very easy sweater upcycle project I stitched up in just a little over an hour; you have to try this! In the last couple of years I have fallen in love with cardigan sweaters, they are great over blouses, tank tops, dresses, other sweaters and misc. tops.  Lately I have been seeing a number of open knit orange sweaters and thought, wow, I need one of those. Two weeks ago while doing a closet re-org project I came across an orange open knit sweater just like the ones I saw on Pinterest except mine was a pullover with a hood and not a cardigan.  It was a sweater I rarely wore because it just never fit right and drove me nuts because the hood was heavy which pulled the top backwards, it was fairly expensive so I never got rid of it thinking someday I would do something with it.  Off the shelf and out of the closet it came and into the dryer, set on air, to knock out the dust, no need to wash it since I knew it was already clean just dusty.  Once it was dust free it was time to thread my sewing machine and get to work, here is what I did.


This is my pretty orange sweater, an open weave semi cable knit, as you can see it is open enough that I always had to wear something under it or show off all my goodies.  If I made it into a cardigan I would not have to worry about that since it would always have some kind of top or dress under it, problem number one solved.

The first thing I did was run pins down the front of the sweater to indicate where I wanted to stitch and ultimately cut open the top, the pins would be my guide line. I chose the center cable as my cutting and stitching point.

The first thing you should know about working with any kind of open cotton knit is they quickly ravel if you cut them or if you get a hole in them due to their chain stitches.  To prevent that from happening on my sweater I knew I had to stitch down a line of thread on each side of where I wanted to make my center cut.  I could have chosen to just use a straight stitch but I knew a tight zig zag stitch would give extra stability and keep the knit intact when I cut it.  The only drawback is that it does cause the edges to ripple a bit and pucker up; you could try larger straight stitches and see what that does, I may do that next time.


Time to cut hoping I did the right thing, if not I just trashed an expensive sweater.  I chose to put the sweater back on my dress form to keep from accidentally cutting anything other then the front of the top. Once I cut the top it released the tension of the stitches and I got a slight ruffle down each side of the new cardigan. 


I could either leave the slight ruffle down the front or turn it under about half an inch on each side to give it some weight and lessen the wave.  I chose to pin it back and stitch it down for a bit more substance in case I wanted to add buttons.  I was very happy I chose to turn it under and give it a more polished finish, I love how it looks.


Almost all of my cardigans have buttons so I pulled out my rather large button collection to see if I had enough of any one kind of button to use all the way down the front.  Not just any button would do, I did not want brown or tan or white or black, I wanted orange to match the sweater, that way I could wear it with anything and not have them clash with my outfit.  I only found two orange ones so I decided I would put one on each side so I could use a fabric loop to close it if I wanted to.  All done and ready to wear, how cute is that!  I know the sweater will now get lots of use all winter long.  I have one just like it in black I have not been wearing; I think it will get a makeover too, only the black one will have a bit of a romantic twist. I guess you will just have to keep checking in to see what I am going to do to make a hooded sweater more feminine and romantic.

Thanks for letting me share my newest tutorial with you, what a great way to re-purpose an unused item of clothing and stretch a dollar, no shopping needed here for a new cardigan sweater or two.
See you soon.
Laurette


Thursday, October 3, 2013

Patio Cushions - Mini Tutorial

Hello everyone, you have probably been wondering where I went and why there have been no new posts on this blog, the answer to that is I have been doing all kinds of projects mostly for my other blog.  I really have not been doing much in the way of sewing since this summer has been all about painting and making over the interior of two of our bathrooms, which I decided last year all belong on another kind of blog not my sewing blog.  I did work on one project late in the summer which required some sewing; the makeover of our back patio, it came out really pretty with the addition of the change of colors through the recovering of our patio furniture cushions.  I actually needed to use my sewing machine for all of those, here is what I made without using any patterns.


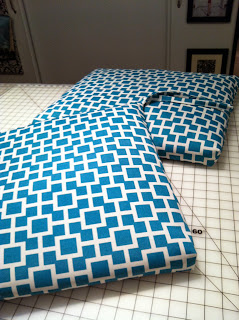
First up were the two ottoman cushions for our chairs, they take a pretty good beating so I made sure to use a really sturdy outdoor fabric to prevent easy damage.  I measured each cushion and the openings then cut them to fit; I also measured how long I wanted the ties to be so the pads would not fall off the ottomans when we put up our feet to relax. I did not want a seam in the front of the cushion so I cut one long rectangle and stitched up the sides and a couple of inches across the top where I inserted the ties between the layers to secure them in place, then stopped and back stitched to create my opening.  Before turning I tucked the old cushion inside the cover to make sure it would fit and squared off the two front ends with pins, pulled out the cushion and stitched up the corners then turned it. I inserted the old cushion and stitched up the opening and I was all done!

Tip of the day:  Some outdoor fabrics tend to unravel where they are cut, try using pinking shears on all the raw edges to prevent that when you are sewing and when you turn the piece, works like a charm.


Next up was the really long bench cushion which was a bit more tricky; it was four feet long and a real challenge to get under the foot of my little machine and through the small opening, not to mention where to put the four feet of length as I sewed closed the opening.  I made the new cover for the pad the same way I made the ottoman covers only with no ties since the cushion seems to stay put without them.


Three cushions down and four more large ones to go!  I wanted to re-use the old cushions but I just could not figure out how to do it and get them through my machine to close them up, it was just too much work for my little sewing machine so I cheated and bought some new plain pale blue cushions on clearance at Target.  My big dilemma was what to do with the main fabric I purchased which tied all the other fabrics and accessories together?  I was also worried the pale blue chair cushions would get dirty really fast and look awful in a hurry, what to do?  Inspiration hit and I came up with an easy slipcover which would slide onto the cushion kind of like a cigar band, covering up the front and back of the cushion leaving the sides open and showing some of the pretty pale blue color which was also in the coordinating fabrics.  Now everything was pulled together and I got a really pretty looking patio and cushion covers I could take off easily and clean.

To make the slipcovers I simply measured all the way around the cushion then figured out how wide to make it once I turned under all the raw edges. Next I cut a long rectangle, hemmed the edges and joined the two ends making a long loop, stitched it and slipped it on the cushion placing the seam in the back at the cushion bend. Just that simple and a quick solution to a very vexing problem.


Thanks for letting me share my latest sewing project with you, I think everything came out lovely and the patio became a really bright and beautiful place to relax all summer. I plan to share more sewing projects with you especially since the holidays are on the way and I tend to do a lot more sewing this time of year.
See you soon.

Laurette

You can see the full patio makeover on my other blog: Create, Upcycle, Decorate, Organize, just click on the link box on the right side of this blog page and it will take you over there, enjoy!!!


Related Posts Plugin for WordPress, Blogger...