Showing posts with label fabric. Show all posts

Thursday, October 3, 2013

Patio Cushions - Mini Tutorial

Hello everyone, you have probably been wondering where I went and why there have been no new posts on this blog, the answer to that is I have been doing all kinds of projects mostly for my other blog.  I really have not been doing much in the way of sewing since this summer has been all about painting and making over the interior of two of our bathrooms, which I decided last year all belong on another kind of blog not my sewing blog.  I did work on one project late in the summer which required some sewing; the makeover of our back patio, it came out really pretty with the addition of the change of colors through the recovering of our patio furniture cushions.  I actually needed to use my sewing machine for all of those, here is what I made without using any patterns.


First up were the two ottoman cushions for our chairs, they take a pretty good beating so I made sure to use a really sturdy outdoor fabric to prevent easy damage.  I measured each cushion and the openings then cut them to fit; I also measured how long I wanted the ties to be so the pads would not fall off the ottomans when we put up our feet to relax. I did not want a seam in the front of the cushion so I cut one long rectangle and stitched up the sides and a couple of inches across the top where I inserted the ties between the layers to secure them in place, then stopped and back stitched to create my opening.  Before turning I tucked the old cushion inside the cover to make sure it would fit and squared off the two front ends with pins, pulled out the cushion and stitched up the corners then turned it. I inserted the old cushion and stitched up the opening and I was all done!

Tip of the day:  Some outdoor fabrics tend to unravel where they are cut, try using pinking shears on all the raw edges to prevent that when you are sewing and when you turn the piece, works like a charm.


Next up was the really long bench cushion which was a bit more tricky; it was four feet long and a real challenge to get under the foot of my little machine and through the small opening, not to mention where to put the four feet of length as I sewed closed the opening.  I made the new cover for the pad the same way I made the ottoman covers only with no ties since the cushion seems to stay put without them.


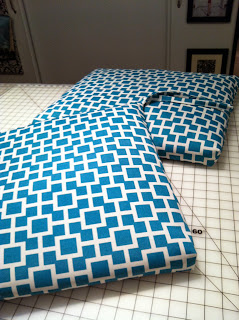
Three cushions down and four more large ones to go!  I wanted to re-use the old cushions but I just could not figure out how to do it and get them through my machine to close them up, it was just too much work for my little sewing machine so I cheated and bought some new plain pale blue cushions on clearance at Target.  My big dilemma was what to do with the main fabric I purchased which tied all the other fabrics and accessories together?  I was also worried the pale blue chair cushions would get dirty really fast and look awful in a hurry, what to do?  Inspiration hit and I came up with an easy slipcover which would slide onto the cushion kind of like a cigar band, covering up the front and back of the cushion leaving the sides open and showing some of the pretty pale blue color which was also in the coordinating fabrics.  Now everything was pulled together and I got a really pretty looking patio and cushion covers I could take off easily and clean.

To make the slipcovers I simply measured all the way around the cushion then figured out how wide to make it once I turned under all the raw edges. Next I cut a long rectangle, hemmed the edges and joined the two ends making a long loop, stitched it and slipped it on the cushion placing the seam in the back at the cushion bend. Just that simple and a quick solution to a very vexing problem.


Thanks for letting me share my latest sewing project with you, I think everything came out lovely and the patio became a really bright and beautiful place to relax all summer. I plan to share more sewing projects with you especially since the holidays are on the way and I tend to do a lot more sewing this time of year.
See you soon.

Laurette

You can see the full patio makeover on my other blog: Create, Upcycle, Decorate, Organize, just click on the link box on the right side of this blog page and it will take you over there, enjoy!!!


Friday, August 16, 2013

Dishtowel Dresses

I want to share a quick little post with you of the darling dishtowel dresses I made for my two granddaughters.  As most of you know I am always thinking out of the box and looking for ways to give something a whole new use; which is pretty much I what I did with a couple of sweet heavy duty cotton dishtowels I saw at Target on sale.  Since I have to drive two towns over to shop for fabric I try to find other ways to get hold of fabrics I can use to sew with including, sheets, towels, tablecloths, placemats, curtains and shower curtains.  Most of those items have good size yardage I can cut up and use for several projects for very little cost especially if they go on sale or clearance. In the case of the cute dishtowels I saw them on the end cap with the summer accessories and thought they were really adorable but they did not go with my kitchen décor. I began wondering what else I could use them for and immediately thought they would make pretty, durable summer dresses for the girls.  Here is what I did with them.

The first dress I made was for my littlest granddaughter, the pretty hot pink and green was so sweet it looked just like her.  I took some measurements from her then cut off one end of each towel, I used two identical towels.  Next I just stitched up the sides two thirds of the way up leaving the existing side seams and hem intact.  I stitched down around the arm holes and turned down several inches at the top to create a casing to run some ties through.  I cut long strips of double fold bias tape, stitched it down one side and threaded it though the casings on each side and tied it at the shoulders, all done in less then thirty minutes!

I made this darling dress for my oldest grandchild the same way I did the first dress, with the exception of two inch slits on each side seam for easy movement.  I top stitched the slits and under the arms to keep the fabric smooth and fuss free. In hindsight I should have put slits in the toddler dress as well since she is super active and she moves around more then her big sister.  These adorable dresses will become very soft and comfy the more they are worn and washed because they are made of sturdy fabric suited to drying dishes. 

Both girls looked very sweet and summery in their new outfits, I am glad I saw those towels and found a whole new use for them.  Thanks for letting me share my dishtowel dresses with you, I hope you enjoyed another one of my out of the box designs.
See you soon.

Laurette


Saturday, November 10, 2012

Apron A Day # 3


Today’s spiffy little number is a black, white and yellow double ruffle, waist tie apron.  I made this one of a kind apron for someone very special but I did not give it to her because she changed her kitchen décor when she moved away, all before I could present her with her gift.


The apron has a French Country feel in the colors, double ruffles, black and white bow at the hem and the antique buttons sewn just in front of the ties in the back.  The pattern was one of my designs and the retro buttons came from my long time button collection.  I hope to someday give it to that special young lady once she moves again and decides on her new kitchen colors, fingers crossed, if not I may just put it up for sale.

Thanks for letting me share apron #3, I hope you are feeling inspired to make some aprons of your own for the up coming holidays. There are more aprons in the series I want to share with you, the toy rooms reveal and plenty of holiday gifts and decorations so keep reading, you don’t want to miss all the fun.
See you soon.

Laurette

You might also like:

Apron A Day Series - # 1 & # 2


Saturday, November 3, 2012

Apron A Day # 2


Welcome to the Apron A Day Blog Series, I am happy you are here to check out my next featured apron.  I made today’s apron from two matching fat quarters because I could not find any full yardage in this cute sewing fabric.  I wanted an apron to wear during my sewing classes and this darling fabric had just the right theme with all the sewing notions pictured on it.  The fabric featured hot pink, red and white so I made the waist band, ties, pocket and hem trim from some sweet mini heart fabric leftover from another project.  The pattern is one of my designs which I adapted so I could use fat quarters instead of full yardage.  My apron cost about $7.00 or less to make; cute and cost effective too.

Thanks for letting me share today’s pretty little sewing apron with you. Be sure you look for the next toy room makeover project in the series; it will be coming right up.
See you soon.

Laurette

You might also like:

Apron A Day - # 1 (The story behind the series)


Tuesday, October 2, 2012

Cute Onesies Dresses


Time to take a break from fall decorating projects to make a couple of really cute Onesies dresses for my youngest granddaughter, I haven’t made any clothing for her yet, it was way past time to get busy.  I really can not take credit for the idea of making baby Onesies into summer or winter dresses, I saw several versions on Pinterest and decided to make a few dresses of my own.


It was a pretty simple process to take a basic Onesies (snap style body suit, for those of you who have not seen them) and add a skirt. Since my granddaughter is only a year old; I used a 1/4yd of 44” wide fabric, stitched the ends closed, gave it a narrow hem then gathered the waist and stitched it to the Onesies, all done, just that simple.  It did not take long once I got use to the stretch of the Onesies and the lack of stretch in the cotton fabric, it was a bit tricky at first until I got the feel of all the stretchy knit.  The two dresses came out so darling I can not wait to see our baby girl modeling them, I will try to get pictures of her in the dresses, if I can catch her, she moves really fast. Giggles!!!

Thanks for letting me share my latest sewing project with you, I am not sure what is up next, it is just too hot to work on the fall projects and I kind of lost my inspiration on those. I am working on several new patterns and the prototypes for those, which I can’t share with you until the patterns are out for sale. I guess I will have to put on my thinking cap so I can find a project I can share with you.
See you soon.

Laurette


Wednesday, September 26, 2012

Fall Windowpane Quilt


Some of the items I use to decorate my home for fall are fabric table runners, a few are just simple fabric runners while others are pieced quilt style fabric table runners. They do not always end up on the table, some are placed on the entry hall table, shelves and on top of the granite island; I switch them up several times each season.  They add lots of color and set the tone for the color pallet and decorations in that room.  In order to get the look I wanted I had to make my own table runners since the stores just do not carry what I like.  The featured table runner for today is my own design titled; Fall Windowpane.

This pretty little quilt was made up of leftover fall fabrics from two very large Thanksgiving table runners.  I ended up with a bunch of large triangles I had no idea what to do with; I was going to make pot holders for my kitchen.  I sewed two triangles long flat sides together to create a square, once they were sewn together and laid out on my cutting table I saw a table runner.  All I needed was something to create the windowpane effect with; there was nothing in my stash large enough or in the right colors so off to the fabric store I went. I ended up with a completely different fabric then I originally went in for, a green with gold highlights to pull out the green in the leaves, kind of hard to see in the photos but it is there.  I was very pleased with how the table runner came out, this year it sits on the entry hall table, very pretty to look at when you come in the front door.

Thanks for letting me share my Fall Windowpane table runner with you.  I still have more fun fall projects to share as I finish them, in the meantime I will be showing more of those quick and easy projects.

Side Note:  It is the 1 Year Anniversary of the Buttons, Bows & Bling Blog. WOOHOO!!!!!!  It has been a year of total learning and great fun, I have really enjoyed sharing all my creative ventures from my studio with each and everyone of you.  Thank you so much for sticking it out with me, I am grateful for each and everyone of my faithful readers. I am not sure where my blog will go from here or what I will be sharing but I truly hope you will keep reading to see what I am up to next.
See you soon.

Laurette


You might also like:

Falling In Love With Fall
Pumpkin Bling
Fall Floral Arrangements


Tuesday, August 21, 2012

Girls Blue Jean Shorts To Skirt


As you can tell I am on a clothing recycle kick, so far there has been a sweatshirt re-vamped into a Jacket, sweatpants transformed into a skirt, a pair of girls long pants re-made into a cute skirt and now I will be making over a pair of girls jean shorts into a darling double ruffled skirt.  I really love taking something old, worn out or unused and creating something new and fun to wear.  It usually doesn’t take very long and it is pretty simple to do, it just takes a little out of the box creative thinking.


These are the shorts and the fabric my granddaughter picked out for her double ruffled skirt; she loves anything blue so this was the fabric of choice.  I began cutting up the legs to make the shorts flat so I could go onto the next step of getting the shorts ready to become a skirt.  I am well on my way to finishing the skirt, I just need to embellish it to make it extra sassy.  Watch for the finished skirt and matching top in the next couple of days.
See you soon.

Laurette

You might also like:

Girls Pants To Skirt


Monday, August 13, 2012

Girls Pants To Skirt - Part 1


These are my granddaughter’s faded/worn jeans which still fit at the waist but are no longer the right length.  They have quite a bit of wear at the knees and at the hem line; can you guess what I plan to do with them?  If you are a regular reader I bet you know what I am going to do or at least you think you do, you may be right.

Time to audition some fabrics I thought my granddaughter might like; she is crazy about anything with blue in it.  I went to my fabric wall and pulled out some fabrics with the same chocolate brown as the pants color.  Most of what I chose had some variation of blues in it except one fabric which featured browns, pinks and oranges in the pattern. Which one do you think I chose to go with the pants???  I guess you will just have to wait and see which fabric I picked and what I did to re-purpose the pants.

This blog post is short on purpose; I joined the August Break inspired by Susannah Conway who began the bloggy break program last summer.  It was a program designed for bloggers so they could take a break during the hectic month of August.  So many writers are busy getting their children ready to go back to school, taking last minute vacations, getting ready for fall quilt/gift markets or they are swamped with deadlines for books or pattern releases.  I am personally getting ready for a trip to celebrate our 35th wedding anniversary, a new website and some pattern production deadlines.  Since I did not want to leave my blog unattended I chose to go with short/quick posts or photos depending on what is going on.  You will see where I am or bits of what project I am working on.  You can also track me on Facebook if the blog post is not enough.  While I am away on my trip I will have a guest blogger filling in for me at least once, it will be lots of fun to see what someone else writes for me.  You may still see full posts and tutorials during the rest of the month as I find time to fit one in here and there, otherwise you will get shorter versions.

Thanks for letting me share part 1 of the Girl’s Pants to Skirt post and August Break, keep watching for part 2 as well as other project snippets.
See you soon.

Laurette


Thursday, August 9, 2012

Snoopy Building Block Quilt


A few days ago I began pulling out fabrics to make the Snoopy quilts for our new grandson who is due to arrive in a few months.  After much auditioning I settled on two stacks of fabric to make a building block quilt, with the flannel and chenille and some cute cotton snoopy fabrics in yellows and blues for a pinwheel quilt. Up first will be the building block quilt using the flannels and chenille fabrics.


Before I began the block quilt I bound a Snoopy cheater quilt which I acquired in 2003, I had it stored away with all the other cute Snoopy fabrics.  My son adored his Snoopy while growing up and requested I collect Snoopy fabric and put it aside for his children someday, which I did every time I saw anything with that pattern, now I get to use it.

Spent one afternoon cutting out all the necessary squares, the fabric is just darling and looks warm and comfy all together.

Started pinning the first of the squares, I don’t usually need to use pins but the chenille stretches and moves around, not to mention it sheds like crazy, it was a whole lot more work then I anticipated.


Once I stitched up the first square I realized I was short on white thread so I decided to use the chain stitching method, basically you feed one square after another through the machine without cutting the threads in between, this went really fast and I did not run out of thread.  All I had to do was clip the threads between the squares and press the seams towards the heavier fabric which was the blue chenille.  At this point I am letting my quilt sit for a bit, I will return to it very soon.

In addition to the block quilt I have a number of other projects I am working on, there are a dozen darling retro cloth dolls in various stages of completion, more gifts for the new baby, some patio cushion covers and my biggest project, designs for my new line of sewing patterns which I plan to release at the beginning of 2013.  Pattern design is a very long tedious process, it requires lots of thought, writing and testing in order to get everything just right.  Once all the pattern pieces and instructions are completed along with finished product samples, I will call on my circle of sewing friends to test the patterns for me before releasing them for sale.  That’s always a fun process since we all get together in my home and have a full day of sewing; everyone gets a different pattern or sets of patterns to test, along with tasty treats to eat while we work.

Thanks for letting me share the journey I have been on over the past couple of months; it is a very creative and busy time in my studio with all the changes and growth coming almost all at once. Whew!!!  I plan to keep writing my blog as I move through all of it, maybe not every other day but as often as I can. Keep checking in to see what I am working on next.
See you soon.

Laurette


Saturday, April 7, 2012

Easter Project Tutorial

Time has just flown by with Sunday being Easter already, I have a project I have been playing around with for the last week or two trying to finish it in time.  I know it is kind of late, I decided to share it with you anyway, maybe it will inspire you to create something for next year.

For several years I kept pulling out these wooden eggs with the intention of decorating them in some way, either with paint, fabric or paper and every year they sit on my project counter and end up getting put away unfinished, until the next year comes around when I pull them out again.  So silly of me to keep repeating the same thing every year, time to finish another one of those old UFO’s, at least actually start it.

I was determined to actually do something with these beautiful wood eggs, this time I not only retrieved them from the craft closet, I also pulled out an assorted pack of Mod Podge sealers, spring papers, stickers and fabrics (we have progress).


First up were the spring papers, I used some leftover scraps from a card making project I squirreled away for future use.  The paper was difficult to work with and quickly broke down when the Mod Podge was brushed on the outside of the paper to seal it.  Using Sparkle Mod Podge helped to give it some shine and hide some of the damage to the outside print; it also created a nice hard seal giving it a bit of bling.  In hind site I would have cut the paper into smaller pieces and put it on collage style in order to get a smoother finish.  I think I would only put enough Mod Podge on the egg to get the paper to stick, then when the paper was dry, go back and cover the whole egg with the sealer instead of doing it all in one step, less damage to the paper (lesson learned).


Since the paper eggs really did not get the desired effect, I moved onto fabric (leftover scraps from cloth dolls) thinking the light weight texture and flow would do better on the smooth wood surface, boy was I ever right.  After learning my lesson on the first two eggs, I cut the fabric into small pieces using my pinking shears on some and leaving others ragged or straight for texture and dimension.  The process went really well and it was so much easier, not to mention twice as fast. I used a second coat of Sparkle Mod Podge sealer over the first coat to give it a bit of pop.

For those of you who don’t know, Mod Podge acts as a glue and sealer all in one.  I bought my multi pack at Michaels craft store so I could try a variety of different projects.

Here are some tips and tricks for working with this tricky little sealer:

*It gets very sticky the more you handle it and dries pretty quickly; you need to have everything cut and ready to go.
*Use a disposable container you can throw away when you are done. I used small paper plates and some plastic trays from frozen foods and plastic yogurt cups (recycling at its best).
*Make sure your room is well ventilated, it can be smelly.
*I used a small natural bristle paint brush; the foam ones fall apart and get hard pretty quickly.  I washed my brush out with warm soapy water the second I was done with it and let it air dry between coats, once the sealer sets it is permanent and won’t come out. Warm soapy water should work the same way for your hands.
*Place your project on a non stick surface, this stuff sticks to everything, I used an upside down foam egg crate, I think foil might work but I haven’t tried it yet, trial and error are the best way to see what works for you.
*Be sure to pick out the right sealer for the kind of project you are working on, there are different kinds of sealers for just about everything.  My little pack had sealers with a sparkle finish, high gloss finish, matte finish, as well as one for paper and one for outdoor use.

I still have five unfinished eggs, at this point I don’t think I will be able to finish them in time for Easter so they will have to go back into the craft closet until next year (sigh), oh well, at least I finished three of them this time, better then none at all, there is always next year.

Pom Pom Bunnies

I was going to share my Bunny post with you before Easter but I ran out of time so here it is, you get a double post today.


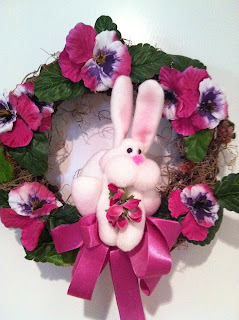
I made all these cute little Bunnies and the Bunny wreath several years ago as Easter decorations for our home, I found them again while going through my holiday decorations and thought I would share them with you this Easter.
I also made the quilted fabric Easter egg sitting in the basket, all the projects were fun to make and fairly simple.  While cleaning out my project boxes in January I found the patterns and all the necessary parts and pieces to make more of them, I think I will try my hand at that again next spring, maybe my daughter would like to help me so she can make some for her children.


Thanks for letting me share my creative Easter projects with you; I hope they inspired you to create some of your own for next year or at least to pull out your Easter decorations to bring a touch of spring to your home for this bright, festive holiday.   

Have a Happy and Wonderful Easter Day.

See you soon.  Laurette


Related Posts Plugin for WordPress, Blogger...