Showing posts with label blue. Show all posts

Monday, January 27, 2014

Guest Bath Bling Reveal!

If you have been faithfully following my guest bath facelift you know I wanted to do a little something with that room featuring some of the accessories leftover from my studio re-org/makeover.  At this point in time I do not have time to paint the room or add new fixtures but we do plan to attempt that process later this spring or in the fall.  If you have not been following along and you are a first time reader, check out all the archives for January 2014 to catch up on the inspiration, process and DIY projects used for this finished project.  Are you ready for the reveal......OK, here we go, no words just photos.


Wow!!! What do you think, pretty glamorous, right?!?  I am totally in love with this very elegant, lady-like room and enjoy doing my make-up and hair in my new bling bathroom.  I pretty much took over the room all for me, no men allowed, unless we are having guests, giggles!

**            **           **         **          **          **         **          **         **

I just had a thought...ah oh!!!...........
The new guest bling bath and my studio makeover got me to thinking about our guest room and how it is no longer working for us since I removed my office from it. There is a huge space where the desk and printer sat and all the furniture which tied everything together is gone leaving kind of a gap in my original design.  I created that room makeover several years ago when I needed to have a place to write my blog and handle a few business details with the guest room designed around that purpose.  Now that I have a full office in another space I am pretty unhappy with the look, feel and purpose of the current floor plan and decor.  Guess what…it is time to give the room new purpose and a new makeover!!!!  Woohoo…more design opportunities with no painting necessary since I am very happy with the current wall color!  I am really excited to get started looking for fun inspiration and purpose, follow along and see where I go from here. 

Thanks for letting me share my guest bath bling reveal with you, I hope it inspires you to create a little facelift in your guest or master bath, give it a try, anyone can do it!  Oh by the way… the outdoor projects are coming along but will not be completed for another week or so but I will share those as soon as I can.
See you soon.


Laurette

Wednesday, September 12, 2012

Blue Jean Shorts to Skirt Part - 2


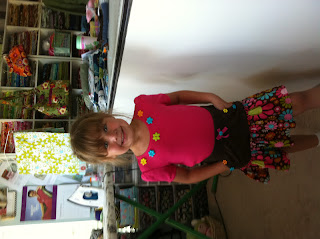
I finally found the time to finish the makeover of the girl’s blue jean shorts into a skirt. This project did not take a lot of time with the exception of the gathering of the two layers of ruffles to fit the new style of the old shorts. Once I had the ruffles ready the rest went very quickly and the skirt was done in no time.  Included in today’s post are the before and after shots and a photo shoot I did with my cute little model, my granddaughter.

Before:


After:

The transformation of the shorts to skirt was much easier then with the pants, just simple cuts up the inner thigh on each leg; carefully cutting through the seam in the center, with old blue jeans the fabric is very thick, a sharp pair of scissors works best.  Next I flattened out the fabric as best I could then cut off the legs to just a little below the zipper leaving enough room to attach the ruffles I made earlier. I was careful to make sure the inside pockets did not get caught up in the seams by pinning them out of the way while sewing on the ruffle. I added some top stitching to the skirt and ruffles to keep them from irritating my granddaughter when she moves around.  I stitched up a narrow fabric belt and tacked it to the back of the skirt at the waistline so the new belt would not become lost in the wash.  I added a few pretty blue buttons to the front of the zipper placket to keep it fun and I was done.  I purchased a new blue shirt to go with the skirt and hand stitched a rick rack bow with a button in the center to tie it into the skirt; the outfit was complete and ready to wear.

Both skirts were upcycled from pants and shorts into bright darling garments ready for their second life in a new form, recycling at its best.


My very happy granddaughter modeling her new outfits, what a cutie!

Thanks for letting me share my upcycling skirt projects with you; I had a great time making them, wait until you see what I can do with a pair of men’s designer jeans, that’s for a later date.  I still have a few easy DIY projects to share with you next so keep watching for those.  I know, I know…, I was supposed to show those today but I was just too excited about finishing the skirts, I had to share those first, thanks for understanding, you will see those next, unless I find a better project to share. (Giggles!!)
See you soon.

Laurette

You might also like:

Girls Pants to Ruffled Skirt
Girls Blue Jean Shorts to Skirt
Sweatshirt to Jeweled Jacket
Sweatpants to Jeweled Skirt


Sunday, July 15, 2012

Finishing The Blues


Thanks to my daughter we were able to complete one of our last projects for the shower next weekend, at least the ones she could help me with. Here are some photos of our newest creation.

We gathered together some of our bits and pieces did some brainstorming and went to work transforming some empty Starbucks Frappucino bottles into fun party drinking glasses. I love the shape of these bottles and have been collecting them for years using some of them to store pencils, paintbrushes, buttons and an odd assortment of embellishments, the rest of the bottles have been stored away waiting for a project.  We soaked off the labels in super hot water then ran them through the dishwasher to sterilize them, all ready to decorate.


We wrapped the clean bottles in foam wrap, tied some colored twine around the foam wrap and finished them off by threading the twine through some retro blue buttons from my collection, tying them off with a bow. Super darling with coordinating striped straws, placed on a Winnie The Pooh serving tray, how cute is that, recycling at its best!


We got our inspiration from one of my favorite creative magazines, Stitch/Craft Create; we saw their darling bottle makeovers on a number of pages and decided we could do something like that with my collection of bottles to fit our theme.  You just never know where your next idea is going to come from.

Thanks for letting me share these fun little drinking glasses with you; we had a great time making them.

Most of you will be reading this on Monday so guess what time it is???........
It is double post Monday!!! Instead of sending out two different postings I am going to put them both on one page for easy reading. This next project was a result of some project leftovers from the charm pins.

I really wanted to make myself a baby boy charm bracelet to wear to the baby shower; I am the grandmother after all.  We had plenty of silver charms leftover and one of each of the enamel charms, I had some silver jump rings and a double strand silver chain, just enough to make my bracelet. It has been a while since I did any jewelry making so it took me a bit to get the fingering just right but eventually I figured out how to get everything going in the same direction and I was off and running.

My bracelet came out just beautiful and looks really sharp against the blue background.  I am very happy with it and I can’t wait to wear it to the baby shower.

Thanks for letting me share all of my baby shower projects with you this past couple of weeks; it was a lot of fun seeing what we could make ourselves instead of just buying everything ready made.  I just have a few things to stitch up for the baby, I am hoping I can get to them before Saturday, keep good thoughts for me.
See you soon.

Laurette

You might also like:

Baby Boy Charm Pins
Blue & White Flower Pens
Note Pad Blues
All About Babies
Back To Babies

Thursday, July 12, 2012

Blue & White Flower Pens


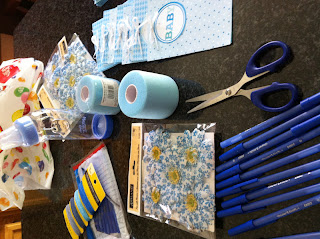
Project number two was to make some really cute flower pens for each of our guests to use during our party games.  I guess I could have just bought some blue pens and left it at that but then I would not be me if I did not add a bit of floral bling to those basic blue pens.

Off to Target and Michael's to get some pens, paper flowers and some foam wrapping tape, all in our blue and white baby boy theme.


This was not a very difficult project, just a time consuming one, with wrapping each pen and flower with the foam wrapping tape and getting it to stick the way I wanted it to, some double sided tape did the trick.  They are really darling and look so cute with the little notepads I made earlier, what a nice set to send home with the ladies along with a few other surprises.

Thanks for letting me share my Blue & White Flower Pens with you, I will be working on the party favors next, just a small hint, think jewelry.  It is time to go, lots more to do after I clean up my huge mess and start a whole new one. (Sigh)
See you soon.

Laurette

You might also like:

Notepad Blues
Fun Fabric Animals
All About Babies
Back To Babies
Pretty in Pink


Tuesday, July 10, 2012

Notepad Blues


First project up is the notepads for the games at the baby shower.  I dug through my all my scrapbook paper stacks/slabs, ribbons, buttons, brads,  stickers and crafting supplies looking for baby boy themed embellishments and prints.  I was very surprised how many little things I accumulated over the years in blues, greens and yellows.  I still had to do some shopping because I did not have everything I needed for all my projects, but it was a good start.  I grabbed some empty photo boxes and gathered it all together in one place for easy use and transported it downstairs to my huge granite island where I like to work on my projects when my cutting/project island, in my studio, is busy with fabric projects, which it is at the moment.

Work began on the notepads we will give out to each guest so they can participate in some quick and easy games. I am not always neat when I am in the creative process but I do clean up once I know what direction my creativity is going.

Everything is cut and ready to assemble using some rectangle sheets of scrapbook paper, printed tags, ribbon, a small round punch and several shades of blue colored copy paper.

Here are some of the notepads all finished and ready for our guests, aren’t they adorable!

Thanks for letting me share my Notepad Blues with you, right behind it are some darling flower pens, look for those in my next post.
See you soon.

Laurette

You might also like:

All About Babies
Back To Babies
Fun Fabric Animals
Pretty In Pink


Friday, May 25, 2012

Simple Changes


Creating simple changes to a room, an outdoor patio, an office, creative studio or your homes curb appeal can have a huge impact on how you feel about the places you work, play or live.  The kinds of changes you can make can be as minor as a new paint color, bold new fabric drapes, artwork on the walls, a new chair or a few bright accessories to pull a room together and give it a cohesive feel.  My favorite things to do are all of the above depending on the room and what I want to accomplish in that room or space. I have written a number of past posts about small changes like adding bling to my studio through paint and accessories, painting tired old furniture giving it a new vibe and painting my front door red adding eye catching curb appeal.  Occasionally just making minor additions like a new tablecloth, place mats or a centerpiece to the dinning room table or changing out bed linens can create a whole new mood in the room you add them too.  It is all so easy to do and sometimes it just happens by accident like the recent transformation in my office/guest room.

This is a photo of the guest room/office right after I completed it around this time last year. It has a light, bright, spacious feel to the room with beach type accents along with complimentary paisley prints in blues and greens.

Simply by turning over the comforter to a solid deep blue color, the whole space became warmer and more intimate pulling out the deeper, darker colors in the fabrics already in the room, giving the entire guest room/office a completely new feel with one simple flip of the fabric, how easy is that.  I will probably leave it that way for awhile, I really like how it pulled out the blue in the walls, which were very subtle before, but now stand out a bit more.  Did I mention I love the color blue?

In addition to flipping over the comforter I added a fantastic, handmade, rod iron dress form to the corner of the room (the dress form was a birthday gift from my daughter).  I dressed her in a pretty blue and green apron I made from one of my patterns; it compliments the other fabrics already in the room.  The dress form is appropriate for the space due to the fact I am a seamstress by trade and the room also serves as my business office, very inspiring when I spend long hours writing at my computer.

Thanks for letting me share some of my simple changes; I hope it encourages you to make some of your own, it is so important to keep your environment fresh, bright and ever changing.  Speaking of changes, this is project weekend for us since we have three days to create and play in the yard and house, I hope to have some new projects to share with you next week so be sure you watch for them.  Just a hint; paint and wood will be involved, that’s all I am saying for now.  Have a fantastic and memorable Memorial Day Weekend. 
See you soon.

Laurette

If you enjoyed reading this post you might also like:

The Red Door
Sewing The Blues
Paisley Crazy Room Makeover- 2011
Holiday Sparkle- 2011
A Bit of Bling- 2011

Tuesday, May 15, 2012

Sewing The Blues


The forecast for spring and summer colors introduced by the fashion and interior design industry called for tangerine/oranges, citron/lime, yellows and blues in every shade imaginable.  Tangerine made a huge splash on the runways and in the home interior previews early this spring.  Right behind the oranges were strong colors in greens and blues; the trend seems to have continued right into the summer lines of clothing, indoor and outdoor furnishings and accessories.  I absolutely adore the fact that blues and greens are making a huge comeback this year; hues of blue have always been my favorite colors since I was a pre-teen and I am very happy to be using them again.

My personal moodboard in a variety of blues and greens, which sits above my desk, was inspired by Pink Chalk Fabrics’ blog, Pink Chalk Studios, featuring textiles by Maasai Mara from dear Stella and Ellen Luckett Baker for Moda.  I use moodboards to collect colorful images to inspire my fabric, paint and project style choices, this one encouraged me to go blue and green in my next project.


Apparently last year I was way ahead of the curve with my Paisley Crazy Room Makeover where I featured lime greens, blue and turquoise as my updated color scheme.  I constantly study, watch and read about fashion and interior design so I can stay up on what is new and fresh each season. I had an inkling as to the coming color changes and chose them for my guest room/office even though some people thought I was nuts for putting them in my home.


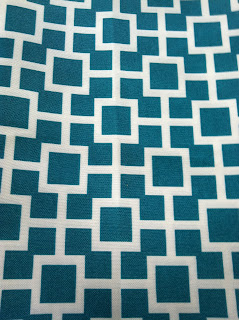
I am at it again, in the early spring I picked out some beautiful blues and greens for my outdoor patio makeover project.  Large prints, geometric patterns and stripes are all the rage in outdoor fabrics and I have them all in complementary colors, a great way to spruce up my dull patio cushions and add some tropical bling.  I already started sewing up several cushion covers but decided to hold off finishing them until the big tree next door finishes shedding sticky pollen and leaves all over my patio; I plan to get back to  sewing early next week so everything will be done in time for a party in mid June.  Once I finish them I will write a before and after post so you can see the difference the new blues and greens made, should be a good one.

Thanks for letting me share Sewing The Blues with you; I hope it inspired you to perk up your indoor and outdoor rooms with some of the new bright and cheerful colors of the summer season.  See you soon.

Laurette

If you enjoyed reading this post you may also like:

Paisley Crazy Room Makeover – Nov, 2011


Related Posts Plugin for WordPress, Blogger...