Showing posts with label toy room. Show all posts

Monday, November 5, 2012

Toy Room Makeover Projects


We have been working like crazy to finish our projects for the toy room and we are almost done. I was going to break down each project into individual posts but time is flying and I am afraid I will not have time to show them all to you so I am going to bunch up a couple of them with just one more final reveal post with the before and after photos.  The holidays are approaching fast and I always have gift making projects and decorating projects and event projects….. Oh my, I better get busy and get this one finished so I can move on.  Today’s projects are; the cushions for the benches, the wall mural and the curtains.  This is going to be a long one, a triple post, so grab your coffee, sit back and enjoy!

We needed some kind of padding for the benches in the play area so I took a page from the iheart organizing blog, which is where I got the inspiration and how to directions for the toy room project.  I think Jen’s blog is one of my all time favorite blogs; you really have to check it out at: iheartorganizing.blogspot.com. 

The first thing we did was to cut the 2” foam to size, Joann’s cut the foam to the right length but we had to cut down the width to fit the top of the benches, my husband used a turkey carving knife, cuts it like butter. Once the foam was the right size I cut the fabric to fit the foam. I could have sewn cushions but time is an issue so I decided to make it Jen’s way which is super easy and very quick, anyone can do it.


Step two was cutting some MDF to fit the foam; my husband did that for me as well, what a handy guy he is.  The MDF was placed on top of the foam ready for the final step.

For the final step I pulled up the sides of the fabric turned under the edges and used the staple gun to tack the fabric to the boards folding the ends like gift wrapping a package, all done, nice and neat and ready to place on the benches.  For detailed instructions you can go to Jen’s blog and see what she did, her playroom makeover is just fantastic.

Up next was the wall mural, I debated where it should go in the room, I was thinking of adding it to the one I already started on the closet but decided to put it on the wall I originally planned it for. Even though I could have painted one on the wall, again time was an issue so I went with peel and stick wall decals I got at Target; they were in my color theme and just the right size.  I would not have to paint over it if I decided to makeover the room later down the road.


I chose the only wall large enough to work with right above one of the benches creating a nice focal point, the other bench sits under the window, no room there. There were a lot of pieces to the tree and no instructions; thank goodness there was a very detailed photo.  It did take longer then I thought trying to match up the pieces with the photo and as usual several pieces were not there in the correct sizes so I ended up moving things around to fit better.


The tree came out just as I saw it in my head and really helps to pull all the pieces in the room together, everything makes sense now, and I love it!  The photo shows it just above the bench, it looks kind of small in the picture but the dimensions are 50” (127cm) high by 36” (91.44cm) wide, not small at all as you will see in the final before and after photos of the reveal.


Last but certainly not least are the curtains for the windows. Even though there are white wooden blinds on the window the room bakes in the sun from September until spring so very heavy curtains are necessary to keep the heat out until the cold weather sets in.  The 10’x10’ room is the hottest and the coldest room in the house, it sits on the outside corner wall and gets all the elements year round.  We purchased the fabric from IKEA; it was a steal at $3.99 a yard for 60” width heavy printed canvas upholstery fabric, perfect to cut down the heat and cold.  I chose a bronze rod to coordinate with the browns in the fabric and the tree trunk on the wall mural, actually I already had it in my stash from a previous home, re-purposing at its best.  Unfortunately, the curtains are still not finished, I have one more panel to make they take forever due to the size and weight of the fabric. The curtain fabric was what I used as the jumping off point for the color scheme for the whole room; you will see them in the final reveal.  That about wraps up the projects for the toy room makeover, oops.... I forgot I still have one more very important painting project left to do.  I am not sure if I will write a post on it or just show it off in the final reveal of the whole project, I guess you will just have to keep reading to find out.

Thanks for letting me share my toy room makeover, it has been quite a project and I can not wait to show you how it all came out. I am not sure how soon that will be since our daughter and her husband just bought a new home and we are helping them fix it up so they can move into it next week.  There are lots of projects, cleaning, packing, moving and babysitting my darling granddaughters which is taking up all my time and energy making it hard to write more then a quick post or two.  I still have posts of the apron series scheduled to share with you; they are fun and quick so keep watching for those.
See you soon.

Laurette

You might also like:

Toy Room Makeover – Day 1, 2 & 3

Wednesday, October 24, 2012

He Has Arrived


That special day we have been waiting for finally arrived on Monday morning, October 22, 2012 at 3:00 am. Our first grandson was born in Anaheim, Southern California via emergency c-section; he was 7 lbs, 12 oz and 19” long, his name is Parker. Unfortunately we were not there when he was born but we did manage to arrive several hours later.  We live about 6-8 hours away depending on traffic and how many stops we needed to make, we left at 5:30 am and arrived around 12:30 pm. My husband and I started packing and getting the house ready when we got the call Sunday evening, we packed all night getting only about an hour of sleep then hopped in the car and started our journey, staying up about 36 hours before we were able to go to sleep.  You know what, we are not young anymore and 36 hours is a long time to go without any sleep but really worth it to be able to see and hold our darling new grand baby not long after he was born.  We truly cherish those first hours of our grandchildren’s lives when we get to really bond with them which makes for a very special life long relationship.

Because it was an emergency trip several things got all messed up or forgotten, one of them being my pre-scheduled blog posts of the Apron A Day Series.  I was not able to set them up like I planned to so I can not share them with you while I am away, oh well; I guess they will wait until I get home again.  I think I will be back on track again late next week after I get home and unpacked.  We planned to stay for about ten days but we could not find an extended stay hotel due to some huge convention which hits town this Friday booking up all the rooms anywhere close to our son’s condo. We managed to find a hotel across the street from Disneyland for a few nights, what a great area with tons of places to shop and eat so we will stay until we have to move out on Friday, after that who knows.  Anyway… we are thrilled to be here spending time with our son and his new little family for as long as we can.

Thanks for letting me share the joy we are experiencing with all of you; things will be back to normal very soon, keep watching for the Apron A Day Series and more of the toy room makeover projects, lots of those coming up.
See you soon.

Laurette

Saturday, October 20, 2012

Toy Room Makeover - Day 2


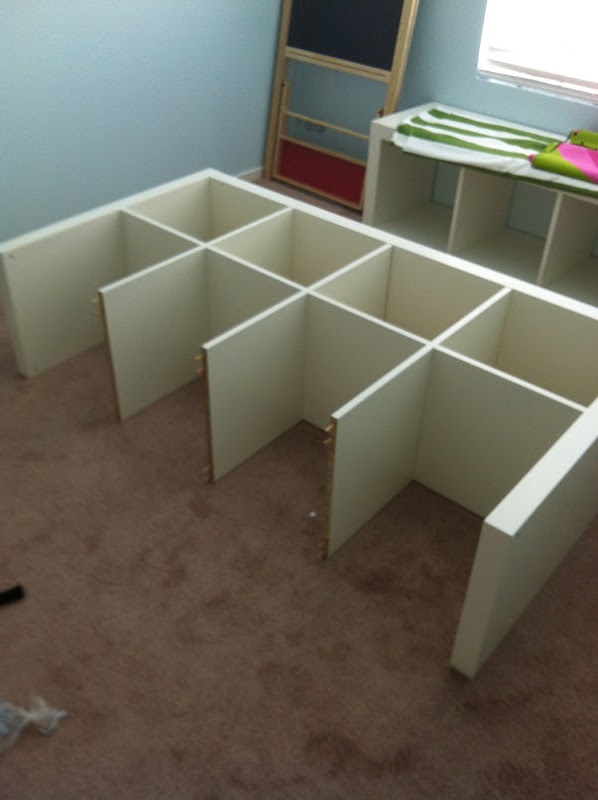
Day 2 was all about putting together the bookcase/bench units we purchased at IKEA several weeks ago.  We purchased two single IKEA EXPEDIT bookcases which could be used in a number of different configurations; ours would be turned on their sides to create very sturdy benches for the adults to sit on while they played with the kids.  Several shoppers at IKEA tested them out with us to make sure they would be safe to sit on, it was lots of fun. That place is a mad house on the weekends, don’t ever go there then, go during the week, totally a crazy but fun experience I would not repeat anytime soon.


These wonderful EXPEDIT bookcases came in very heavy six foot long boxes.  They are the build it yourself style furniture using wooden pegs and an Allen wrench. I must say they are very well built, the pieces are substantial and everything lines up perfectly unlike some of the other build it yourself furniture out there, my husband was impressed with the easy installation of the pieces.


The first two single bookcases went together pretty quickly and before we knew it we had our two corner bench pieces ready to put into place.  Don’t they look great, sturdy too!


Up next were the double bookcases which we planned to put on each side of an existing bookcase we already own and planned to use in the room once it was given a new paint color.  The double bookcases went together the same way just taking a bit longer with double the pieces.


Once we had the bookcases assembled they were much bigger then we thought they would be in width but not as tall as we needed to keep little hands out of the big girl toys they were not ready to play with yet. What to do????  We tried several different configurations but ultimately ended up turning them on their sides and stacking them to gain about four inches in height, which should do the trick.  The bottom two rows are for the toddlers and the top two rows for the 6 year old, an even split.  We had to leave out our existing bookcase and send it to storage for the time being, one less project to paint.

Thanks for letting me share day 2 of our toy room makeover, day three is the beginning of the fun part, decorating the room. There will also be sewing projects and painting projects some of which will have to wait until we return, after our new grandson is born.
See you soon.

Laurette

You might also like:

Toy Room Makeover – Day 1


Thursday, October 18, 2012

Toy Room Makeover - Day 1


My husband and I recently decided to turn our very small 5th bedroom into a dedicated playroom/toy room for our three grandchildren.  So much of our home is not particularly child friendly since just the two of us live here, hence the need for a really safe place for the grandchildren to play.  The room has been moved around and been several things in the last two years, I planned to make it into a beautiful boutique style closet for all my clothing and accessories but we felt for now we needed the playroom more.  Oh well they won’t be small forever and we designed the movable elements in such a way as to be able to use the storage in my boutique closet later. Come along with us on our journey to creating a very cool kid space, here is what we did.


I really detested the wall color and finish on the walls in that tiny little room every time I walked in there.  The color was painted a dirty/pinkish beige with very splotchy textured walls which was applied to cover up a ton of damage and stains, not something we did it was that way when we moved in. No matter what I did to the room to brighten it up with colorful fabrics, toys and furniture it just looked awful.


I am not sure we can do justice to the mess the walls were in with these photos but I gave it a try.  The first thing we did was to take sanding blocks and try to sand down the really rough patches, we found if we went to far the damage and stains started to appear so we could only sand the top layer without getting into re-plastering all four walls, Yikes!  That particular part of the project was a long one because we had to brush down the walls afterwards and vacuum twice. We were smart enough to move everything out of the room first.  Once the room was prepped with blue painters tape we began the real work of cutting in around the baseboards and corners, a long process; once that was done, out came the rollers.  My husband also painted the ceiling which really created a light bright room, the walls are not as smooth as we wanted but we did the best job we could taking into consideration the past damage. With art work, a mural, furniture and curtains not much wall should be showing anyway.

Can you guess what color we chose for the room, we asked my oldest granddaughter what color she wanted to see in there, pale yellow or a light blue?  She chose an icy blue to go with all the other fabrics for the curtains, pillows, bench cushions and furniture we were adding to the color scheme.


I could not get a good photo of the room color just yet but you will see it as we work on it day by day, sorry about that. Not much color in this post, I can guarantee there is plenty of it in all the rest of the posts to come.

Thanks for letting me share day one of our toy room makeover; furniture construction is up next, what a difference those pieces made to an empty space.
See you very soon.

Laurette

I am sorry for the strange font sizes in the pint, sometimes the blogger program goes bonkers on me and there is little I can do to change it without erasing the whole thing. Yikes!****
Related Posts Plugin for WordPress, Blogger...