Wednesday, August 21, 2013

Quilted Mug Rug


From the Writers Wall Quilt I had a lot of leftover fabrics due to my little “design opportunity”, I pondered long and hard what I should make to use up some of my scraps.  I looked at a ton of ideas I pinned onto my Pinterest boards and came up with the idea of making a quilted mug rug.  What is a mug rug you ask?  Well… it is larger then a drink coaster and smaller then a placemat and usually heat proof, primarily used for a drink and a small snack plate or anything else which fits on the small surface.  I looked for tutorials or patterns but really did not find one which gave me dimensions or instructions, as usual I made up my own pattern and inserted Insul-Bright to protect surfaces from hot and cold drinks and foods.

I still had more leftover fabrics so I made a couple of coffee cup cozy’s which came out pretty cute.  I lined those with Insul-Bright as well to keep in the hot and cold.  I did not take a photo of one wrapped around a coffee cup but you get the idea.

Here is the photo of my quilt hanging in my sister’s office and the coffee cozy and mug rug on her desk.  I was really thrilled to see them all in her office, I was absolutely honored she did that.

Thanks for letting me share some of my scrap projects with you today; I hope you got inspired to use up some of your leftover scraps to make some fun gifts.  There are several more sewing projects on the books to share with you so keep an eye out for them.
See you soon.

Laurette


Monday, August 19, 2013

Writers Wall Quilt


I have wanted to share this lovely wall quilt with you for sometime but I just have not been able to show you this project until now.  Sometime ago my oldest sister and I bought a wonderful set of antique looking fabrics when our local quilt shop went out of business.  We had no real idea what we would make out of the fabrics so we bought one of the kits which included wine type prints for me and coordinating fabrics which had typeset and writers words on it for her with the idea of using the same pattern for both quilts. The pattern included in the kit was, Simply…ho! ho! ho! by Me and My Sister Designs, the store sample was made up in the kit fabrics so I knew it was just the ticket for what we wanted to use these stunning fabrics for.

Between the sample photo and the great instructions I had no problems assembling it; however, I highly recommend reading it all the way through at least once to avoid making any mistakes.  I wanted to make a change to the pattern and did not pay close enough attention to part of the instructions and ended up with a re-design part way through to compensate for the miss-cuts.  I was extremely lucky I had enough extra fabric to fix my mistakes creating a “design opportunity” which worked out just fine in the end.


I wanted the wall quilt to be very unique and artsy so I included some embellishments in the center of the quilt and around the edges.  I added my sister’s initials across the bottom and top of the center section using typewriter key brads and stitched on an antique heart, key, ring and button in each section of the middle giving the quilt dimension. 

Thanks for letting me share my Writers Wall Quilt with you, I really love how it came out and my sister was thrilled to receive it, she hung it in her office.  I made a few more projects from the quilt scraps which I also gave to my sister, those are up next.
See you soon.


Laurette
Friday, August 16, 2013

Dishtowel Dresses

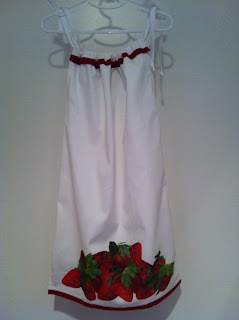
I want to share a quick little post with you of the darling dishtowel dresses I made for my two granddaughters.  As most of you know I am always thinking out of the box and looking for ways to give something a whole new use; which is pretty much I what I did with a couple of sweet heavy duty cotton dishtowels I saw at Target on sale.  Since I have to drive two towns over to shop for fabric I try to find other ways to get hold of fabrics I can use to sew with including, sheets, towels, tablecloths, placemats, curtains and shower curtains.  Most of those items have good size yardage I can cut up and use for several projects for very little cost especially if they go on sale or clearance. In the case of the cute dishtowels I saw them on the end cap with the summer accessories and thought they were really adorable but they did not go with my kitchen décor. I began wondering what else I could use them for and immediately thought they would make pretty, durable summer dresses for the girls.  Here is what I did with them.

The first dress I made was for my littlest granddaughter, the pretty hot pink and green was so sweet it looked just like her.  I took some measurements from her then cut off one end of each towel, I used two identical towels.  Next I just stitched up the sides two thirds of the way up leaving the existing side seams and hem intact.  I stitched down around the arm holes and turned down several inches at the top to create a casing to run some ties through.  I cut long strips of double fold bias tape, stitched it down one side and threaded it though the casings on each side and tied it at the shoulders, all done in less then thirty minutes!

I made this darling dress for my oldest grandchild the same way I did the first dress, with the exception of two inch slits on each side seam for easy movement.  I top stitched the slits and under the arms to keep the fabric smooth and fuss free. In hindsight I should have put slits in the toddler dress as well since she is super active and she moves around more then her big sister.  These adorable dresses will become very soft and comfy the more they are worn and washed because they are made of sturdy fabric suited to drying dishes. 

Both girls looked very sweet and summery in their new outfits, I am glad I saw those towels and found a whole new use for them.  Thanks for letting me share my dishtowel dresses with you, I hope you enjoyed another one of my out of the box designs.
See you soon.

Laurette


Thursday, August 8, 2013

New On The Blog

Hello Everyone, just wanted to let you know I have been posting on my other blog some of my projects which do not involve sewing.  I really did not want you to think I quit this blog, I have just been very busy sewing, crafting, painting and decorating without stopping to write about it all as I went. You will start seeing my sewing projects again since there are quite a few of those along with all the rest I have been working on.

First up is my newest obsession, making purses!!!  I just love it, actually I like taking the classes about purse making with my friend and teacher, Sheila.  She has been such a great inspiration, she taught me so many techniques that my confidence is really growing with each bag I make.  This very pretty pink leopard/zebra bag was really fun to make, not a bag I would attempt without a class since it has 16 pockets inside, a magnetic snap and a special hard bag bottom to keep it standing.  The pattern is the Tuscany Tote by Pink Sand Beach Designs, designed by Nancy Green, I just love all their purse patterns.


My new favorite little cutie bag to make is the Runaround Bag by Lazy Girl Designs, designed by Joan Hawley.  This bag actually takes longer to cut out then to stitch up, we made two in two hours, I would have made more but my sewing machine froze up and refused to sew anymore.  I have four more cut out ready to sew up as soon as I get my machine back from the sewing machine hospital, lets hope it just needed cleaning in the places I can not get to and it is not a terminal illness, giggles!!!  Anyway... I can not wait to make more of these darling little bags very soon.

Last but not least is the Laptop Satchel by Vanilla House, designed by Barbara Brunson. I made this satchel without taking a class, kind of a tough one to make, not sure I would do it again, the directions were confusing and I ended up re-writing the pattern to reflect my sewing knowledge.  Some of you may find it just fine to make as is depending on how you were taught to sew.

Thanks for letting me share some of my current sewing projects, there are several more to come in the near future.  Be sure to check out my other blog; Create, Upcycle, Decorate, Organize to see what I have been up to. New on that blog is a post about my office relocation/expansion, part 1.  Head on over now and take a look before I post part 2.
See you soon.

Laurette


Sunday, April 14, 2013

Kitchen Grapes


I have a great post for you today; I want to share the darling hand towels I made for my new kitchen makeover.  Just a bit of background about my recent decorating projects, I decided I did not like the coffee shop décor I chose for our newest home, it was something I had actually picked out for another home and just dropped everything into place when we moved in, without really thinking things through.  After living with it for almost three years I was not a happy camper, I started to think about what would make me happy and the answer was to go back to what I originally had in my first/favorite home.  I really adored my wine/Tuscan inspired home, the colors really spoke to me and everything complemented each other nicely.  Time to decorate with what I loved no matter what anyone else thought or what the decorating trends and colors are now, no more brown, gold and red.  I decided to use my sage green, burgundy, cream and Tuscan gold, all elegant colors when put together in small doses.  I did not have to purchase much since I had all my décor items in those colors in storage, all I had to do was go get everything and put it out.  I was short on curtains for the kitchen window and the family room windows, lucky for me Bed, Bath & Beyond still had more of the same drapes for the windows in the family room and I had great fabrics in my stash which would pull it all together for the kitchen window.

Most of my kitchen accessories were a bit worn out making it time to create some new ones using one of my own patterns.  Since it is a pattern I sell I won’t be doing a tutorial here but I will share that the tops of the towels are machine quilted and they also have some really sweet pleats on the back side and I was able to sew up four in just a couple of hours. Aren’t they darling! I just love the rich colors which are repeated throughout the kitchen through accessories and artwork. You will be seeing photos of the whole kitchen makeover when I share the kitchen valance tutorial next time.

I hope you enjoyed your first peek at one of the projects I did for my kitchen makeover. Keep reading to see the new kitchen window valance tutorial I will be sharing in a few days.
See you soon.

Laurette

Thursday, April 11, 2013

The Blue Dress


Hello everyone, I have been away from my blog for some time now due to unforeseen medical problems and a nasty fall resulting in several sprains and a concussion. Yikes!! I have been a mess but I am finally healing from my fall so I can get back to doing what I love most, creating, sewing and blogging.  I have several quick sewing projects I was able to get done before all of that stuff happened so I will start posting them so we can all get caught up. I will also have new posts on my other blog page as well so look for those in the next few days as I get going again. I completely missed Easter so you may see some out of time projects from that as well.  So…. Let’s get going here is the first sewing project I want to share with you.


I decided I needed a new dress for Easter so off to my sewing and pattern stash I went and chose a beautiful blue double knit fabric and a dress pattern by McCall’s, pattern number M6112.  It was easy to cut out both the pattern and the fabric; I was sewing in no time and had the top half completed quickly, the best part of the dress is the kimono sleeves.  The pattern also had options for pockets, a cowl neck or kimono sleeves with a slit on the top, I pretty much did my own thing to get just the right look.

The rest of the dress went just as quickly and it was finished in no time, about two hours start to finish. Isn’t it cute! Very light and airy, I can wear it alone or with boots and a turtleneck underneath it if I want to wear the dress as a jumper during the winter months.  I usually try to make garments which can be worn for dual seasons, I get more use out of them that way and I can justify spending a bit more on a great fabric when I find one.  Too bad I did not get to wear it to Easter dinner at my daughter’s house, I had to stay home and get well instead, oh well, there will be another occasion to wear it soon.

Thanks for letting me share my little blue dress with you; it was fun to show you my new outfit.  I have some sewing projects I made for my kitchen makeover to show you next time; one of them is an easy tutorial, look for those in a day or so.
See you soon.

Laurette

Watch for a new blog post on Create*Upcycle*Decorate*Organize, coming very soon, it is about our new stone patio just completed last weekend; my husband did a fantastic job on it.

Tuesday, March 12, 2013

Curb Appeal

Hello Everyone,

I have been gone for some time now, a lot longer then I planned actually, I was down very ill and I was just not up to working on any creative projects, but I am back to my old self ready to get to work on lots of interesting projects.  In fact I have a new one to share with you on my new blog page over at Create*Upcycle*Decorate*Organize, it is a curb appeal project I think you will all enjoy, I will say no more, you will just have to click over and check it out.

I have also been working on redecorating the whole downstairs of my home the past week or two, I am not sure if I am going to share that project with you or not, we will see how I feel about it when I am done.  I will say I have gone back to my roots by bringing back my Tuscan inspired colors/ theme and replacing the reds and browns of the coffee shop theme.  I can also say I am much happier now that I am almost done and the tranquil atmosphere of my home has returned, no more red! That's a story for another time.

I look forward to sharing many more fun projects with you from my studio. Don't forget to check out my new curb appeal project, Southern Carriage House.  
See you soon.

Laurette

Wednesday, February 13, 2013

Happy Valentine's Day


Hello Everyone, I want to wish each and every one of my readers a very lovely Valentine’s Day.  I hope you all have some kind of special plans for your day even if it is just cooking a special dinner, setting the table with your best china and popping in a love story DVD to watch with that very important someone in you life.

I apologize for not writing for a bit, I am and have been down with a very nasty bug which seems to be plaguing just about everyone.  I held it off as long as I could but alas I succumbed to it and still have not recovered.  I do plan to return soon, I have several projects ready to sew up and I also have my spring and summer color forecast, which I do each year, so you can be up on the newest color trends released by Pantone for home and fashion, I can not wait to share those with you right away.

***Check out my newest blog post; Adventures With Adhesive over at createupcycledecorateorganize.blogspot.com. It is a fun post featuring recycled containers for organizing your kitchen and office. Check it out by clicking on the button on the right side of this page; it will take you right to the post.

Have a wonderful Valentine’s Day!
See you soon.

Laurette

Tuesday, January 29, 2013

Apron A Day #6


Today is double post Tuesday so you get two for one. The first thing I want to share with you is the great news about my new blog, it is now completed and I have already written my first post which went live last week on January 23.  You can access my new blog by clicking on the button marked Create*Upcycle*Decorate*Organize on the right side of my page which is right below the Pinterest button.  Everything on that side of my blog page is a link to the symbol shown; like my Pinterest boards, the link to Where I Sew with Pink Chalk studios and the story I wrote for Coats & Clark 200th Anniversary. I am totally in love with my new blog page and the fantastic work my Graphic Artist, Jolene Burt, did on both pages, she is fantastic!  Anyway, hop on over and check it out!!! The new blog will show all my projects for anything I create which are not sewn on a sewing machine.  Buttons, Bows & Bling will remain a sewing blog for clothing, toys, quilts and home décor items, like pillows, drapes, etc… For those of you who get this blog notification by email you will have to go to my new blog and sign up for email there to keep getting all my new projects which I will post on that sight; basically you have to sign up for email on both if you want to see what I am creating.

Now for the second post of the day, today’s post is a juicy orange apron, I made from one of my patterns, to wear while teaching sewing classes.  I fell in love with this fabric but I had no idea what I would use it for, I adore fabrics with sewing themes on them and this had that going for it with all the cute measuring tapes and polka dots.


Because I wanted to wear the apron while sewing and teaching I felt it needed lots of useful pockets for scissors, measuring tapes, tailors chalk, pins and all the rest. One small pocket was added to the top for my glasses and one long pocket divided into four sections was added along the bottom width for my sewing notions, making it easy for quick access.


I added some retro 60’s orange pom poms, from my stash, to the top and bottom of the apron and some jumbo orange rick rack to give it a little more retro flare; you know how much I love my retro accessories on aprons. I lined the apron in a complimentary fabric to give it enough body so the pockets would not sag when I placed my heavy cutting shears in them. This was a really fun apron to make and wear since it is so bright and cheery.

Thanks for letting me share the fantastic news about my new blog and my cheery orange sewing apron. There are still more aprons to share with you on this blog and lots of fun new posts on the new blog.  I am working on organizing my small office space with pretty new accessories so it will be functional and attractive. Be sure you watch for that new post over there in the next day or so.
See you soon.

Laurette

***On our new blog, Create*Upcycle*Decorate*Organize you might like:
Small Office Organization – Part 1

Friday, January 18, 2013

Apron A Day #5


This darling shoe apron is one of my designs sewn with three coordinating fabrics from a great collection. When I purchased the fabric I had no idea what I was going to use it for, I just fell in love with it so I bought it and the fabrics became part of my ever growing stash. I wanted to use all three of the prints so I picked the panel for the front and the smallest print for the lining with the tiny shoe print for the ties and ruffles on the top and bottom.  I did not include a pocket because I chose to embellish the apron with complementing buttons and rick rack to bring out the pattern and colors giving it some added dimension. The apron is lined to add weight and extra body, not to mention good protection for my clothing while I am cooking, always a good thing for a messy cook.

This little diva shoe apron was meant for cooking and compliments, thanks for letting me share it with you today.  There will be more aprons featured in a few days, the next one has some real retro flare and is one of my favorites.
See you soon.

Laurette

You might also like:
Apron A Day 1, 2, 3 & 4 (Archives 2012 for 1, 2&3)


Related Posts Plugin for WordPress, Blogger...