Monday, October 15, 2012

What Will It Be?


With the passing of the one year anniversary of my Buttons, Bows & Bling Blog came some deep thought as to what direction I wanted my blog to go.  It started out being about all the creative ventures from my studio featuring a wide variety of projects which included sewing, crafting, furniture painting, upcycling all kinds of items and clothing, home décor, landscaping, flowers, recipes and just about anything else I could dream up.

Part way though the year I began to direct my main focus on more creative sewing and showing less of all the other creative projects I was doing. The blog emails from some readers wanted a variety of projects and others wanted to see the blog go all sewing.  As a blogger it is tough to decide what direction is best for the readers and me to keep everyone interested over the long haul.  We bloggers live and write to see positive comments at the end of each page and to have a long list of viewers/readers join our blog, in this arena I am not seeing participation from my readers, making it hard to judge what is popular with all of you and just who is actually reading the posts.

Sewing is my first great love; it is why I get up in the morning and what I think about before going to sleep each night but… without the other creative projects I would burn out and probably quit sewing and blogging.  With that being said I am going to continue to focus on all kinds of projects which include fabric and sewing as well as decorating and crafting, hopefully appealing to a wide variety of readers as well as keeping me entertained. With that being said I will be sharing two project series with you, the Playroom Makeover and An Apron A Day.  I am not sure yet if they will alternate or follow each other, I guess you will have to check in to find out.

Thanks for letting me share my thoughts with you about the direction of my blog. My next blog post will feature day one of the toy room makeover, there are a lot of projects including, sewing curtains, cushions, pillows, a wall mural and few painting projects as well.
See you soon.

Laurette

***If you enjoy reading my blog please take the time to enter a comment and like us on Facebook, it would really help me to keep creating and writing.

Thursday, October 11, 2012

Vintage Inspired Art


Today I have an easy project I want to share with you from my laundry room makeover.  I had quite a bit of wall space in my small laundry area; I was not sure what I wanted to hang on the walls.  I could hang racks for storage or rods for rolls of wrapping paper or all kinds of other organizing items, since I could not make up my mind I decided to make something which would go with the retro theme until I knew for sure what I needed for that space.  Here is what I made.

I needed to keep with my turquoise and red vintage theme so I went through my paper stacks looking for those colors and retro inspired images, not finding enough of the colors I went to Michael's to get what I needed to go with some photos I found from an old engagement calendar.

I went through my blank canvas collection for just the right sizes for the photos and papers I wanted to use.  I chose two sizes and painted them with some of the blue wall paint I used in the room.  Once they were completely dry for a day or two, I used the Mod Podge for paper to adhere each of the printed papers to the canvas.


I let each of them dry for several days before adding the photo pictures to the papers.  This was a pretty easy project but not quick because you need to let the paint and papers dry for at least 24 hours before moving onto the next layer or you end up with a wrinkled mess.  Once they were all dry they were hung up on the wall as a nice collection just behind the door so you see them when the door to the room is closed.  Lucy is one of my favorite actresses from that era and I collect as much of her stuff as I can so having her in my laundry room seems like just the right accessory for that vintage inspired space.

Thanks for letting me share my vintage inspired art with you; there is still one more quick project from that room I want to show you, it should be up next.  We plan to start the toy room makeover this weekend which means there will be some great projects to share with you next week, unless of coarse the baby shows up this weekend, you never know.
See you soon.

Laurette

You might also like:

Retro Laundry Room
Quick Cork Board

Monday, October 8, 2012

Flowing T-Shirt Vest


I am sorry I have been away from my blog for a little bit, I have been dealing with some medical issues and unable to sit and write at my computer.  Things are still not resolved so today’s post will be a relatively short one with more photos then verbiage.  As most of you know I really enjoy recycling old or unused clothing into newer trendy garments, today I am going to share with you how I took a large men’s t-shirt and made it into a flowing vest I can wear with my turtleneck sweaters this winter.


Can you believe this softly draping vest was made with a regular size large men’s cotton knit shirt? It was so simple it only took about 10 minutes to make without using a sewing machine, anyone can make one of these.  Here’s how I did it.


The first thing I did was to cut up the sides along the seam lines using sharp scissors.  Next I cut around the sleeves removing them completely. Be sure you cut off all the old stitching leaving nice clean edges all around. Last but not least I trimmed around the neck starting at the shoulder, don’t make too big of an opening at first, I had to re-cut mine a little bigger so it would fit around my neck and back, if you cut it too large you may be stuck with a baggy fitting vest.


The back view shows two seams which are the old shoulder seams on the t-shirt, one around the neck and one at the middle of the back or lower depending on how tall you are. The opening is what use to be the neck of the shirt, you basically wear it sideways.  For those of you who are visual you can watch a video clip of how to make one on www.wobisobi.blogspot.com which is what I did before making one myself.  This soft vest was so fun and quick to make I plan to make another one in dark grey to wear this winter, I pilfered the green one from my husband’s collection, with his permission.

Thanks for letting me share my flowing t-shirt vest with you; I hope it inspires you to make some recycled clothing of your own.

Now for some news; we have taken on a new project which will last about a month; we are completely revamping our old toy room. It has been moved around and switched up several times since we moved in, after much thinking and debate over what we want to do with that room we have decided to make it into a permanent playroom for all the grandchildren. There will be several sewing projects, furniture painting and building, a new paint color for the walls and plenty of decorating, all of which I plan to share with you as we go along.  Our goal for the finished room is to have it completed and ready to play in by Thanksgiving, think we can do it??  I hope so or the kids will be driving us all nuts when they have no room to play after dinner.  Keep checking in to see how we do. 

Side note:  Our new grandson is due to arrive anytime now, if I am absent for a while from my blog it will be because we have gone to Los Angeles, California for his birth. (We are both so excited we can not wait to hold him.)  I may ask a guest blogger to take over and share photos of the baby with you or share some of her creative blog posts; we will see what her busy schedule allows.  Until then I will try to post at least once a week depending on how my health is doing and when the baby arrives.  Keep us in your thoughts.
See you very soon.

Laurette

Tuesday, October 2, 2012

Cute Onesies Dresses


Time to take a break from fall decorating projects to make a couple of really cute Onesies dresses for my youngest granddaughter, I haven’t made any clothing for her yet, it was way past time to get busy.  I really can not take credit for the idea of making baby Onesies into summer or winter dresses, I saw several versions on Pinterest and decided to make a few dresses of my own.


It was a pretty simple process to take a basic Onesies (snap style body suit, for those of you who have not seen them) and add a skirt. Since my granddaughter is only a year old; I used a 1/4yd of 44” wide fabric, stitched the ends closed, gave it a narrow hem then gathered the waist and stitched it to the Onesies, all done, just that simple.  It did not take long once I got use to the stretch of the Onesies and the lack of stretch in the cotton fabric, it was a bit tricky at first until I got the feel of all the stretchy knit.  The two dresses came out so darling I can not wait to see our baby girl modeling them, I will try to get pictures of her in the dresses, if I can catch her, she moves really fast. Giggles!!!

Thanks for letting me share my latest sewing project with you, I am not sure what is up next, it is just too hot to work on the fall projects and I kind of lost my inspiration on those. I am working on several new patterns and the prototypes for those, which I can’t share with you until the patterns are out for sale. I guess I will have to put on my thinking cap so I can find a project I can share with you.
See you soon.

Laurette


Wednesday, September 26, 2012

Fall Windowpane Quilt


Some of the items I use to decorate my home for fall are fabric table runners, a few are just simple fabric runners while others are pieced quilt style fabric table runners. They do not always end up on the table, some are placed on the entry hall table, shelves and on top of the granite island; I switch them up several times each season.  They add lots of color and set the tone for the color pallet and decorations in that room.  In order to get the look I wanted I had to make my own table runners since the stores just do not carry what I like.  The featured table runner for today is my own design titled; Fall Windowpane.

This pretty little quilt was made up of leftover fall fabrics from two very large Thanksgiving table runners.  I ended up with a bunch of large triangles I had no idea what to do with; I was going to make pot holders for my kitchen.  I sewed two triangles long flat sides together to create a square, once they were sewn together and laid out on my cutting table I saw a table runner.  All I needed was something to create the windowpane effect with; there was nothing in my stash large enough or in the right colors so off to the fabric store I went. I ended up with a completely different fabric then I originally went in for, a green with gold highlights to pull out the green in the leaves, kind of hard to see in the photos but it is there.  I was very pleased with how the table runner came out, this year it sits on the entry hall table, very pretty to look at when you come in the front door.

Thanks for letting me share my Fall Windowpane table runner with you.  I still have more fun fall projects to share as I finish them, in the meantime I will be showing more of those quick and easy projects.

Side Note:  It is the 1 Year Anniversary of the Buttons, Bows & Bling Blog. WOOHOO!!!!!!  It has been a year of total learning and great fun, I have really enjoyed sharing all my creative ventures from my studio with each and everyone of you.  Thank you so much for sticking it out with me, I am grateful for each and everyone of my faithful readers. I am not sure where my blog will go from here or what I will be sharing but I truly hope you will keep reading to see what I am up to next.
See you soon.

Laurette


You might also like:

Falling In Love With Fall
Pumpkin Bling
Fall Floral Arrangements


Sunday, September 23, 2012

Falling In Love With Fall


Happy fall, it has finally arrived, of course in some parts of California we don’t really get the kind of fall the rest of the country gets but we do have our own version of it.  I really love this time of year when the light and the leaves begin to change and the evenings and mornings become cooler and just a bit crisp.

The colors of autumn truly inspire me to get very creative in a number of areas which include baking, decorating and sewing.  Recently I made my first trip to Michael's and Joann’s to stock up on fall decorating and fabric supplies.  Thanks to Pinterest I have a ton of fun fall inspired project ideas, of course everything will have my own spin on it but the pin boards really got me thinking and very excited to make some new things to decorate the inside of my home and pump up my outdoor curb appeal.


After my shopping trip I got the bug to set my dinning room table for fall as I do each season.  Out came the rusty orange colored tablecloth, the place mats, chargers, napkins and napkin rings. I also pulled out several of my autumn quilted table runners to place in the center of the table and around the house.


I saw a version of this great idea on Pinterest and decided to make some with the glassware, veggies and candles I already had in my entertaining inventory closet.  I took out the largest wine glasses I had, put the veggies inside, turned it upside down and put a short pillar candle on top, super fun and easy.  I will do a version for Christmas, something a bit more elaborate with lots of bling for the holidays.

I spent today in fall mode by making new autumn flower arrangements for my Mom’s grave site, then putting them in place, everything is all cleaned up and looking pretty again, I feel so much better.  When I got home I was in the mood to bake, I made some delicious caramel cinnamon apple bread, super yummy!  Instead of just making bread I whipped up an Italian turkey loaf for our dinner, which is baking in the oven as I write this, the house smells fantastic; I can’t wait for dinner.

Thanks for letting me share my love affair with fall; I hope it inspires you to do some fall decorating of your own.  Lots of autumn projects to come as long as I can stay healthy, I have been down with a killer upper respiratory infection for the last two weeks which really slowed down the creative and blogging time, fingers crossed.
See you soon.

Laurette

You might also like:

A California Fall
Pumpkin Bling
Fall Floral Arrangements

Tuesday, September 18, 2012

Quick Cork Board


OK, I promised you a quick and easy project so here it is.  I needed a cork board for our little kitchen desk to hold post-it-notes and appointment cards and could not find one the right size which did not cost a fortune, being the crafty lady I am I made one.  Here is what I did.

I purchased some 12 x 12 cork tiles at Staples and a nice brown/black 17”x14” frame with a glass front and a white mat inside, the frame was on clearance at Michael's. The inside of the frame was only 11” so I got out my x-acto knife and my cutting mat and carefully trimmed off the excess.  I was going to remove the glass but decided to leave it and attach the cork to the glass with heavy duty two side stick tape making it sit flush with the frame.  I had a choice to either add another piece of cork or leave it a bit short and decorate the top or use it as a dry erase board for little notes.  I chose some great word stickers to finish off my project, all done, super quick, very easy and half the price.

There were still three cork tiles left in the package so I chose to create a cork board for the laundry room by cutting and attaching the cork tiles to the inside of one of the cabinet door insets.  Using my x-acto knife and the double side stick tape made it another quick and easy project; I got two cork boards for the price of one all in a single sitting.

Thanks for letting me share my Quick Cork Board project with you today, I still have several other quick and easy projects to share with you along with lots of fun fall designs to warm up your home and curb appeal.
See you soon.

Laurette

Wednesday, September 12, 2012

Blue Jean Shorts to Skirt Part - 2


I finally found the time to finish the makeover of the girl’s blue jean shorts into a skirt. This project did not take a lot of time with the exception of the gathering of the two layers of ruffles to fit the new style of the old shorts. Once I had the ruffles ready the rest went very quickly and the skirt was done in no time.  Included in today’s post are the before and after shots and a photo shoot I did with my cute little model, my granddaughter.

Before:


After:

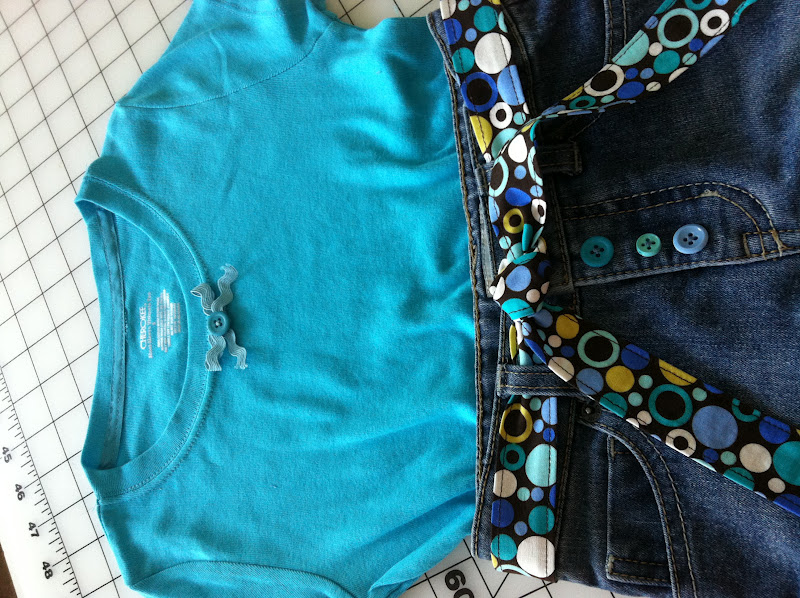
The transformation of the shorts to skirt was much easier then with the pants, just simple cuts up the inner thigh on each leg; carefully cutting through the seam in the center, with old blue jeans the fabric is very thick, a sharp pair of scissors works best.  Next I flattened out the fabric as best I could then cut off the legs to just a little below the zipper leaving enough room to attach the ruffles I made earlier. I was careful to make sure the inside pockets did not get caught up in the seams by pinning them out of the way while sewing on the ruffle. I added some top stitching to the skirt and ruffles to keep them from irritating my granddaughter when she moves around.  I stitched up a narrow fabric belt and tacked it to the back of the skirt at the waistline so the new belt would not become lost in the wash.  I added a few pretty blue buttons to the front of the zipper placket to keep it fun and I was done.  I purchased a new blue shirt to go with the skirt and hand stitched a rick rack bow with a button in the center to tie it into the skirt; the outfit was complete and ready to wear.

Both skirts were upcycled from pants and shorts into bright darling garments ready for their second life in a new form, recycling at its best.


My very happy granddaughter modeling her new outfits, what a cutie!

Thanks for letting me share my upcycling skirt projects with you; I had a great time making them, wait until you see what I can do with a pair of men’s designer jeans, that’s for a later date.  I still have a few easy DIY projects to share with you next so keep watching for those.  I know, I know…, I was supposed to show those today but I was just too excited about finishing the skirts, I had to share those first, thanks for understanding, you will see those next, unless I find a better project to share. (Giggles!!)
See you soon.

Laurette

You might also like:

Girls Pants to Ruffled Skirt
Girls Blue Jean Shorts to Skirt
Sweatshirt to Jeweled Jacket
Sweatpants to Jeweled Skirt


Monday, September 10, 2012

Cabo Bucket Bag


Last Saturday I took the Cabo Bucket Purse making class, I have been waiting for this class since I took the Marissa Bag class on my birthday, part two of my gift from my husband, what a great guy I married.


Just before my class I went to The Nimble Thimble in Gilroy to purchase my class supplies and fabric.  It took a bit of time to figure out what I wanted to use for my purse fabric, with the help of the store owner, Dave and my husband, I settled on Rooftop Garden by Moda, two very pretty fabrics showcasing fall colors in several shades of green, orange, gold and plum. Afterwards I went home to do the pre-class prep of cutting out all my fabrics and fleece, a very long process.


My teacher, Sheila, was great about sharing all her little tips and tricks and had wonderful suggestions for making the purse go together as easy as possible. It was an all day project but absolutely worth every minute, my bag came out fantastic and we had a great time sewing and chatting the day away.  I was totally worn out when I was done but I would do it again, I plan to take a few more purse making classes in the very near future.


The bag is lined with a complimentary fabric with another contrasting fabric for the exterior pocket lining, the button and the interior pockets, there are eight with a contrasting trim.  The bucket bag is pulled into shape by a magnetic closure and held closed with an oversize button. I am very pleased with my new purse; I can not wait to start using it as soon as I break out my fall wardrobe.

Thanks for letting me share my new Cabo Bucket Bag; I had a great time making it along with the Marissa Bag I made last week.  Time to move on and share some of my other projects, I have quite a few to show you, watch for those in the next few days.
See you soon.

Laurette

You might also like:

Marissa’s Bag in Orange
Colorful Fabric Zip Bags (Feb. 2012)
Project Progress (May 2012)
Related Posts Plugin for WordPress, Blogger...