Wednesday, October 16, 2013

Storage For Your Bling

I have a quick sparkly little post for you involving bling! Today’s post is not about sewing but it is about organization for your daily bling which is part of the title of this blog so it is going on this page; here we go.

Like most of you I have all kinds of jewelry I forget about because it is out of sight so therefore it is also out of mind.  More then once while riding in the car I would think to myself, why am I not wearing some fabulous necklace or bracelet with my outfit???  Probably because it was tucked into some drawer, jewelry box or other closed storage item never to be seen again. I have tons of jewelry, from my days as a color/image consultant, sitting in boxes waiting for chunky jewelry to be worn again, the time has finally arrived. I have been scoping out all kinds of stores looking for the right storage solutions to appear but only found a few nice looking options and only bought one of them.

The only piece I purchased was this elegant black velvet three tier bracelet holder from Michael’s for 50% off, such a deal, but still pricey since it is meant for semi professional use in a booth or retail store.  I absolutely love the way my jewelry sparkles when placed side by side on the velvet bars. While writing this post I kept running back and forth to my room and adding more and more pieces and rearranging all the jewelry I wanted out. (This post took forever to write because I kept remembering great pieces I wanted on display and it snowballed out of control…giggles!)

While organizing I found two other items I decided to re-purpose into necklace storage.  The hangers originally hung behind the front door to hold our guests umbrellas and scarves during the winter time and became decorative pieces during the summer months.  The only problem with the pretty holders was they would occasionally fall off the wall if a scarf or umbrella became tangled on the hook then down everything came, total disaster.  We recently put up a new more stable coat rack with lots of hooks and no danger of an accident, leaving the decorative holders without a home.

Into my bedroom they went right next to my pretty dressing table close to my velvet bars; this way the jewelry I wanted to wear most often was on display and ready to use.  I have to say that ever since I put up the velvet bars I have been consistently wearing the jewelry I had stored on it.  Now with the other pieces I just added to it and the holders with the necklaces on the wall I will wear even more pieces this winter and into the spring.  I am very happy with all that bling on my dressing table and wall adding a bit of sparkle to my bedroom, what more could a girl ask for!

Thanks for letting me share my bit of bling decorating with you, I hope it inspires you to dig out some of that seldom worn jewelry, find attractive storage solutions for and put it on display someplace you will see and wear it.  There are a lot more projects finished and ready to share on both my blogs as soon as I can sit down long enough to write them.
See you very soon.

Laurette

Watch for a new furniture painting project, using some exciting new products, which I am in the process of creating over on my other blog. It should be on the blog in the next day or so, keep checking daily to see what I am working on now.


Thursday, October 10, 2013

Hooded Sweater To Cardigan - Tutorial

I have a really great post for you today, a very easy sweater upcycle project I stitched up in just a little over an hour; you have to try this! In the last couple of years I have fallen in love with cardigan sweaters, they are great over blouses, tank tops, dresses, other sweaters and misc. tops.  Lately I have been seeing a number of open knit orange sweaters and thought, wow, I need one of those. Two weeks ago while doing a closet re-org project I came across an orange open knit sweater just like the ones I saw on Pinterest except mine was a pullover with a hood and not a cardigan.  It was a sweater I rarely wore because it just never fit right and drove me nuts because the hood was heavy which pulled the top backwards, it was fairly expensive so I never got rid of it thinking someday I would do something with it.  Off the shelf and out of the closet it came and into the dryer, set on air, to knock out the dust, no need to wash it since I knew it was already clean just dusty.  Once it was dust free it was time to thread my sewing machine and get to work, here is what I did.


This is my pretty orange sweater, an open weave semi cable knit, as you can see it is open enough that I always had to wear something under it or show off all my goodies.  If I made it into a cardigan I would not have to worry about that since it would always have some kind of top or dress under it, problem number one solved.

The first thing I did was run pins down the front of the sweater to indicate where I wanted to stitch and ultimately cut open the top, the pins would be my guide line. I chose the center cable as my cutting and stitching point.

The first thing you should know about working with any kind of open cotton knit is they quickly ravel if you cut them or if you get a hole in them due to their chain stitches.  To prevent that from happening on my sweater I knew I had to stitch down a line of thread on each side of where I wanted to make my center cut.  I could have chosen to just use a straight stitch but I knew a tight zig zag stitch would give extra stability and keep the knit intact when I cut it.  The only drawback is that it does cause the edges to ripple a bit and pucker up; you could try larger straight stitches and see what that does, I may do that next time.


Time to cut hoping I did the right thing, if not I just trashed an expensive sweater.  I chose to put the sweater back on my dress form to keep from accidentally cutting anything other then the front of the top. Once I cut the top it released the tension of the stitches and I got a slight ruffle down each side of the new cardigan. 


I could either leave the slight ruffle down the front or turn it under about half an inch on each side to give it some weight and lessen the wave.  I chose to pin it back and stitch it down for a bit more substance in case I wanted to add buttons.  I was very happy I chose to turn it under and give it a more polished finish, I love how it looks.


Almost all of my cardigans have buttons so I pulled out my rather large button collection to see if I had enough of any one kind of button to use all the way down the front.  Not just any button would do, I did not want brown or tan or white or black, I wanted orange to match the sweater, that way I could wear it with anything and not have them clash with my outfit.  I only found two orange ones so I decided I would put one on each side so I could use a fabric loop to close it if I wanted to.  All done and ready to wear, how cute is that!  I know the sweater will now get lots of use all winter long.  I have one just like it in black I have not been wearing; I think it will get a makeover too, only the black one will have a bit of a romantic twist. I guess you will just have to keep checking in to see what I am going to do to make a hooded sweater more feminine and romantic.

Thanks for letting me share my newest tutorial with you, what a great way to re-purpose an unused item of clothing and stretch a dollar, no shopping needed here for a new cardigan sweater or two.
See you soon.
Laurette


Thursday, October 3, 2013

Patio Cushions - Mini Tutorial

Hello everyone, you have probably been wondering where I went and why there have been no new posts on this blog, the answer to that is I have been doing all kinds of projects mostly for my other blog.  I really have not been doing much in the way of sewing since this summer has been all about painting and making over the interior of two of our bathrooms, which I decided last year all belong on another kind of blog not my sewing blog.  I did work on one project late in the summer which required some sewing; the makeover of our back patio, it came out really pretty with the addition of the change of colors through the recovering of our patio furniture cushions.  I actually needed to use my sewing machine for all of those, here is what I made without using any patterns.


First up were the two ottoman cushions for our chairs, they take a pretty good beating so I made sure to use a really sturdy outdoor fabric to prevent easy damage.  I measured each cushion and the openings then cut them to fit; I also measured how long I wanted the ties to be so the pads would not fall off the ottomans when we put up our feet to relax. I did not want a seam in the front of the cushion so I cut one long rectangle and stitched up the sides and a couple of inches across the top where I inserted the ties between the layers to secure them in place, then stopped and back stitched to create my opening.  Before turning I tucked the old cushion inside the cover to make sure it would fit and squared off the two front ends with pins, pulled out the cushion and stitched up the corners then turned it. I inserted the old cushion and stitched up the opening and I was all done!

Tip of the day:  Some outdoor fabrics tend to unravel where they are cut, try using pinking shears on all the raw edges to prevent that when you are sewing and when you turn the piece, works like a charm.


Next up was the really long bench cushion which was a bit more tricky; it was four feet long and a real challenge to get under the foot of my little machine and through the small opening, not to mention where to put the four feet of length as I sewed closed the opening.  I made the new cover for the pad the same way I made the ottoman covers only with no ties since the cushion seems to stay put without them.


Three cushions down and four more large ones to go!  I wanted to re-use the old cushions but I just could not figure out how to do it and get them through my machine to close them up, it was just too much work for my little sewing machine so I cheated and bought some new plain pale blue cushions on clearance at Target.  My big dilemma was what to do with the main fabric I purchased which tied all the other fabrics and accessories together?  I was also worried the pale blue chair cushions would get dirty really fast and look awful in a hurry, what to do?  Inspiration hit and I came up with an easy slipcover which would slide onto the cushion kind of like a cigar band, covering up the front and back of the cushion leaving the sides open and showing some of the pretty pale blue color which was also in the coordinating fabrics.  Now everything was pulled together and I got a really pretty looking patio and cushion covers I could take off easily and clean.

To make the slipcovers I simply measured all the way around the cushion then figured out how wide to make it once I turned under all the raw edges. Next I cut a long rectangle, hemmed the edges and joined the two ends making a long loop, stitched it and slipped it on the cushion placing the seam in the back at the cushion bend. Just that simple and a quick solution to a very vexing problem.


Thanks for letting me share my latest sewing project with you, I think everything came out lovely and the patio became a really bright and beautiful place to relax all summer. I plan to share more sewing projects with you especially since the holidays are on the way and I tend to do a lot more sewing this time of year.
See you soon.

Laurette

You can see the full patio makeover on my other blog: Create, Upcycle, Decorate, Organize, just click on the link box on the right side of this blog page and it will take you over there, enjoy!!!


Wednesday, August 21, 2013

Quilted Mug Rug


From the Writers Wall Quilt I had a lot of leftover fabrics due to my little “design opportunity”, I pondered long and hard what I should make to use up some of my scraps.  I looked at a ton of ideas I pinned onto my Pinterest boards and came up with the idea of making a quilted mug rug.  What is a mug rug you ask?  Well… it is larger then a drink coaster and smaller then a placemat and usually heat proof, primarily used for a drink and a small snack plate or anything else which fits on the small surface.  I looked for tutorials or patterns but really did not find one which gave me dimensions or instructions, as usual I made up my own pattern and inserted Insul-Bright to protect surfaces from hot and cold drinks and foods.

I still had more leftover fabrics so I made a couple of coffee cup cozy’s which came out pretty cute.  I lined those with Insul-Bright as well to keep in the hot and cold.  I did not take a photo of one wrapped around a coffee cup but you get the idea.

Here is the photo of my quilt hanging in my sister’s office and the coffee cozy and mug rug on her desk.  I was really thrilled to see them all in her office, I was absolutely honored she did that.

Thanks for letting me share some of my scrap projects with you today; I hope you got inspired to use up some of your leftover scraps to make some fun gifts.  There are several more sewing projects on the books to share with you so keep an eye out for them.
See you soon.

Laurette


Monday, August 19, 2013

Writers Wall Quilt


I have wanted to share this lovely wall quilt with you for sometime but I just have not been able to show you this project until now.  Sometime ago my oldest sister and I bought a wonderful set of antique looking fabrics when our local quilt shop went out of business.  We had no real idea what we would make out of the fabrics so we bought one of the kits which included wine type prints for me and coordinating fabrics which had typeset and writers words on it for her with the idea of using the same pattern for both quilts. The pattern included in the kit was, Simply…ho! ho! ho! by Me and My Sister Designs, the store sample was made up in the kit fabrics so I knew it was just the ticket for what we wanted to use these stunning fabrics for.

Between the sample photo and the great instructions I had no problems assembling it; however, I highly recommend reading it all the way through at least once to avoid making any mistakes.  I wanted to make a change to the pattern and did not pay close enough attention to part of the instructions and ended up with a re-design part way through to compensate for the miss-cuts.  I was extremely lucky I had enough extra fabric to fix my mistakes creating a “design opportunity” which worked out just fine in the end.


I wanted the wall quilt to be very unique and artsy so I included some embellishments in the center of the quilt and around the edges.  I added my sister’s initials across the bottom and top of the center section using typewriter key brads and stitched on an antique heart, key, ring and button in each section of the middle giving the quilt dimension. 

Thanks for letting me share my Writers Wall Quilt with you, I really love how it came out and my sister was thrilled to receive it, she hung it in her office.  I made a few more projects from the quilt scraps which I also gave to my sister, those are up next.
See you soon.


Laurette

Friday, August 16, 2013

Dishtowel Dresses

I want to share a quick little post with you of the darling dishtowel dresses I made for my two granddaughters.  As most of you know I am always thinking out of the box and looking for ways to give something a whole new use; which is pretty much I what I did with a couple of sweet heavy duty cotton dishtowels I saw at Target on sale.  Since I have to drive two towns over to shop for fabric I try to find other ways to get hold of fabrics I can use to sew with including, sheets, towels, tablecloths, placemats, curtains and shower curtains.  Most of those items have good size yardage I can cut up and use for several projects for very little cost especially if they go on sale or clearance. In the case of the cute dishtowels I saw them on the end cap with the summer accessories and thought they were really adorable but they did not go with my kitchen décor. I began wondering what else I could use them for and immediately thought they would make pretty, durable summer dresses for the girls.  Here is what I did with them.

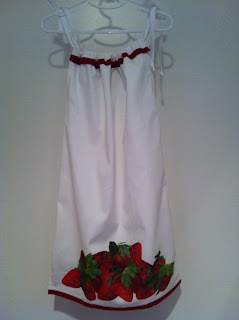
The first dress I made was for my littlest granddaughter, the pretty hot pink and green was so sweet it looked just like her.  I took some measurements from her then cut off one end of each towel, I used two identical towels.  Next I just stitched up the sides two thirds of the way up leaving the existing side seams and hem intact.  I stitched down around the arm holes and turned down several inches at the top to create a casing to run some ties through.  I cut long strips of double fold bias tape, stitched it down one side and threaded it though the casings on each side and tied it at the shoulders, all done in less then thirty minutes!

I made this darling dress for my oldest grandchild the same way I did the first dress, with the exception of two inch slits on each side seam for easy movement.  I top stitched the slits and under the arms to keep the fabric smooth and fuss free. In hindsight I should have put slits in the toddler dress as well since she is super active and she moves around more then her big sister.  These adorable dresses will become very soft and comfy the more they are worn and washed because they are made of sturdy fabric suited to drying dishes. 

Both girls looked very sweet and summery in their new outfits, I am glad I saw those towels and found a whole new use for them.  Thanks for letting me share my dishtowel dresses with you, I hope you enjoyed another one of my out of the box designs.
See you soon.

Laurette


Thursday, August 8, 2013

New On The Blog

Hello Everyone, just wanted to let you know I have been posting on my other blog some of my projects which do not involve sewing.  I really did not want you to think I quit this blog, I have just been very busy sewing, crafting, painting and decorating without stopping to write about it all as I went. You will start seeing my sewing projects again since there are quite a few of those along with all the rest I have been working on.

First up is my newest obsession, making purses!!!  I just love it, actually I like taking the classes about purse making with my friend and teacher, Sheila.  She has been such a great inspiration, she taught me so many techniques that my confidence is really growing with each bag I make.  This very pretty pink leopard/zebra bag was really fun to make, not a bag I would attempt without a class since it has 16 pockets inside, a magnetic snap and a special hard bag bottom to keep it standing.  The pattern is the Tuscany Tote by Pink Sand Beach Designs, designed by Nancy Green, I just love all their purse patterns.


My new favorite little cutie bag to make is the Runaround Bag by Lazy Girl Designs, designed by Joan Hawley.  This bag actually takes longer to cut out then to stitch up, we made two in two hours, I would have made more but my sewing machine froze up and refused to sew anymore.  I have four more cut out ready to sew up as soon as I get my machine back from the sewing machine hospital, lets hope it just needed cleaning in the places I can not get to and it is not a terminal illness, giggles!!!  Anyway... I can not wait to make more of these darling little bags very soon.

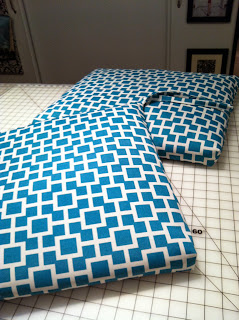
Last but not least is the Laptop Satchel by Vanilla House, designed by Barbara Brunson. I made this satchel without taking a class, kind of a tough one to make, not sure I would do it again, the directions were confusing and I ended up re-writing the pattern to reflect my sewing knowledge.  Some of you may find it just fine to make as is depending on how you were taught to sew.

Thanks for letting me share some of my current sewing projects, there are several more to come in the near future.  Be sure to check out my other blog; Create, Upcycle, Decorate, Organize to see what I have been up to. New on that blog is a post about my office relocation/expansion, part 1.  Head on over now and take a look before I post part 2.
See you soon.

Laurette


Sunday, April 14, 2013

Kitchen Grapes


I have a great post for you today; I want to share the darling hand towels I made for my new kitchen makeover.  Just a bit of background about my recent decorating projects, I decided I did not like the coffee shop décor I chose for our newest home, it was something I had actually picked out for another home and just dropped everything into place when we moved in, without really thinking things through.  After living with it for almost three years I was not a happy camper, I started to think about what would make me happy and the answer was to go back to what I originally had in my first/favorite home.  I really adored my wine/Tuscan inspired home, the colors really spoke to me and everything complemented each other nicely.  Time to decorate with what I loved no matter what anyone else thought or what the decorating trends and colors are now, no more brown, gold and red.  I decided to use my sage green, burgundy, cream and Tuscan gold, all elegant colors when put together in small doses.  I did not have to purchase much since I had all my décor items in those colors in storage, all I had to do was go get everything and put it out.  I was short on curtains for the kitchen window and the family room windows, lucky for me Bed, Bath & Beyond still had more of the same drapes for the windows in the family room and I had great fabrics in my stash which would pull it all together for the kitchen window.

Most of my kitchen accessories were a bit worn out making it time to create some new ones using one of my own patterns.  Since it is a pattern I sell I won’t be doing a tutorial here but I will share that the tops of the towels are machine quilted and they also have some really sweet pleats on the back side and I was able to sew up four in just a couple of hours. Aren’t they darling! I just love the rich colors which are repeated throughout the kitchen through accessories and artwork. You will be seeing photos of the whole kitchen makeover when I share the kitchen valance tutorial next time.

I hope you enjoyed your first peek at one of the projects I did for my kitchen makeover. Keep reading to see the new kitchen window valance tutorial I will be sharing in a few days.
See you soon.

Laurette

Thursday, April 11, 2013

The Blue Dress


Hello everyone, I have been away from my blog for some time now due to unforeseen medical problems and a nasty fall resulting in several sprains and a concussion. Yikes!! I have been a mess but I am finally healing from my fall so I can get back to doing what I love most, creating, sewing and blogging.  I have several quick sewing projects I was able to get done before all of that stuff happened so I will start posting them so we can all get caught up. I will also have new posts on my other blog page as well so look for those in the next few days as I get going again. I completely missed Easter so you may see some out of time projects from that as well.  So…. Let’s get going here is the first sewing project I want to share with you.


I decided I needed a new dress for Easter so off to my sewing and pattern stash I went and chose a beautiful blue double knit fabric and a dress pattern by McCall’s, pattern number M6112.  It was easy to cut out both the pattern and the fabric; I was sewing in no time and had the top half completed quickly, the best part of the dress is the kimono sleeves.  The pattern also had options for pockets, a cowl neck or kimono sleeves with a slit on the top, I pretty much did my own thing to get just the right look.

The rest of the dress went just as quickly and it was finished in no time, about two hours start to finish. Isn’t it cute! Very light and airy, I can wear it alone or with boots and a turtleneck underneath it if I want to wear the dress as a jumper during the winter months.  I usually try to make garments which can be worn for dual seasons, I get more use out of them that way and I can justify spending a bit more on a great fabric when I find one.  Too bad I did not get to wear it to Easter dinner at my daughter’s house, I had to stay home and get well instead, oh well, there will be another occasion to wear it soon.

Thanks for letting me share my little blue dress with you; it was fun to show you my new outfit.  I have some sewing projects I made for my kitchen makeover to show you next time; one of them is an easy tutorial, look for those in a day or so.
See you soon.

Laurette

Watch for a new blog post on Create*Upcycle*Decorate*Organize, coming very soon, it is about our new stone patio just completed last weekend; my husband did a fantastic job on it.
Related Posts Plugin for WordPress, Blogger...