Wednesday, June 20, 2012

Sweatshirt To Jeweled Jacket - Tutorial


One of the creative things I like to do is take old or unused clothing and re-purpose them into beautiful new garments or decorative items.  The most recent upcycling project was an olive green sweatshirt which I loved the color of but not the fit, it was brand new and never worn; I kept moving it from house to house thinking I would do something with it someday. After much debate I finally settled on transforming the ordinary sweatshirt into a stunning short jacket for fall.  For those of you who sew, this is a great project you can do with just about any sweater or shirt with just a few tweaks, follow along with my tutorial and you will be all set to make one of your own.


Pictured is the sweatshirt, I am going to makeover, in its original form. The first thing I did was to take my dressmakers chalk and draw a line down the middle of the shirt, measuring from each side to the center until I got it even. Once the line was drawn I cut a nice straight line down the middle to create the jacket opening, all set and ready to stitch up once I finished cutting off all the unnecessary parts.


I really did not like the cuffs on the sleeves due to the fact they were very wide and tight, they were totally uncomfortable. Once I had them measured for the new sleeve length, I cut off the cuffs and began pinning up a new hem.

I moved onto the bottom of the shirt measuring and very carefully cutting off the bottom band of the sweatshirt.  It was a really well made knit band with a fine tight weave which I set aside to use later in an unusual, surprising way.
Note:  I like to do all my cutting and pinning at once, then go to my sewing machine instead of popping up and down every five minutes, it saves a lot of time and moves the project along quickly.


The first thing I did was to start stitching the hem of my new jacket, I decided on three layers of stitching to make it decorative instead of just a simple ¼” seam.  Because the fabric is knit the edges did not need to be folded under or any kind of finishing stitches on the raw edges.  I sewed each set of stitches ¼” apart for a nice uniform look, I chose a double row of stitches for the cuff finish.  Once the bottom hem was completed I moved onto stitching up a small placket down the front of the jacket, just a single row of stitches since I had other plans for the opening.


It was finally time for the neck opening, it took me a while to figure out what I wanted to do with it, and I had a lot of ideas which took me forever to settle on one design. As soon as I cut off the band from the bottom of the shirt I knew right away I was going to use it on the neck to change the lines.  I draped it across one shoulder which I liked, then I considered evenly sewing it around the neck and using the long ends to make a self tie or bow, my final choice was to lay it on collar style which felt more like the jacket I originally had in mind.


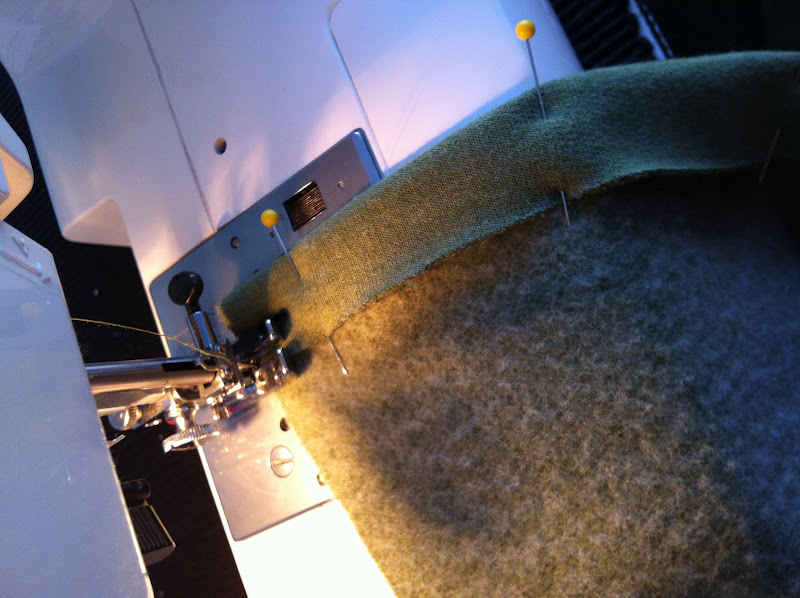
This was the tricky part, getting the band around the neck without causing a lot of stretching and ruining the shape of the jacket.  I chose to leave the original collar intact in case I wanted to alter it again in the future.  When I removed the banding from the bottom of the shirt I cut about two inches away from the original hem seam so I would have extra fabric to work with, it turned out to be a good choice.  I was able to place the neck edge up against the existing band hem seam and pin it just below the old collar hem, I used a good number of pins to make sure everything stayed in place while I stitched it up. Stitching along the original collar line would allow for the new collar to lay down over the old one concealing it and giving the whole area more stability and no sagging or stretching.  I could have added some stitching in the ditch or other stabilizing stitches but I wanted to be able to remove the collar at some point in time without a lot of fuss.

Before:

After:


My olive green fall jacket it complete with one photo showing it without the jewels running down the front and the second photo showing the gems, I hand sewed into place, sparkling in the light giving the illusion of the crystal jewels being larger then they are and slightly uneven.  I can assure you they are evenly spaced with hook and eye closures just behind the stones.  Plain sweatshirt turned custom trendy jeweled jacket without a trip to the designer showrooms. How much fun is that!

Thanks for letting me share my jeweled jacket makeover, I hope you enjoyed my tutorial and you are inspired to make one of your own.  Did I mention the sweatshirt was part of a set, can you guess what I am going to make out of the poorly fitting sweatpants?  I guess you will have to watch for that makeover to appear in a future post, it is already in progress.
See you soon.

Laurette

You might also like:

Bling Those Shoes – Part 1
Bling Those Shoes – Part 2


Tuesday, June 19, 2012

Festive Updates


The weekend was a smashing success with all of the family events we had. Things are slowly getting back to normal with lots of laundry, setting the guest room back in order, putting away tables, chairs and all the other party decorations and accessories. I think the clean up is almost as much work as the set up, but it was very much worth all the work.  Everyone has finally gone home so I thought I would do a quick catch up of each event before going on to share some of the makeover projects I have planned for this weeks posts.


First up was the pre-school graduation for my oldest granddaughter on Friday evening, unfortunately I wasn’t able to get close to the kids and I was taking photos into the sun, but you get the idea.  They were just darling in their cute little caps and gowns, loved it.


Next came the 30Th Birthday party for my son, given by my daughter-in-law, she did a fantastic job with the decorations and all the wonderful food, we are all very lucky to have her in his life and ours.

Last but not least was Father’s Day on Sunday, I didn’t get any good pictures at dinner, I was too busy running around making sure everyone got fed and fun gifts handed out and opened by all the Dads. They got to play golf in the morning and had barbecued steaks with all the trimmings for dinner, cooked by the ladies, what lucky guys.

A quick update on my outdoor studio kitty, Toby, he came home from the pet hospital mid morning on Monday, he spent 7 days there and is happy to be home.  He is slowly getting better day by day but he still has a long way to go before he ventures outside again.  Thanks for all the good thoughts, they worked.

That pretty much sums up everything going on in my home since I last wrote to all of you, time to get back to work on my creative projects.  I have lots to do before the baby shower for my daughter-in-law next month including getting out the invitations and completing the patio makeover, which is where the baby shower will be held.  Never a non-creative or dull moment around here.

Thanks for letting me share all my festive events from last weekend. Coming up next are some before and after makeovers, watch for those in the next couple of days. 
See you soon.

Laurette

Tuesday, June 12, 2012

Pretty In Pink


I just had to share these sweet little bubblegum pink newborn kimono jackets and matching burp cloths.  They came out so cute they make me think of pretty baby girls all soft and sweet smelling after a bath, brings back lots of memories.

This is the only time you will see me making any pink baby clothing or accessories, we found out the new baby due in October is a BABY BOY! We are over the moon and so excited to be having our first grandson; he is going to be so spoiled.  All of my baby projects will now be the usual blues and greens with some yellows and oranges thrown into the mix.  I guess the little pink jackets and burp cloths will have to go into a box until the next baby girl comes along. After sewing nothing but little girl things for the last six years it will be really fun to work with other colors for little boy projects while still sewing pretty things for the girls.

Today while picking up the toy room I realized it is decorated predominately in oranges, greens and pinks (perfect for little divas).  I think I will need to do a bit of a re-vamp to make it much more gender neutral; oranges and turquoise blues added into the color scheme should do the trick.  More fun projects for me to work on during the fall and winter months, at least I have time before the baby will be old enough to play in there, but it is something fun for my creative mind to play around with until I have time to work in there.  I think it might be time for me to pull out my sketch books and blank mood boards so I can jot down any ideas that come along in the next couple of months.

For those of you who read this blog on a regular basis, you may have a noticed a lag in between my posts.  I wanted to let you know I am working on several projects at once which is keeping me away from my writing; I am also swamped with taking care of a very sick outdoor studio kitty and several family events all happening this weekend. So far I am keeping my head above water but who knows how things will go, fingers crossed. 

For those of you who follow the antics of my furry studio helpers please keep good thoughts for my kitty, Toby, he is very ill and in the cat hospital in pretty bad shape, I will keep you posted.  

As for the rest, everything else should work out just fine, I have my granddaughters pre-school graduation, my son’s 30Th Birthday party and a Father’s Day barbecue, all three days in a row with two of the events in my home and stay over company for five days as well.  Once all this is over I will be back early next week writing again about some great new projects I did this week.  Keep checking in between now and then in case I get some time to sneak up to my computer and share all the festivities with you as well as a progress report on Toby.

Thanks for letting me share my bubblegum pink kimonos with you, be on the lookout for several fun makeover projects, I can’t wait to show them to you.
See you soon.

Laurette

You might also like:

Back To Babies
All About Babies
Fun Fabric Animals

Friday, June 8, 2012

Cherry Red Stones


Last weekend I did several paint projects, I painted my tired old plant stands a lovely bright shade of lime green which perked them up and added a pop of color to my dull looking patio.  The second project was spray painting several decorative stone tiles, they started out one color, which faded over time in the strong sun, and ended up a pale shadow of what they were.  The original colors were great at our former home but didn’t work at this new one; a change in color was definitely called for.

This once cute little decorative garden stone had been stepped on and broken in two pieces, it also became very faded from a rich green to a washed out pale green. I really loved the little animals; they were just so darling I wanted to save them; I glued it together and gave it a good cleaning to see if I could revive the stone with a vibrant new color.

The crack and chalky faded green color pretty much disappeared with a couple of quick coats of KRYLON Interior-Exterior spray paint in a high gloss finish, Cherry Red; it dries in 12 minutes or less.  This is my favorite paint to use on projects which are not metal or rusted; it does not run or drip and goes on super smooth.  For my rod-iron art pieces, plant stands and patio furniture I use RUST-OLEUM, it blocks rust and leaves a nice clean glossy finish.


My final piece was a hanging decorative tile which also started its life a dark green color it faded to an awful pale green.  I used the same process of cleaning it and giving it several coats of, Cherry Red, KRYLON spray paint to protect it from the sun and rain, it hangs on the fence at the top of the hill giving the fence and yard  extra color when the roses are not in bloom.  I could have bought two new pieces but decided to upcycle them with fresh color and use them in my yard instead of putting more stuff in the landfill. Think about looking around at what you have and ask yourself what you can do to use it in a new and different way, you will be surprised at how much fun it is to make something old new again, give it a try and let me know what you did, I would love to hear about it.  For more projects and ideas take a peak at this fun website; www.projectsinacan.com created by KRYLON spray paints.

Thanks for letting me share my Cherry Red painting project with you, I hope it really does inspire you to pick up a can of spray paint and get to work on some of those old garden pieces making them into pretty new show pieces for your yard or home.
See you soon.

Laurette

You might also like:

Time For Lime
The Red Door
Pumpkin Bling – 2011 Archive


Monday, June 4, 2012

Time For Lime


I finally got to work on one of the painting projects I have been trying to get completed the last couple of weeks, re-painting my rusted and faded patio plant stands.  The projects were simple but took a bit of prep time since I needed to sweep and vacuum my outdoor studio floors to reduce any dust and dirt before breaking out the paints.  Because my outside studio cats sleep there at night and during bad weather the cat hair can really mount up no matter how much I clean, it can be a real chore to get it ready for painting. Once the clean up was complete, down went the brown craft paper secured with blue painters tape, to protect the floors from too much over-spray, time to get to work making over my plant stands.


This little number was originally a vibrant deep black color which had faded and rusted over the last couple of years.  Time for a good cleaning with a soft brush and a soft cloth to remove dust, dirt and those pesky spider webs.

In order to get the paint to stick to the metal and to reduce rust I sanded down all of the metal with a medium grit sanding block to remove the rust and any loose paint which had started to crack and peel.  Roughing up the paint on the rest of the stand allows the paint to adhere to the smooth surface creating a better bond.


This plant stand was in dire need of a new paint job as well; it started out a cute shabby chic antique white but rusted over time.  I re-sprayed it white several times over the years when I had white wicker outdoor furniture on my little front yard patio.  Alas, I no longer have that furniture and my tastes have gone away from shabby chic to something more colorful and fun. The stand received the same cleaning and sanding treatment to make it ready for its new coat of paint.

All set and ready for the new color, Key Lime by RUST-OLEUM, I love using this paint the coverage is fantastic and I rarely get any dripping unless I stay in one spot too long and don’t keep a constant sweeping movement with the spray can.  I chose this color because of the new fabrics I will be using to recover my patio furniture cushions which includes the colors of blues and vibrant greens.

I always turn my pieces upside down and spray the underside first including the inside of the legs.  I let them completely dry before adding a second and or third coat of paint depending on how well it is covering everything.  Once it is all dry I flip them over and spray the top side with several coats until I get full coverage in all the nooks and crannies.  It is best to use light coats each time instead of one heavy coat which will cause an uneven looking surface.


All done and looking fresh and new dressed in their pretty lime coats of paint, what a difference.  These plant stands should be just the bright pop of color I am looking for on the patio to go with the new fabrics.  If I decide I don’t like the color I can always repaint them, I just love spray paint it is so quick and easy to do, another one of those simple changes for the price of a can of spray paint.

Thanks for letting me share my Key Lime painting project with you, I have another paint project to share with you this week, let me give you a hint, it matches my front door.
See you soon.

Laurette

If you enjoyed reading this post you might also like:

The Red Door
Sewing The Blues
Pumpkin Bling - 2011
The Paisley Crazy Room Makeover- 2011


Related Posts Plugin for WordPress, Blogger...