Thursday, May 31, 2012

Bling Those Shoes - Part 2


In April I shared with you about the darling Anne Michelle shoes I scored for only $5.00, while I was on vacation in Pismo Beach, which I planned to cover with crystal gems (inspired by the blog New Dress A Day).  I worked on them right away but did not get very far, it takes a really, really long time to hand glue each stone on one by one, what was I thinking?!  After several attempts I put them aside frustrated because it was taking forever just to get a couple of rows done at a time.  I finally got tired of constantly dusting the shoes and moving them all around the studio to keep from damaging them so I picked them up, put the shoes on my work counter and started gluing on the stones.  The hardest part was trying to decide what pattern I was going to make, I originally wanted to cover the whole heel but got discouraged part way though so I switched it up and only covered the hefty part of the heel then I ran stones down the center with spaces between them. Once that was done I placed three of the smallest gems down the center of the bow on the front of the shoe giving it some bling, why should the heels get all the attention, very cute.  Here is my progress from start to finish.

I turned the shoe upside down so I would not get glue all over the outside as I handled it. I used Krazy Glue because I did not want the stones to fall off if the shoes ever got worn.  The smallest stones were hard to handle so I used bent nosed tweezers to pick them up and dip them into the glue then placed the gems onto the shoes.

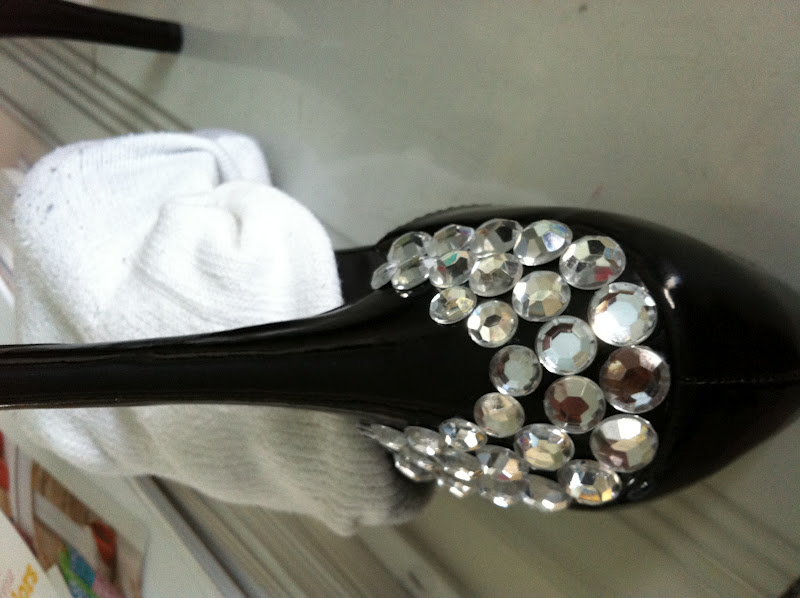
I kept getting glue and finger prints all over the shoes so I pulled an old soft sock over the shoes which kept them clean and from moving around all over my work counter.

This photo shows my first finished shoes with tiny spaces between the gems running down the high heel of the shoe.  I was not completely happy with the look of the heels, I let them sit for a while trying to decide what to do next.  I love the three stones on the little bows, I could have gone crazy with the crystals and covered the whole thing which is what I intended to do originally, but I thought I should just keep it simple, at least for now.

After looking at the shoes for awhile the spaces kept bugging me, I finally decided to add the smallest crystal gems in the package to see if I would like that look any better.  It is somewhat more pleasing to the eye but I cannot say I am in love with the final product.  I think these shoes will remain a work in progress; I will probably end up covering the entire heel and bow with crystals on each shoe, which was my original plan for over the top bling, just like the designers are showing this season.

Thanks for letting me share my newest bling project with you; I hope to get back to a few more bling projects throughout the summer months, I miss all that sparkle.
See you soon.

Laurette

If you enjoyed reading this post you might also like:

Bling Those Shoes - Part 1
Black and White Bling - 2011
A Bit of Bling - 2011
Buttons Bows & Bling - 2011


Wednesday, May 30, 2012

Mailbox Makeover


During this past weekend one project in particular was started and completed, a simple project but a very important one, new mailboxes and post.  This project has been on the books for almost two years, ever since we bought our home.  I have been bugging my husband to get it completed, but since it was not a top priority it kept getting pushed to the bottom of the list, at least until our mail carrier requested we do something about it soon.  With a three day weekend and no other large projects looming he finally agreed to get it done. Because it was such a long awaited project and I was so excited I decided to share it with you.

As you can see the post is curved and leaning towards the smaller mailbox, there were  two different size boxes and in two different colors, a total eyesore, they had to go.  The post was surrounded by grass and the occasional weed, the post got wet every time the lawns were watered, creating the leaning tower of mailboxes.

The new post is treated redwood, straight and true and the mailboxes are both the same size and black with matching gold numbers on the front, a real treat for the eyes, the mailboxes and materials were purchased at Lowes and McKinnon Lumber.  My husband did a fantastic job all by himself, he is very talented with woodworking and just about any project he does.  In the background of the photo you can see two of my outside studio cats supervising and inspecting the completion of our new mailboxes, I think they were pleased (the inspectors were Sweetie in the front and Tyler just behind her).


Instead of the damp grass sitting below the boxes, my husband built a redwood box and filled it with outdoor decorator rocks in a variety of colors (the rocks and box were my idea and I helped to load them in, he was great about including my part of the project).  We put down plastic before adding the frame and rocks to help keep down the weeds, at least for a little while.
I was suppose to paint the wood post, base and box but my husband really liked the natural redwood look, so for now it will stay that way until it starts to weather, then it will get sanded and painted to complement the two houses. Adding more curb appeal never hurts; putting up a new mailbox or painting the existing one is one of those simple changes I am always preaching about, it makes a very big impact for very little time and money.

Thanks for letting me share our mailbox makeover with you; I hope my projects continue to inspire you to make those simple changes to bring new life to the inside and outside of your home.  I have no idea what projects I will be sharing with you, I guess it will be a surprise to all of us, keep watching to see what creative projects I/We tackle next.
See you soon.

Laurette

If you enjoyed reading this post you might also like:

The Red Door
Simple Changes
Rose Rescue
Sewing The Blues
The Paisley Crazy Room Makeover - 2011

Monday, May 28, 2012

Rose Rescue


This weekend I had great plans for transforming some outdated and rusted patio plant stands and a wooden park bench into bright, colorful accents for my patio makeover. Sometimes things just don’t go as planned due to time constraints or a lack of communication with my spouse, which is exactly what happened this weekend. (Sigh…) Oh well, such is my life sometimes, total frustration, anyway….. I did manage to get a much needed yard work project completed.  It was time to trim up all the hedges, trees and prune the roses up on the hill.  It takes a full day to manicure the whole backyard because it includes trimming, pruning, raking, adding new soil around all the plants, weeding, deadheading the flowers, fertilizing and watering all the plants and lawns, almost forgot, there was a ton of cleanup from all the clippings, cuttings and leaves as well.  By the time 5pm came around we were completely worn out but very happy at the tailored/manicured look of the front and backyard. 

All the hard work with the roses last year and this year is finally paying off big; we are actually getting a second blooming of roses already and it is only May. We only had one partial  round of blooms out of the roses early last spring, then nothing the rest of the growing season. I did not even know what colors were up there until this spring and I was very pleasantly surprised to see lavender roses and some really stunning yellow/orange striped roses which have a touch of peach/salmon in some of the blooms. I love these they are so happy looking and really make me smile.

I have been asked what I use on my roses, here is a photo of the container, I use Bayer Advanced Rose & Flower Care which feeds and protects the flowers for up to 8 weeks, sometimes longer depending on the placement of your plants.  I absolutely swear by this rose food and recommend it to anyone who has roses and wants to reverse any kind of neglect or add more blooms.  I usually buy it at Lowes or Ace Hardware or at any good garden center, it is well worth the money and lasts a long time, unless you have dozens of rose bushes, you might need a second container before the end of the growing season.  Give it a try and watch healthy roses bloom all season long.

Thanks for letting me share my Rose Rescue with you; I hope each and every one of you had a wonderful Memorial Day weekend.  I guess I am going to have to try to start those paint projects in the next day or two, watch for those to appear on my blog in the next couple of weeks.
See you soon.

Laurette

If you enjoyed reading this post you might also like:

Happy Mother’s Day (About my roses)
Simple Changes
The Red Door


Friday, May 25, 2012

Simple Changes


Creating simple changes to a room, an outdoor patio, an office, creative studio or your homes curb appeal can have a huge impact on how you feel about the places you work, play or live.  The kinds of changes you can make can be as minor as a new paint color, bold new fabric drapes, artwork on the walls, a new chair or a few bright accessories to pull a room together and give it a cohesive feel.  My favorite things to do are all of the above depending on the room and what I want to accomplish in that room or space. I have written a number of past posts about small changes like adding bling to my studio through paint and accessories, painting tired old furniture giving it a new vibe and painting my front door red adding eye catching curb appeal.  Occasionally just making minor additions like a new tablecloth, place mats or a centerpiece to the dinning room table or changing out bed linens can create a whole new mood in the room you add them too.  It is all so easy to do and sometimes it just happens by accident like the recent transformation in my office/guest room.

This is a photo of the guest room/office right after I completed it around this time last year. It has a light, bright, spacious feel to the room with beach type accents along with complimentary paisley prints in blues and greens.

Simply by turning over the comforter to a solid deep blue color, the whole space became warmer and more intimate pulling out the deeper, darker colors in the fabrics already in the room, giving the entire guest room/office a completely new feel with one simple flip of the fabric, how easy is that.  I will probably leave it that way for awhile, I really like how it pulled out the blue in the walls, which were very subtle before, but now stand out a bit more.  Did I mention I love the color blue?

In addition to flipping over the comforter I added a fantastic, handmade, rod iron dress form to the corner of the room (the dress form was a birthday gift from my daughter).  I dressed her in a pretty blue and green apron I made from one of my patterns; it compliments the other fabrics already in the room.  The dress form is appropriate for the space due to the fact I am a seamstress by trade and the room also serves as my business office, very inspiring when I spend long hours writing at my computer.

Thanks for letting me share some of my simple changes; I hope it encourages you to make some of your own, it is so important to keep your environment fresh, bright and ever changing.  Speaking of changes, this is project weekend for us since we have three days to create and play in the yard and house, I hope to have some new projects to share with you next week so be sure you watch for them.  Just a hint; paint and wood will be involved, that’s all I am saying for now.  Have a fantastic and memorable Memorial Day Weekend. 
See you soon.

Laurette

If you enjoyed reading this post you might also like:

The Red Door
Sewing The Blues
Paisley Crazy Room Makeover- 2011
Holiday Sparkle- 2011
A Bit of Bling- 2011

Tuesday, May 22, 2012

Back to Babies


Currently, I am back to sewing baby gear for our new grand baby who is due this coming fall.  This time around I am working with soft, cuddly printed flannel, I just love working in flannel since it is easy to use and irons up nicely at the finish of each project, not to mention keeping baby nice and warm.  All these prints are just darling, some of them are geared for a baby boy or girl and some can be used for either one.  I will probably make my projects out of both prints and put away which ever one I don’t use for this baby and save the others for the next one.

My newest baby projects are newborn kimono jackets, I made them when both my children were babies and used them all the time after a bath and over their little pajamas and nightgowns for extra warmth; the cotton versions are great for summer playtime or sleeping in on a warm night.  While digging through my patterns, this cute jacket just jumped out at me as something I should make for our new baby, it is not something you see new mom’s using these days, maybe it will make a come back this year when I re-release the pattern and jackets later this fall.  The pattern is simple to read and easy to use, they make up pretty quickly using the flannel, bias tape and printed ribbons.


This little top can be worn by either a boy or a girl but leans slightly towards a baby boy with the darling blue elephants and the orange trim.  I made another jacket in the same fabric with a matching green trim and a pale yellow bow before going on to work with the other prints; each one will be totally unique with different trims and ribbons, no two will be alike.

Thanks for letting me share my newborn kimono jackets with you, there are going to be lots of baby projects mixed in with all the other painting and craft projects over the next couple of months. I hope they inspire you to create some baby gear of your own for your baby, grand baby or as a shower gift, happy sewing. 

See you soon.

Laurette

If you enjoyed reading this post you might also like:

All About Babies
Fun Fabric Animals
Gift Card Envelopes and Owls- Dec. 2011
A Quick Gift- Dec. 2011

Monday, May 21, 2012

The Red Door


I wrote a big impressive posting about the red door and the family room/kitchen makeover, edited it a million times, saved it all the way, chose lots of photos and promptly lost the whole thing through some kind of computer or user error (sigh).  Boy was I mad at myself, I am sure it was some dumb thing I did but I lost three hours of hard work.  So…… I am only going to tell you about the red door today and break it up into two different posts, since I cannot remember everything I wrote the first time, this one will be a short one.


Our front door started out a kind of light brown/mocha color which was surrounded by a creamy white trim and tan walls, kind of a neutral non-descript looking home, basic curb appeal but no real pop of color to draw the eye in, totally not my kind of house.  We just were not ready to re-paint the whole exterior of the house since it was painted less then two years ago by the investors we purchased the home from.  The best way to give it some new curb appeal was to paint our front door red so it could be seen through the white screen door.  I originally wanted to paint the door a nice glossy black but decided to go bold instead, because as most of you know I love color, it does not have to be super bright but it does need a bit of bling to make me happy.


I chose Ace Hardware Exterior-Latex paint, semi-gloss, Dried Tomato; the color is not an orange red more of a deeper darker red with a black base.  No matter which red you use it will take more then one coat, mine took three to get a nice even glossy coat of full coverage.  No matter how careful I was when applying the blue painters tape, some of the paint came off around the door handles and the glass when I pulled off the tape.  I will have to go back and touch it all up to cover the primer coat and the original mocha paint color, one of the hazards of doing a DIY project instead of using a professional painter, not a big deal just a bit more work, good thing I like to paint, more lessons learned.

Thanks for letting me share my Red Door painting project with you, my door came out a really beautiful, rich, red which pumped up our homes’ curb appeal and brings a smile to my face every time I open the front door.  I hope my little curb appeal project will encourage you to make some small changes (painted flower boxes, rod iron accents over windows and doors, painted shutters or a new rich front door color) to the front of your house so you can smile every time you arrive home.  I have more painted projects headed your way, keep reading you never know what I am going to paint, sew or craft next.
See you soon.

Laurette


Tuesday, May 15, 2012

Sewing The Blues


The forecast for spring and summer colors introduced by the fashion and interior design industry called for tangerine/oranges, citron/lime, yellows and blues in every shade imaginable.  Tangerine made a huge splash on the runways and in the home interior previews early this spring.  Right behind the oranges were strong colors in greens and blues; the trend seems to have continued right into the summer lines of clothing, indoor and outdoor furnishings and accessories.  I absolutely adore the fact that blues and greens are making a huge comeback this year; hues of blue have always been my favorite colors since I was a pre-teen and I am very happy to be using them again.

My personal moodboard in a variety of blues and greens, which sits above my desk, was inspired by Pink Chalk Fabrics’ blog, Pink Chalk Studios, featuring textiles by Maasai Mara from dear Stella and Ellen Luckett Baker for Moda.  I use moodboards to collect colorful images to inspire my fabric, paint and project style choices, this one encouraged me to go blue and green in my next project.


Apparently last year I was way ahead of the curve with my Paisley Crazy Room Makeover where I featured lime greens, blue and turquoise as my updated color scheme.  I constantly study, watch and read about fashion and interior design so I can stay up on what is new and fresh each season. I had an inkling as to the coming color changes and chose them for my guest room/office even though some people thought I was nuts for putting them in my home.


I am at it again, in the early spring I picked out some beautiful blues and greens for my outdoor patio makeover project.  Large prints, geometric patterns and stripes are all the rage in outdoor fabrics and I have them all in complementary colors, a great way to spruce up my dull patio cushions and add some tropical bling.  I already started sewing up several cushion covers but decided to hold off finishing them until the big tree next door finishes shedding sticky pollen and leaves all over my patio; I plan to get back to  sewing early next week so everything will be done in time for a party in mid June.  Once I finish them I will write a before and after post so you can see the difference the new blues and greens made, should be a good one.

Thanks for letting me share Sewing The Blues with you; I hope it inspired you to perk up your indoor and outdoor rooms with some of the new bright and cheerful colors of the summer season.  See you soon.

Laurette

If you enjoyed reading this post you may also like:

Paisley Crazy Room Makeover – Nov, 2011


Saturday, May 12, 2012

Happy Mother's Day


I want to wish each and every Mother, Grandmother and Mommy-to-be a wonderful and Happy Mother’s Day, I hope each of you has a very special day with your families. 

I will be spending the day with my daughter getting manicures and pedicures, having lunch out and then some shopping, no children or spouses.  We will return for a dinner prepared by our husbands and the kids, it should be a fun meal.

I wanted to share with you some of the beautiful roses from my garden, just in case you are allergic and can’t have them or don’t get any of your own. (I don’t usually get roses since I grow my own.)  Enjoy!


I have just about every color you can think of and a few unusual colors as well; I even have lavender, several shades of pinks, reds, yellows, peach and white.  They sit up on the hill in the warm sun all day long and bloom about nine months out of the year, I am very lucky to have the perfect spot to grow roses.  They were neglected for several years until we purchased the property and I began giving each plant regular trimmings, rose food and plenty of water.  This is our second summer and we are finally getting most of the plants to bloom on a regular basis, they should get healthier each year with lots of tender loving care.

Thanks for letting me share my rose garden with all of you; I hope you have a spectacular Mother’s Day.  Hugs to each of you.  See you soon.

Laurette

Thursday, May 10, 2012

All About Babies


Today’s creative project is baby burp cloths, with an 8 month old granddaughter and a new baby arriving in the fall, I thought it was time to get sewing for the little ones again.  I felt it was appropriate to begin with all those necessary little generic layette items since we don’t know yet what the sex of our fall baby is.  Burp cloths were up first, with baby kimonos, bibs, blankets, toys and quilts to follow as time allows.  I love to sew for babies and toddlers the fabrics are so much fun to work with; you will be seeing quite a few projects over the next couple of months as I gather together my completed projects for the baby shower.


I had a great time shopping in my fabric stash for the retro prints I used on most of the burp cloths.  The fabrics remind me so much of the ones I used to make things for my children when they were babies, except the prints then were the originals, these are replicas of those.  The retro fabrics I chose are not gender specific and can be used for either a boy or a girl.


I played around with different kinds of fabric mixes with printed cottons for one side with either flannel on the back or terrycloth toweling.  On one of them I used the same flannel print on both sides. I sent one of each kind over to my daughter’s house to try on her 8 month old to see how well they work and wash up; they are still in the testing stages, so far so good.

These six will go into the basket of goodies for the baby shower; they are a mix of cottons, flannel and terrycloth toweling. As soon as I find out the gender my projects will get much more specific, but for now I get to sew for the baby as my creative spirit speaks to me.

Thanks for letting me share my baby burp cloth project with you.  I have several summer patio sewing and painting projects coming up very soon as well as the kitchen/family room makeover posting, I misplaced some photos which is putting me a little behind on that one, but it is on the way.  See you soon.
Laurette

If you enjoyed reading this post you might also like:

Fun Fabric Animals
Project Progress
Gift Card Envelopes and Owls - Dec, 2011
A Quick Gift - Dec, 2011
Super Studio - Nov, 2011
Related Posts Plugin for WordPress, Blogger...