Showing posts with label shoes. Show all posts

Friday, January 18, 2013

Apron A Day #5


This darling shoe apron is one of my designs sewn with three coordinating fabrics from a great collection. When I purchased the fabric I had no idea what I was going to use it for, I just fell in love with it so I bought it and the fabrics became part of my ever growing stash. I wanted to use all three of the prints so I picked the panel for the front and the smallest print for the lining with the tiny shoe print for the ties and ruffles on the top and bottom.  I did not include a pocket because I chose to embellish the apron with complementing buttons and rick rack to bring out the pattern and colors giving it some added dimension. The apron is lined to add weight and extra body, not to mention good protection for my clothing while I am cooking, always a good thing for a messy cook.

This little diva shoe apron was meant for cooking and compliments, thanks for letting me share it with you today.  There will be more aprons featured in a few days, the next one has some real retro flare and is one of my favorites.
See you soon.

Laurette

You might also like:
Apron A Day 1, 2, 3 & 4 (Archives 2012 for 1, 2&3)


Thursday, May 31, 2012

Bling Those Shoes - Part 2


In April I shared with you about the darling Anne Michelle shoes I scored for only $5.00, while I was on vacation in Pismo Beach, which I planned to cover with crystal gems (inspired by the blog New Dress A Day).  I worked on them right away but did not get very far, it takes a really, really long time to hand glue each stone on one by one, what was I thinking?!  After several attempts I put them aside frustrated because it was taking forever just to get a couple of rows done at a time.  I finally got tired of constantly dusting the shoes and moving them all around the studio to keep from damaging them so I picked them up, put the shoes on my work counter and started gluing on the stones.  The hardest part was trying to decide what pattern I was going to make, I originally wanted to cover the whole heel but got discouraged part way though so I switched it up and only covered the hefty part of the heel then I ran stones down the center with spaces between them. Once that was done I placed three of the smallest gems down the center of the bow on the front of the shoe giving it some bling, why should the heels get all the attention, very cute.  Here is my progress from start to finish.

I turned the shoe upside down so I would not get glue all over the outside as I handled it. I used Krazy Glue because I did not want the stones to fall off if the shoes ever got worn.  The smallest stones were hard to handle so I used bent nosed tweezers to pick them up and dip them into the glue then placed the gems onto the shoes.

I kept getting glue and finger prints all over the shoes so I pulled an old soft sock over the shoes which kept them clean and from moving around all over my work counter.

This photo shows my first finished shoes with tiny spaces between the gems running down the high heel of the shoe.  I was not completely happy with the look of the heels, I let them sit for a while trying to decide what to do next.  I love the three stones on the little bows, I could have gone crazy with the crystals and covered the whole thing which is what I intended to do originally, but I thought I should just keep it simple, at least for now.

After looking at the shoes for awhile the spaces kept bugging me, I finally decided to add the smallest crystal gems in the package to see if I would like that look any better.  It is somewhat more pleasing to the eye but I cannot say I am in love with the final product.  I think these shoes will remain a work in progress; I will probably end up covering the entire heel and bow with crystals on each shoe, which was my original plan for over the top bling, just like the designers are showing this season.

Thanks for letting me share my newest bling project with you; I hope to get back to a few more bling projects throughout the summer months, I miss all that sparkle.
See you soon.

Laurette

If you enjoyed reading this post you might also like:

Bling Those Shoes - Part 1
Black and White Bling - 2011
A Bit of Bling - 2011
Buttons Bows & Bling - 2011


Wednesday, April 11, 2012

Bling Those Shoes - Part 1

While on vacation I purchased these darling Anne Michelle shoes for an obscenely small amount of money.  Can you guess what I paid for them?  Wait for it…..here it comes….a whopping $5.00!!!  Can you believe it?!?
I was so excited, but not for the usual reasons, I did not buy them to wear, I bought them as project shoes.  Ever since I saw several of the shoes Marisa made over, on her New Dress a Day blog, I have been dying to try bedazzling some bling on a pair of stiletto shoes of my own.  I just needed to find a pair with a reasonable price tag, just in case I messed them up.  Even though my knees will no longer let me wear high heals like that, I still love the look and the endless creative possibilities.  I think I may have found a use for all those lonely stilettos stashed in the back of my closet.


I adore the shiny black of the shoes and the darling bows but I feel the bow and high heals could use that certain something extra……a substantial amount of bling should do it.

could not wait to get started; I purchased two boxes of crystal gems, one for each shoe, right after buying the shoes.  After looking at the amount of gems used on Marisa’s tutorial I knew one box was not going to cut it, I am not sure two will do it either, I guess I will just have to see how far I can get with one box each, I have to start somewhere.  I will let you know how it all comes out once I finish the project.  I’ll bet you thought I was going to show you the finished shoe, not just yet.

Thanks for letting me share my cute new project with you, watch for part 2 to see my completed bedazzled shoes, coming your way in the very near future.

(I apologize for the strange multiple font sizes in one of the paragraphs, the blog program seems to have some kind of glitch going on I cannot figure out how to fix.)

See you soon, Laurette

If you enjoyed reading this post you might also enjoy:


A Bit of Bling – 2011
Black & White Bling – 2011

Friday, November 18, 2011

A Bit of Bling

As you know bling is my thing, having said that, it does not mean everything is covered in gold, silver or rhinestones.  In fact I have very little of it in my own home, something I intend to remedy in a tasteful, limited way.  I decided to start small with little items in my studio and bedroom.  I began the search for things I could add some sparkle to and found a few, here is what I did.

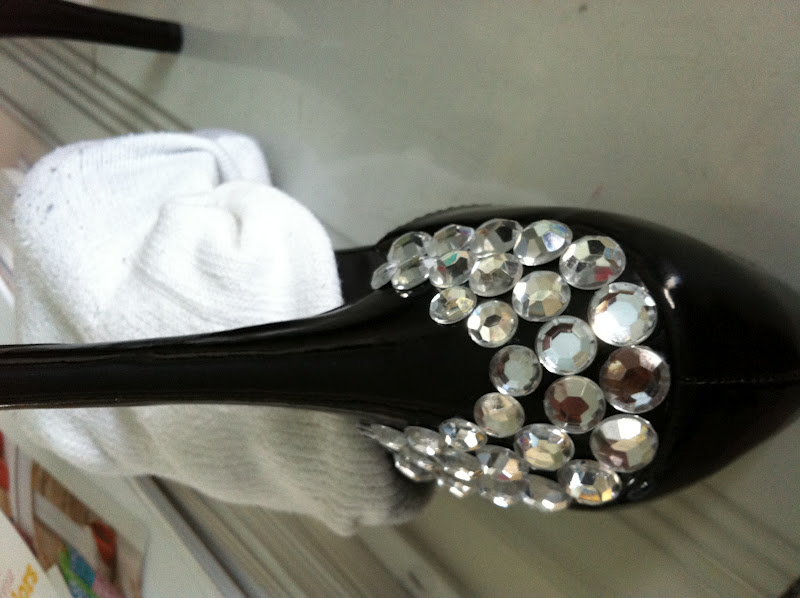
Recently my daughter gave me a very cute black stiletto tape dispenser, I loved it, and I put it on my work counter where it sat for sometime.  It was cute but lacking something, sparkle, a bit of bling, what could I do to glam it up?


Inspiration struck, why not put some crystals on it, some shoe bling just like designer shoes have.  I went right to Michael's to get some princess stick on crystals.  The actual inspiration came from a blog I look at daily, A Dress A Day.  The host did a copy of a Christian Loubouton shoe using silly plastic eyes to cover the whole shoe, just like the designer did.  Since I love sparkle I chose crystals instead and left some of the black shoe showing for better impact.  Very fun looking; it sparkles whenever I turn the lights on.


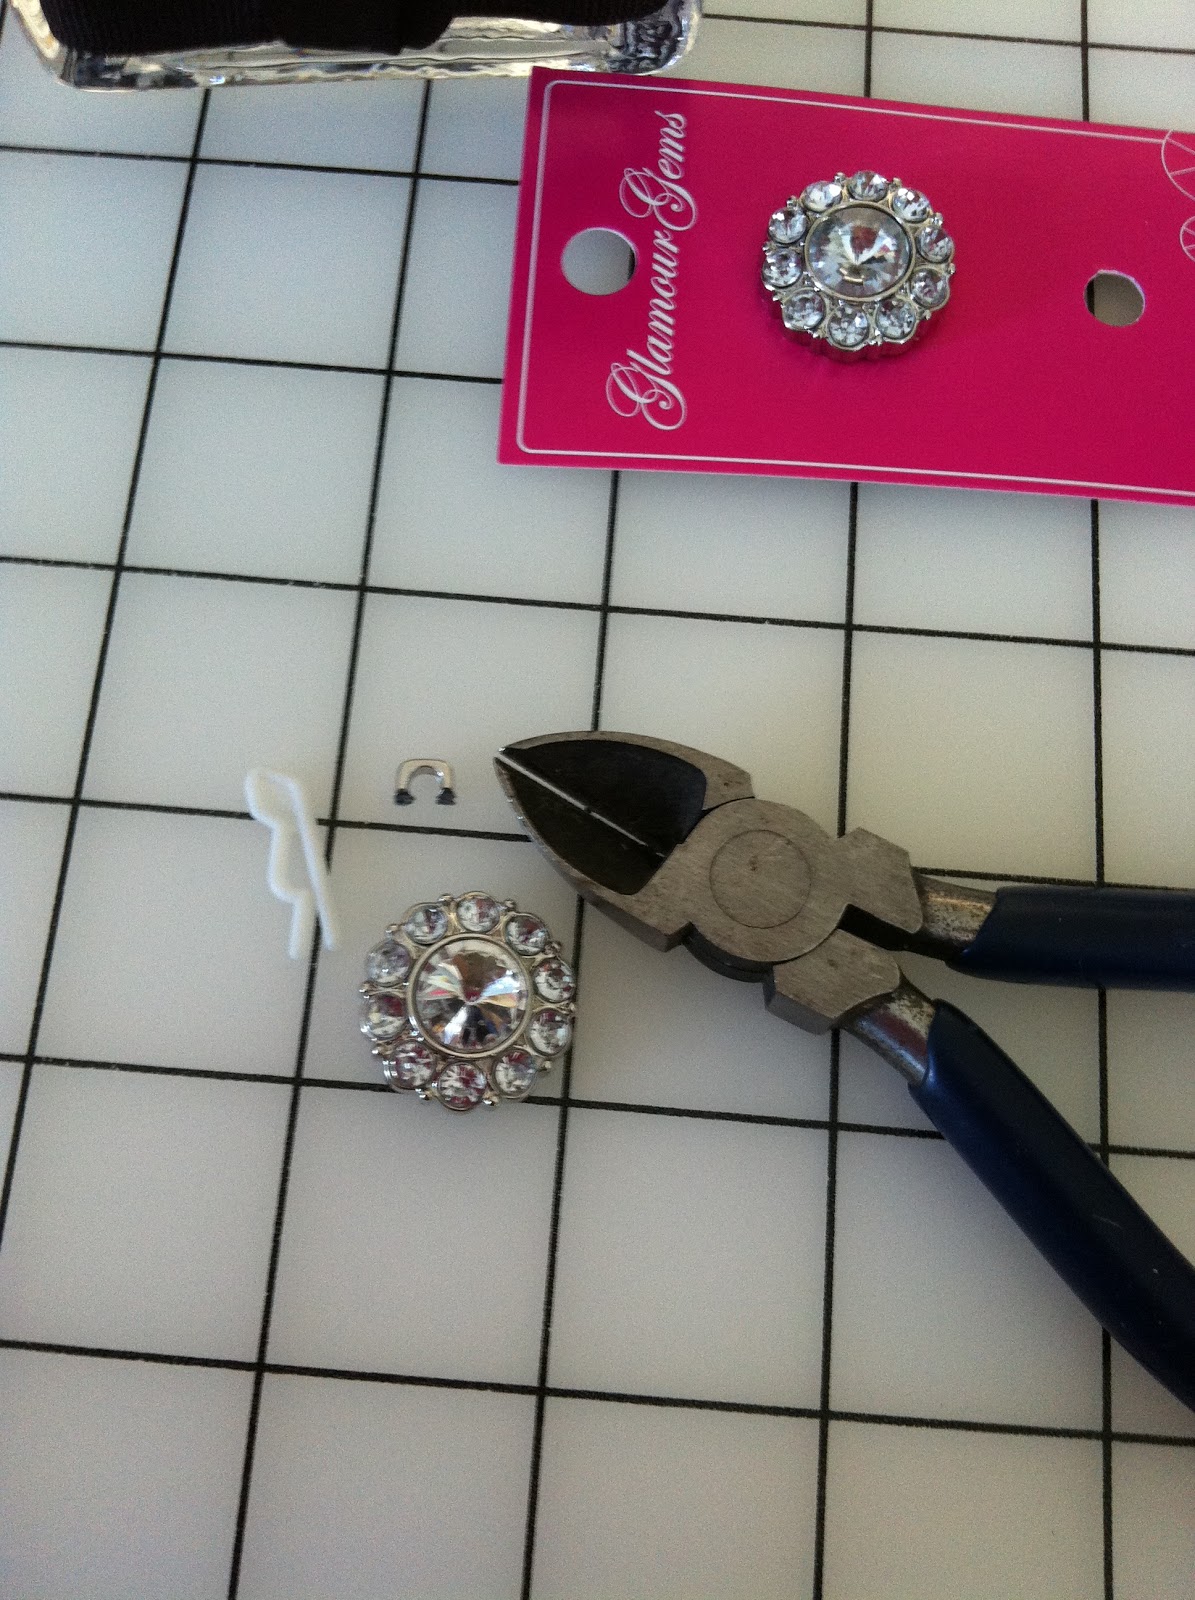
Next up were two pretty, heavy, glass containers with large black bows on them, they were from my Son’s wedding and the containers originally held small rose buds.  I have a dozen containers and could not figure out what to do to with all of them. I pulled out my glue gun, cutters and some glamour gem buttons and went to work.  I cut off the button shanks so I would have a flat surface to apply my hot glue to.

I hot glued a button to the center of each bow giving them some really elegant sparkle.  Now I use these little glass containers as candle holders and as storage for little bits and pieces while working on projects, what a pretty way to work.


As I looked around I spotted the black & white lampshade with the big black bow, I featured in my Black & White Bling post.  As much as I loved that lampshade, it was missing that special something.  Out came the gems and the glue gun, this time I added two buttons to the bow to give it more glamour.  Now it had the elegant sparkle I was looking for.

I am crazy about decorator pillows and have a great time making them myself.  This little pillow was made from polka dot fabric and ribbons and a pre-printed fashion fabric panel.  The pillow came out great but still felt a bit plain so I added some pretty crystals to give it bit of flare.  All these little projects helped to add small amounts of light to my studio, after all it is winter and the days are getting darker with all the cloud cover, every bit of light helps.


Last but not least, was a new faux-fur leopard pillow with an iridescent chocolate brown, silk backing, which I made in under an hour.  I added an elegant crystal pendant to the middle of the fur side of the pillow and covered a button in fur for the back side of the pillow. The pillow came out absolutely gorgeous, I made it for the center of my king size bed.  Every girl needs a little leopard faux-fur in her bedroom, adding a stunning fur pillow to the bed was just the right amount of glamour without going over the top.

There were a number of other small studio projects I completed but I decided to save those for a future post.  Since I will be adding more glamour to my master bedroom I will share the rest of the bedroom projects with you as I go along.  Look for those after the holidays sometime in January, unless I get the bug to do it as a New Years makeover, something like; New Year New Bedroom.  You never know, watch for it.  Thanks for letting me share my creative ventures from my studio.  See you soon.

Watch for:  Christmas Stockings for Charity and Elegant Elements, coming next week.


If you liked this post also look for past posts;
Black & White Bling
Pumpkin Bling
Holiday Sparkle
Buttons, Bows & Bling

Where to buy:
For crystals and pendants
Michael's
Glam Gem Buttons:
JOANN Fabrics


Monday, October 10, 2011

Black & White Bling

I have been asked how I chose the name of my blog and business, what was my inspiration? It was obvious from what I do, I use buttons and bows in my sewing, decorating and crafting so it was a natural choice. But where did the bling come from? My answer to that question is an easy one, it came from all the pretty things in my studio.

When I started the re-design for my very first studio I decided on a black and white theme with green and pink accents. I wanted something to reflect the various icons of the fashion industry; like purses, shoes, pictures of couture garments and lots of shiny things. That studio was such a fun and inspiring space to work, everything had a place; it was organized and beautiful to look at. I worked in the updated version of my studio for about two years until we sold it and bought a new home. My studios since then followed along the same themes featuring black and white fabrics, fashion icons and accessories which have a bit of bling.

For my pop of color, this time, I used two tones of an icy blue on the walls and touches of hot pink as minor accessories throughout the room, very feminine and elegant. My newest studio is still a work in progress as I fine tune the furniture and cabinet layouts. Many of the accessories from the last two studios don’t work well in my new space, not enough walls and two extra windows, giving me less space for all my pretty pieces which give it the bling. I am working on new ways to bring it in without making the space seem small and cluttered.

Here is some of the pretty bling I did manage to bring into my studio so far.


This beautiful little piece was a birthday gift from my daughter; it hangs in the center of my studio surrounded by a black ceiling medallion, which I painted and hung.

These trios of candles are decorated with a black velvet flocked print on the glass; the insides of the candles have pretty sparkles embedded in the wax. Very elegant and just the right amount of bling.

These three little dress forms sit on a black floating shelf above my sewing counter, very fun to look at.

Just a few of the couture dress forms and miniature designer shoes I collect. Aren’t they pretty.

I have several of these black and white lamps around my studio both in the floor lamp and desk styles. I added a big black bow around the barrel shade, which my new daughter-in-law made for me. The bow was originally wrapped around a pretty box decorated with couture dresses and shoes. A great way to re-purpose your special ribbons.

This is a photograph of my Mom who is modeling a beautiful 1950’s black velvet dress with white satin ruffles at the neckline. She is also draped in white fur (Fur was not an issue then) and wearing black velvet shoes. Truly an elegant ensemble. She did a lot of modeling in the 50’s and 60’s, but this is my favorite picture of her, it sits above my long sewing counter so I can see her as I sew.

These original sewing patterns belonged to my Grandmother, they were given to me when she passed away along with a big box of fabrics. I mounted them on black and white print papers and placed them in black frames. The original pattern pieces and instructions are still inside the pattern covers and can be accessed at any time for future use. A handy way to preserve the patterns but still be able to see and use them.

Just a few of the pretty little things in my studio which inspire the bling in my work and my blog. I hope you enjoyed this little peak into my creative life. Someday soon when I get my studio just right I will post those pictures for you to see.

On a side note; for those of you tracking the adventures of the computer crash, I am still working on my little notebook computer while trying to learn Windows 7 and getting my new laptop set up. Such a process for someone who was stuck in the dark ages just a few months ago.


Just got the call….my IT people were able to retrieve all my data and photos, I will get a disk with all of it back tomorrow, I saved and shut it down in time, Yeah!!!! Woohoo!!! I am a very happy gal.

Thanks for following along with me today, look for my next post, hopefully on my new laptop, see you soon.

Where I bought it:

Lamps & Picture frames - Target


Sunday, October 9, 2011

An Adventure

An Adventure

As I shopped for a new laptop I realized it was a lot like buying a new car, kind of stressful. Different models had different features, no one computer seemed to have it all, each one seemed to be missing some component I needed. It took going to the store I should have started with, not the last one I shopped in, before I finally bought one. A little voice kept saying, “go to the Sony Outlet Store”, where I purchased the last one. Did I listen, no, I ignored my little voice (women’s intuition) telling it to be quiet, we needed to shop around and look at all the laptops recommended to me by the “experts”. After much time spent on the internet, talking with my IT techs and three stores later, I still ended up at the Sony store. Why didn’t I listen and just go there instead of wasting a whole day? I could have been fabric or shoe shopping! The laptop I chose was the up to date version of the one which crashed on Friday, it has all the features I needed and wanted, finally. I guess I am just one of those Loyal Lindas who like to stick with what works best for her no matter what the newest in technology is. I had my laptop for over seven years so I know the brand and service is good. Let’s hope I am right and this one lasts me just as long or at least more then a couple of years. I will no longer be chasing the new technology with a very slow computer, I am now like everyone else flying through the internet at warp speeds. Look out world here I come! Woohoo!!

A couple of side notes:

I still don’t know if my pictures and data can be saved, I won’t know until Monday or Tuesday (still biting my nails, bad for my manicure, very naughty).

Finally, once I get all my programs and data loaded I will be back to sharing all kinds of fun projects and other goodies with you on a regular basis. I have high hopes for Monday or Tuesday.
Some of my future posts will include; Fall decorating part 2, Cut that Clutter part 3, Guest room makeover including all the DIY projects which went into it, some DIY and sewing tutorials, lots more bling and so much more. Look for me, I will be back with fun and photos, see you soon.
Related Posts Plugin for WordPress, Blogger...