It looks like I have run into photo storage problems with Google which will not allow me to download photos from my files into the blogger program so I can share them with you. I am not sure if there is a resolution to this problem, if not, I will not be able to continue using Blogspot for my blog hosting site and I will have to wait until the new year to see what can be done to transfer it to a new site, not sure how that works. What a total pain in the behind!!!! Sooo.... I won't be able to share the toy room reveal or the Apron a Day series, or all the holiday projects I had planned.
In case this cannot be resolved:
I wish each and everyone of you a Very Happy Holidays and a Wonderful New Year!!!!
I hope to see you then!!! Look for me on the web in 2013!!!
Hugs,
Laurette

Sunday, November 25, 2012
Saturday, November 10, 2012
Apron A Day # 3

Today’s spiffy little number
is a black, white and yellow double ruffle, waist tie apron. I made this one of a kind apron for someone very
special but I did not give it to her because she changed her kitchen décor when
she moved away, all before I could present her with her gift.


The apron has a French
Country feel in the colors, double ruffles, black and white bow at the hem and the
antique buttons sewn just in front of the ties in the back. The pattern was one of my designs and the
retro buttons came from my long time button collection. I hope to someday give it to that special
young lady once she moves again and decides on her new kitchen colors, fingers
crossed, if not I may just put it up for sale.
Thanks for letting me share
apron #3, I hope you are feeling inspired to make some aprons of your own for
the up coming holidays. There are more aprons in the series I want to share
with you, the toy rooms reveal and plenty of holiday gifts and decorations so keep
reading, you don’t want to miss all the fun.
See you soon.
Laurette
You might also like:

Apron A Day Series - # 1
& # 2
Thursday, November 8, 2012
Flowers In Pumpkins

Thanksgiving is on the way
and I am way behind getting my decorations completed. I decorate for fall, then Halloween and
finally Thanksgiving which is usually last on my list for making new
decorations. This year after looking at
so many beautiful fall decorations on Pinterest I decided to give a few of the
ideas a try using the inspiration not the exact craft. I wanted some fresh fall flowers to decorate
my porch giving it a pop of color, but as I found out the hard way, the sun
beats down on the porch from sun up to late into the afternoon killing any kind
of plant or flower I put there. I really
wanted fresh flowers and real pumpkins for that space but I was going to have
to settle for faux pumpkins and silk flowers if I wanted the look and color I
saw in those photos.

I gathered up some of my fall
craft supplies and went to work. The first thing I did was to ask my husband to
carve up the pumpkins by using a hot knife to cut the top open so I could
insert the flowers and greens. He went through a couple of blades and some
muscle to carve out the tops, once that was done the rest was a breeze. I think they came out just great and will add
just the right amount of color; drawing all eyes to that small but useful
space.

Look how bright and cheerful
the oranges, reds, yellows and greens look against the tan walls and black rod
iron. They also look really lovely with
the red front door, very eye catching, just the look I was going for even if I
could not use the real thing.
Thanks for letting me share
my pretty fall flower decorations with you, I hope they inspire you to make
some new decorations for your porch, front door or yard to give your curb
appeal a boost. I still have a decoration
or two to finish up for Thanksgiving, I am not sure if I will have enough time
to finish them with everything else I am working on, only time will tell.
Coming soon are more aprons from the series and the toy room reveal, keep
watching for those.
See you soon.
Laurette
You might also like:

Falling In Love With Fall
Fall Windowpane Quilt
Monday, November 5, 2012
Toy Room Makeover Projects
We have been working like
crazy to finish our projects for the toy room and we are almost done. I was
going to break down each project into individual posts but time is flying and I
am afraid I will not have time to show them all to you so I am going to bunch
up a couple of them with just one more final reveal post with the before and
after photos. The holidays are
approaching fast and I always have gift making projects and decorating projects
and event projects….. Oh my, I better get busy and get this one finished so I
can move on. Today’s projects are; the
cushions for the benches, the wall mural and the curtains. This is going to be a long one, a triple
post, so grab your coffee, sit back and enjoy!

We needed some kind of
padding for the benches in the play area so I took a page from the iheart organizing
blog, which is where I got the inspiration and how to directions for the toy
room project. I think Jen’s blog is one
of my all time favorite blogs; you really have to check it out at: iheartorganizing.blogspot.com.

The first thing we did was to
cut the 2” foam to size, Joann’s cut the foam to the right length but we had to
cut down the width to fit the top of the benches, my husband used a turkey
carving knife, cuts it like butter. Once the foam was the right size I cut the
fabric to fit the foam. I could have sewn cushions but time is an issue so I
decided to make it Jen’s way which is super easy and very quick, anyone can do
it.


Step two was cutting some MDF
to fit the foam; my husband did that for me as well, what a handy guy he
is. The MDF was placed on top of the
foam ready for the final step.

For the final step I pulled
up the sides of the fabric turned under the edges and used the staple gun to
tack the fabric to the boards folding the ends like gift wrapping a package,
all done, nice and neat and ready to place on the benches. For detailed instructions you can go to Jen’s
blog and see what she did, her playroom makeover is just fantastic.

Up next was the wall mural, I
debated where it should go in the room, I was thinking of adding it to the one
I already started on the closet but decided to put it on the wall I originally
planned it for. Even though I could have painted one on the wall, again time
was an issue so I went with peel and stick wall decals I got at Target; they
were in my color theme and just the right size.
I would not have to paint over it if I decided to makeover the room
later down the road.


I chose the only wall large
enough to work with right above one of the benches creating a nice focal point,
the other bench sits under the window, no room there. There were a lot of
pieces to the tree and no instructions; thank goodness there was a very
detailed photo. It did take longer then
I thought trying to match up the pieces with the photo and as usual several
pieces were not there in the correct sizes so I ended up moving things around
to fit better.


The tree came out just as I
saw it in my head and really helps to pull all the pieces in the room together,
everything makes sense now, and I love it!
The photo shows it just above the bench, it looks kind of small in the
picture but the dimensions are 50” (127cm) high by 36” (91.44cm) wide, not
small at all as you will see in the final before and after photos of the
reveal.


Last but certainly not least
are the curtains for the windows. Even though there are white wooden blinds on
the window the room bakes in the sun from September until spring so very heavy
curtains are necessary to keep the heat out until the cold weather sets
in. The 10’x10’ room is the hottest and
the coldest room in the house, it sits on the outside corner wall and gets all
the elements year round. We purchased
the fabric from IKEA; it was a steal at $3.99 a yard for 60” width heavy
printed canvas upholstery fabric, perfect to cut down the heat and cold. I chose a bronze rod to coordinate with the
browns in the fabric and the tree trunk on the wall mural, actually I already
had it in my stash from a previous home, re-purposing at its best. Unfortunately, the curtains are still not
finished, I have one more panel to make they take forever due to the size and
weight of the fabric. The curtain fabric was what I used as the jumping off
point for the color scheme for the whole room; you will see them in the final
reveal. That about wraps up the projects
for the toy room makeover, oops.... I forgot I still have one more very important
painting project left to do. I am not
sure if I will write a post on it or just show it off in the final reveal of
the whole project, I guess you will just have to keep reading to find out.
Thanks for letting me share
my toy room makeover, it has been quite a project and I can not wait to show
you how it all came out. I am not sure how soon that will be since our daughter
and her husband just bought a new home and we are helping them fix it up so
they can move into it next week. There
are lots of projects, cleaning, packing, moving and babysitting my darling
granddaughters which is taking up all my time and energy making it hard to
write more then a quick post or two. I
still have posts of the apron series scheduled to share with you; they are fun
and quick so keep watching for those.
See you soon.
Laurette
You might also like:

Toy Room Makeover – Day 1, 2
& 3
Saturday, November 3, 2012
Apron A Day # 2

Welcome to the Apron A Day
Blog Series, I am happy you are here to check out my next featured apron. I made today’s apron from two matching fat
quarters because I could not find any full yardage in this cute sewing fabric. I wanted an apron to wear during my sewing
classes and this darling fabric had just the right theme with all the sewing
notions pictured on it. The fabric
featured hot pink, red and white so I made the waist band, ties, pocket and hem
trim from some sweet mini heart fabric leftover from another project. The pattern is one of my designs which I
adapted so I could use fat quarters instead of full yardage. My apron cost about $7.00 or less to make;
cute and cost effective too.
Thanks for letting me share
today’s pretty little sewing apron with you. Be sure you look for the next toy
room makeover project in the series; it will be coming right up.
See you soon.
Laurette
You might also like:

Apron A Day - # 1 (The story
behind the series)
Friday, November 2, 2012
Apron A Day Series - # 1
Here it is, the apron series
I have been talking about for a couple of weeks, I will be sharing aprons I
made over the years some of which are now considered vintage by today’s
standards. In addition I will be sharing
some of the aprons my mom designed and made for me as gifts. If you have been following me for a while you
know my mother was a master seamstress who made her living from the things she
designed, stitched and sold at craft shows and other venues, she is my true
inspiration every single day. I grew up working the shows with her and
eventually we both designed and sold our products together, sometimes I don’t
even remember who designed what since we traded patterns back and forth
regularly. I have most of those patterns,
her sewing notions and some of her fabric, the rest was divided up among my two
sisters who also sew and crochet. I
think of her everyday when go into my studio to work, I really feel her looking
over my shoulder, especially when I pull out some of her notions, fabric and
patterns to begin a project. My mother wore an apron everyday of her life
whenever she cooked a meal or cleaned the house to protect her clothing from
stains. Because of her strong influence I grew up with a fascination for aprons
both in wearing one when I cook, clean or work on messy craft projects and with
collecting and making them. I have
books, patterns and a good size stash of fabrics set aside just for apron
making, I am obsessed. I dedicate this
series to my mom who passed away from breast cancer fourteen years ago this
month, this one is for you mom.


I added a loop in the back so
a light weight hand towel could be hung there for easy clean up, no more
searching for a clean towel. This pretty
little apron only took a couple of hours to make from start to finish, quick
and easy with great results.
Thanks for letting me share
the first apron from my new series, I hope it inspires you to start sewing and
wearing aprons by the time the series is done.
For those of you who are not in love with aprons, like I am, there will
be several new projects inserted in between the apron posts, for example, I have
some Thanksgiving craft projects and more photos of the toy room makeover
projects so keep checking in to see what is on tap for the day. There will be a
lot of creativity going on in the studio during the next couple of months as
the holidays approach, I hope the projects on my blog will be a hub of creative
inspiration for all of you so keep reading, get out those glue guns, paints and
sewing machines and get busy with me.
See you soon.
Laurette
Wednesday, October 31, 2012
Happy Halloween

For those of you who
celebrate Halloween, I hope you had a safe and fun day and night. I got to spend it with my two granddaughters
who went trick or treating in my neighborhood, it was fun to see them all
dressed up as a cheerleader for the oldest and Tigger for the little one. Not many kids came by so the lights
went off early and here I am writing to all of you. Halloween is over for me,
after a quick clean up of the decorations I will move onto Thanksgiving
decorating and a few projects for that holiday, which I will be sharing with
you as I get them done.
It has been quite an
adventure getting back to normal after being gone for ten days, so much to do
to get laundry, bills and all the rest caught up so I can go back to my normal
day to day life. I have a lot of
projects to share with you, I just need to have the time to sit down and post
it all. First up is the Apron A Day series
which should appear in a day or so, I will be sharing other projects in between
so I won’t actually be showing you apron projects every single day but pretty
close to it which means if I can do it right you will see a post a day, at
least that’s the plan. The photo shoot
for all those aprons is completed, I just have to do the writing, easier said
then done but I will give it my best shot. I will also have more toy room projects to post in between all the rest of the other projects. Yikes!!! I better get writing!

I made this little witch doll
many years ago when I was making and selling every kind of theme fabric doll
imaginable. She is one of my original designs, who knows maybe I will start
making them again; everything comes around if you wait long enough.
Thanks for letting me share
my posting schedule with you, I felt it was important to let you in on the
plans for the next few posts and what to expect.
See you soon,
Laurette
Wednesday, October 24, 2012
He Has Arrived

That special day we have been
waiting for finally arrived on Monday morning, October 22, 2012 at 3:00 am. Our
first grandson was born in Anaheim , Southern California via emergency c-section; he was 7 lbs, 12 oz and 19” long, his name is Parker. Unfortunately we were not there when he
was born but we did manage to arrive several hours later. We live about 6-8 hours away depending on
traffic and how many stops we needed to make, we left at 5:30 am and arrived
around 12:30 pm. My husband and I started packing and getting the house ready
when we got the call Sunday evening, we packed all night getting only about an
hour of sleep then hopped in the car and started our journey, staying up about
36 hours before we were able to go to sleep.
You know what, we are not young anymore and 36 hours is a long time to
go without any sleep but really worth it to be able to see and hold our darling
new grand baby not long after he was born.
We truly cherish those first hours of our grandchildren’s lives when we
get to really bond with them which makes for a very special life long
relationship.

Because it was an emergency
trip several things got all messed up or forgotten, one of them being my
pre-scheduled blog posts of the Apron A Day Series. I was not able to set them up like I planned
to so I can not share them with you while I am away, oh well; I guess they will
wait until I get home again. I think I
will be back on track again late next week after I get home and unpacked. We planned to stay for about ten days but we
could not find an extended stay hotel due to some huge convention which hits
town this Friday booking up all the rooms anywhere close to our son’s condo. We
managed to find a hotel across the street from Disneyland
for a few nights, what a great area with tons of places to shop and eat so we
will stay until we have to move out on Friday, after that who knows. Anyway… we are thrilled to be here spending
time with our son and his new little family for as long as we can.

Thanks for letting me share
the joy we are experiencing with all of you; things will be back to normal very
soon, keep watching for the Apron A Day Series and more of the toy room
makeover projects, lots of those coming up.
See you soon.
Laurette
Sunday, October 21, 2012
Day 3 - Toy Room Makeover
Day three was all about
bringing the toys back into the room which were in there before and pulling out
the rest of the toys from storage to see if we had enough room for everything.
I must say I had a really good time playing with all the fabric bins moving
them around and changing them up over and over trying for a pleasing look to go
with the rest of the soft goods going into the room later.

I had a wonderful time
sorting toys for the large bookcase; I wanted all the dolls, Barbie dolls,
clothing, dishes and books for my 6 year old granddaughter up on the top two
shelves and all the toddler toys on the bottom two shelves and in the fabric
baskets under the two benches for easy access.

I placed all the art supplies
up on a high shelf, out of reach for little hands, so they could be used for
supervised project/art time, meaning no crayons or paint on the walls when we
were not looking. All the special puppets and antique toys were placed on the
highest shelf for easy admiration and to add a pop of color, taking your eyes
up making the ceiling look higher then it actually is.


More toddler and infant toys
were placed in baskets and shelves under the bench so the little ones could pull
them out and onto the floor, great for easy clean up too. The light weight fabric boxes can be easily
transported around the room or downstairs when needed. Two car track carpets were placed in front of
the benches for color, added softness and lots of creative/fun playtime.


There are still several more
items to go into the room which are full blown projects. You are probably wondering what else I could
possibly put in there? I am giving you a
few hints with the above photos but I won’t tell you what they go with, you
will just have to keep checking in to see what I am up to next.
Thanks for letting me share
day 3 of the toy room makeover, the rest of the makeover series will not happen
until after our grandson is born and we are back from southern California
See you soon.
Laurette
You might also like:

Toy Room Makeover – Day 1
Toy Room Makeover – Day 2
Saturday, October 20, 2012
Toy Room Makeover - Day 2
Day 2 was all about putting
together the bookcase/bench units we purchased at IKEA several weeks ago. We purchased two single IKEA EXPEDIT
bookcases which could be used in a number of different configurations; ours
would be turned on their sides to create very sturdy benches for the adults to
sit on while they played with the kids.
Several shoppers at IKEA tested them out with us to make sure they would
be safe to sit on, it was lots of fun. That place is a mad house on the weekends,
don’t ever go there then, go during the week, totally a crazy but fun
experience I would not repeat anytime soon.


These wonderful EXPEDIT
bookcases came in very heavy six foot long boxes. They are the build it yourself style
furniture using wooden pegs and an Allen wrench. I must say they are very well
built, the pieces are substantial and everything lines up perfectly unlike some
of the other build it yourself furniture out there, my husband was impressed
with the easy installation of the pieces.

The first two single
bookcases went together pretty quickly and before we knew it we had our two
corner bench pieces ready to put into place.
Don’t they look great, sturdy too!
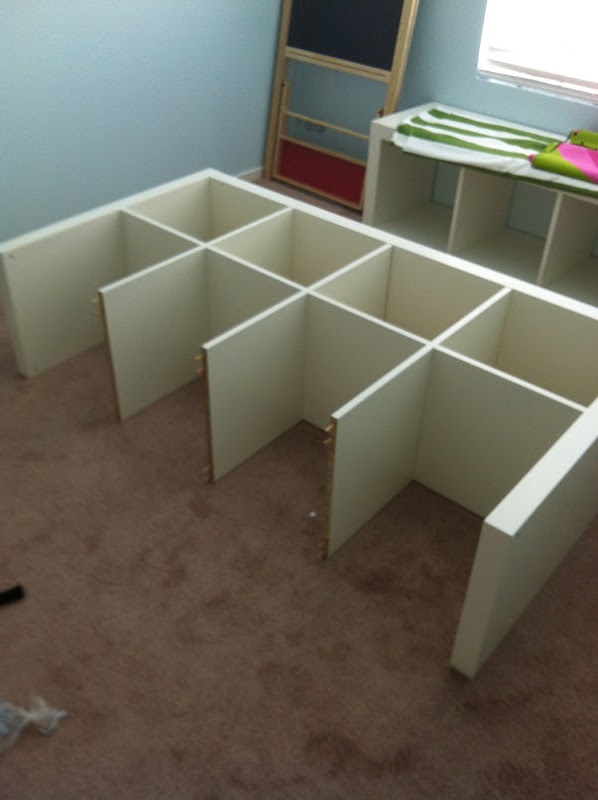

Up next were the double
bookcases which we planned to put on each side of an existing bookcase we
already own and planned to use in the room once it was given a new paint
color. The double bookcases went
together the same way just taking a bit longer with double the pieces.


Once we had the bookcases
assembled they were much bigger then we thought they would be in width but not
as tall as we needed to keep little hands out of the big girl toys they were
not ready to play with yet. What to do????
We tried several different configurations but ultimately ended up
turning them on their sides and stacking them to gain about four inches in
height, which should do the trick. The
bottom two rows are for the toddlers and the top two rows for the 6 year old,
an even split. We had to leave out our
existing bookcase and send it to storage for the time being, one less project
to paint.

Thanks for letting me share
day 2 of our toy room makeover, day three is the beginning of the fun part,
decorating the room. There will also be sewing projects and painting projects
some of which will have to wait until we return, after our new grandson is
born.
See you soon.
Laurette
You might also like:

Toy Room Makeover – Day 1
Thursday, October 18, 2012
Toy Room Makeover - Day 1
My husband and I recently
decided to turn our very small 5th bedroom into a dedicated
playroom/toy room for our three grandchildren.
So much of our home is not particularly child friendly since just the
two of us live here, hence the need for a really safe place for the grandchildren
to play. The room has been moved around
and been several things in the last two years, I planned to make it into a
beautiful boutique style closet for all my clothing and accessories but we felt
for now we needed the playroom more. Oh
well they won’t be small forever and we designed the movable elements in such
a way as to be able to use the storage in my boutique closet later. Come along
with us on our journey to creating a very cool kid space, here is what we did.


I really detested the wall
color and finish on the walls in that tiny little room every time I walked in
there. The color was painted a
dirty/pinkish beige with very splotchy textured walls which was applied to
cover up a ton of damage and stains, not something we did it was that way when
we moved in. No matter what I did to the room to brighten it up with colorful
fabrics, toys and furniture it just looked awful.


I am not sure we can do
justice to the mess the walls were in with these photos but I gave it a
try. The first thing we did was to take
sanding blocks and try to sand down the really rough patches, we found if we
went to far the damage and stains started to appear so we could only sand the
top layer without getting into re-plastering all four walls, Yikes! That particular part of the project was a
long one because we had to brush down the walls afterwards and vacuum twice. We
were smart enough to move everything out of the room first. Once the room was prepped with blue painters
tape we began the real work of cutting in around the baseboards and corners, a
long process; once that was done, out came the rollers. My husband also painted the ceiling which
really created a light bright room, the walls are not as smooth as we wanted
but we did the best job we could taking into consideration the past damage. With
art work, a mural, furniture and curtains not much wall should be showing
anyway.
Can you guess what color we
chose for the room, we asked my oldest granddaughter what color she wanted to
see in there, pale yellow or a light blue? She chose an icy blue to go with all the
other fabrics for the curtains, pillows, bench cushions and furniture we were adding
to the color scheme.


I could not get a good photo
of the room color just yet but you will see it as we work on it day by day,
sorry about that. Not much color in this post, I can guarantee there is plenty
of it in all the rest of the posts to come.
Thanks for letting me share
day one of our toy room makeover; furniture construction is up next, what a
difference those pieces made to an empty space.
See you very soon.
Laurette
I am sorry for the strange font sizes in the pint, sometimes the blogger program goes bonkers on me and there is little I can do to change it without erasing the whole thing. Yikes!****
Subscribe to:
Posts (Atom)