Showing posts with label paint projects. Show all posts

Monday, October 8, 2012

Flowing T-Shirt Vest


I am sorry I have been away from my blog for a little bit, I have been dealing with some medical issues and unable to sit and write at my computer.  Things are still not resolved so today’s post will be a relatively short one with more photos then verbiage.  As most of you know I really enjoy recycling old or unused clothing into newer trendy garments, today I am going to share with you how I took a large men’s t-shirt and made it into a flowing vest I can wear with my turtleneck sweaters this winter.


Can you believe this softly draping vest was made with a regular size large men’s cotton knit shirt? It was so simple it only took about 10 minutes to make without using a sewing machine, anyone can make one of these.  Here’s how I did it.


The first thing I did was to cut up the sides along the seam lines using sharp scissors.  Next I cut around the sleeves removing them completely. Be sure you cut off all the old stitching leaving nice clean edges all around. Last but not least I trimmed around the neck starting at the shoulder, don’t make too big of an opening at first, I had to re-cut mine a little bigger so it would fit around my neck and back, if you cut it too large you may be stuck with a baggy fitting vest.


The back view shows two seams which are the old shoulder seams on the t-shirt, one around the neck and one at the middle of the back or lower depending on how tall you are. The opening is what use to be the neck of the shirt, you basically wear it sideways.  For those of you who are visual you can watch a video clip of how to make one on www.wobisobi.blogspot.com which is what I did before making one myself.  This soft vest was so fun and quick to make I plan to make another one in dark grey to wear this winter, I pilfered the green one from my husband’s collection, with his permission.

Thanks for letting me share my flowing t-shirt vest with you; I hope it inspires you to make some recycled clothing of your own.

Now for some news; we have taken on a new project which will last about a month; we are completely revamping our old toy room. It has been moved around and switched up several times since we moved in, after much thinking and debate over what we want to do with that room we have decided to make it into a permanent playroom for all the grandchildren. There will be several sewing projects, furniture painting and building, a new paint color for the walls and plenty of decorating, all of which I plan to share with you as we go along.  Our goal for the finished room is to have it completed and ready to play in by Thanksgiving, think we can do it??  I hope so or the kids will be driving us all nuts when they have no room to play after dinner.  Keep checking in to see how we do. 

Side note:  Our new grandson is due to arrive anytime now, if I am absent for a while from my blog it will be because we have gone to Los Angeles, California for his birth. (We are both so excited we can not wait to hold him.)  I may ask a guest blogger to take over and share photos of the baby with you or share some of her creative blog posts; we will see what her busy schedule allows.  Until then I will try to post at least once a week depending on how my health is doing and when the baby arrives.  Keep us in your thoughts.
See you very soon.

Laurette
Monday, June 4, 2012

Time For Lime


I finally got to work on one of the painting projects I have been trying to get completed the last couple of weeks, re-painting my rusted and faded patio plant stands.  The projects were simple but took a bit of prep time since I needed to sweep and vacuum my outdoor studio floors to reduce any dust and dirt before breaking out the paints.  Because my outside studio cats sleep there at night and during bad weather the cat hair can really mount up no matter how much I clean, it can be a real chore to get it ready for painting. Once the clean up was complete, down went the brown craft paper secured with blue painters tape, to protect the floors from too much over-spray, time to get to work making over my plant stands.


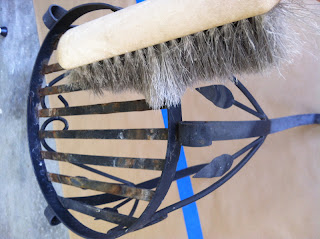
This little number was originally a vibrant deep black color which had faded and rusted over the last couple of years.  Time for a good cleaning with a soft brush and a soft cloth to remove dust, dirt and those pesky spider webs.

In order to get the paint to stick to the metal and to reduce rust I sanded down all of the metal with a medium grit sanding block to remove the rust and any loose paint which had started to crack and peel.  Roughing up the paint on the rest of the stand allows the paint to adhere to the smooth surface creating a better bond.


This plant stand was in dire need of a new paint job as well; it started out a cute shabby chic antique white but rusted over time.  I re-sprayed it white several times over the years when I had white wicker outdoor furniture on my little front yard patio.  Alas, I no longer have that furniture and my tastes have gone away from shabby chic to something more colorful and fun. The stand received the same cleaning and sanding treatment to make it ready for its new coat of paint.

All set and ready for the new color, Key Lime by RUST-OLEUM, I love using this paint the coverage is fantastic and I rarely get any dripping unless I stay in one spot too long and don’t keep a constant sweeping movement with the spray can.  I chose this color because of the new fabrics I will be using to recover my patio furniture cushions which includes the colors of blues and vibrant greens.

I always turn my pieces upside down and spray the underside first including the inside of the legs.  I let them completely dry before adding a second and or third coat of paint depending on how well it is covering everything.  Once it is all dry I flip them over and spray the top side with several coats until I get full coverage in all the nooks and crannies.  It is best to use light coats each time instead of one heavy coat which will cause an uneven looking surface.


All done and looking fresh and new dressed in their pretty lime coats of paint, what a difference.  These plant stands should be just the bright pop of color I am looking for on the patio to go with the new fabrics.  If I decide I don’t like the color I can always repaint them, I just love spray paint it is so quick and easy to do, another one of those simple changes for the price of a can of spray paint.

Thanks for letting me share my Key Lime painting project with you, I have another paint project to share with you this week, let me give you a hint, it matches my front door.
See you soon.

Laurette

If you enjoyed reading this post you might also like:

The Red Door
Sewing The Blues
Pumpkin Bling - 2011
The Paisley Crazy Room Makeover- 2011


Related Posts Plugin for WordPress, Blogger...