Wednesday, August 21, 2013

Quilted Mug Rug


From the Writers Wall Quilt I had a lot of leftover fabrics due to my little “design opportunity”, I pondered long and hard what I should make to use up some of my scraps.  I looked at a ton of ideas I pinned onto my Pinterest boards and came up with the idea of making a quilted mug rug.  What is a mug rug you ask?  Well… it is larger then a drink coaster and smaller then a placemat and usually heat proof, primarily used for a drink and a small snack plate or anything else which fits on the small surface.  I looked for tutorials or patterns but really did not find one which gave me dimensions or instructions, as usual I made up my own pattern and inserted Insul-Bright to protect surfaces from hot and cold drinks and foods.

I still had more leftover fabrics so I made a couple of coffee cup cozy’s which came out pretty cute.  I lined those with Insul-Bright as well to keep in the hot and cold.  I did not take a photo of one wrapped around a coffee cup but you get the idea.

Here is the photo of my quilt hanging in my sister’s office and the coffee cozy and mug rug on her desk.  I was really thrilled to see them all in her office, I was absolutely honored she did that.

Thanks for letting me share some of my scrap projects with you today; I hope you got inspired to use up some of your leftover scraps to make some fun gifts.  There are several more sewing projects on the books to share with you so keep an eye out for them.
See you soon.

Laurette


Monday, August 19, 2013

Writers Wall Quilt


I have wanted to share this lovely wall quilt with you for sometime but I just have not been able to show you this project until now.  Sometime ago my oldest sister and I bought a wonderful set of antique looking fabrics when our local quilt shop went out of business.  We had no real idea what we would make out of the fabrics so we bought one of the kits which included wine type prints for me and coordinating fabrics which had typeset and writers words on it for her with the idea of using the same pattern for both quilts. The pattern included in the kit was, Simply…ho! ho! ho! by Me and My Sister Designs, the store sample was made up in the kit fabrics so I knew it was just the ticket for what we wanted to use these stunning fabrics for.

Between the sample photo and the great instructions I had no problems assembling it; however, I highly recommend reading it all the way through at least once to avoid making any mistakes.  I wanted to make a change to the pattern and did not pay close enough attention to part of the instructions and ended up with a re-design part way through to compensate for the miss-cuts.  I was extremely lucky I had enough extra fabric to fix my mistakes creating a “design opportunity” which worked out just fine in the end.


I wanted the wall quilt to be very unique and artsy so I included some embellishments in the center of the quilt and around the edges.  I added my sister’s initials across the bottom and top of the center section using typewriter key brads and stitched on an antique heart, key, ring and button in each section of the middle giving the quilt dimension. 

Thanks for letting me share my Writers Wall Quilt with you, I really love how it came out and my sister was thrilled to receive it, she hung it in her office.  I made a few more projects from the quilt scraps which I also gave to my sister, those are up next.
See you soon.


Laurette
Friday, August 16, 2013

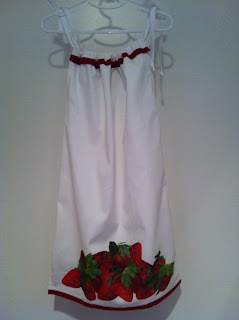
Dishtowel Dresses

I want to share a quick little post with you of the darling dishtowel dresses I made for my two granddaughters.  As most of you know I am always thinking out of the box and looking for ways to give something a whole new use; which is pretty much I what I did with a couple of sweet heavy duty cotton dishtowels I saw at Target on sale.  Since I have to drive two towns over to shop for fabric I try to find other ways to get hold of fabrics I can use to sew with including, sheets, towels, tablecloths, placemats, curtains and shower curtains.  Most of those items have good size yardage I can cut up and use for several projects for very little cost especially if they go on sale or clearance. In the case of the cute dishtowels I saw them on the end cap with the summer accessories and thought they were really adorable but they did not go with my kitchen décor. I began wondering what else I could use them for and immediately thought they would make pretty, durable summer dresses for the girls.  Here is what I did with them.

The first dress I made was for my littlest granddaughter, the pretty hot pink and green was so sweet it looked just like her.  I took some measurements from her then cut off one end of each towel, I used two identical towels.  Next I just stitched up the sides two thirds of the way up leaving the existing side seams and hem intact.  I stitched down around the arm holes and turned down several inches at the top to create a casing to run some ties through.  I cut long strips of double fold bias tape, stitched it down one side and threaded it though the casings on each side and tied it at the shoulders, all done in less then thirty minutes!

I made this darling dress for my oldest grandchild the same way I did the first dress, with the exception of two inch slits on each side seam for easy movement.  I top stitched the slits and under the arms to keep the fabric smooth and fuss free. In hindsight I should have put slits in the toddler dress as well since she is super active and she moves around more then her big sister.  These adorable dresses will become very soft and comfy the more they are worn and washed because they are made of sturdy fabric suited to drying dishes. 

Both girls looked very sweet and summery in their new outfits, I am glad I saw those towels and found a whole new use for them.  Thanks for letting me share my dishtowel dresses with you, I hope you enjoyed another one of my out of the box designs.
See you soon.

Laurette


Thursday, August 8, 2013

New On The Blog

Hello Everyone, just wanted to let you know I have been posting on my other blog some of my projects which do not involve sewing.  I really did not want you to think I quit this blog, I have just been very busy sewing, crafting, painting and decorating without stopping to write about it all as I went. You will start seeing my sewing projects again since there are quite a few of those along with all the rest I have been working on.

First up is my newest obsession, making purses!!!  I just love it, actually I like taking the classes about purse making with my friend and teacher, Sheila.  She has been such a great inspiration, she taught me so many techniques that my confidence is really growing with each bag I make.  This very pretty pink leopard/zebra bag was really fun to make, not a bag I would attempt without a class since it has 16 pockets inside, a magnetic snap and a special hard bag bottom to keep it standing.  The pattern is the Tuscany Tote by Pink Sand Beach Designs, designed by Nancy Green, I just love all their purse patterns.


My new favorite little cutie bag to make is the Runaround Bag by Lazy Girl Designs, designed by Joan Hawley.  This bag actually takes longer to cut out then to stitch up, we made two in two hours, I would have made more but my sewing machine froze up and refused to sew anymore.  I have four more cut out ready to sew up as soon as I get my machine back from the sewing machine hospital, lets hope it just needed cleaning in the places I can not get to and it is not a terminal illness, giggles!!!  Anyway... I can not wait to make more of these darling little bags very soon.

Last but not least is the Laptop Satchel by Vanilla House, designed by Barbara Brunson. I made this satchel without taking a class, kind of a tough one to make, not sure I would do it again, the directions were confusing and I ended up re-writing the pattern to reflect my sewing knowledge.  Some of you may find it just fine to make as is depending on how you were taught to sew.

Thanks for letting me share some of my current sewing projects, there are several more to come in the near future.  Be sure to check out my other blog; Create, Upcycle, Decorate, Organize to see what I have been up to. New on that blog is a post about my office relocation/expansion, part 1.  Head on over now and take a look before I post part 2.
See you soon.

Laurette


Related Posts Plugin for WordPress, Blogger...