Time has just flown by with Sunday being Easter already, I have a project I have been playing around with for the last week or two trying to finish it in time. I know it is kind of late, I decided to share it with you anyway, maybe it will inspire you to create something for next year.
For several years I kept pulling out these wooden eggs with the intention of decorating them in some way, either with paint, fabric or paper and every year they sit on my project counter and end up getting put away unfinished, until the next year comes around when I pull them out again. So silly of me to keep repeating the same thing every year, time to finish another one of those old UFO’s, at least actually start it.
I was determined to actually do something with these beautiful wood eggs, this time I not only retrieved them from the craft closet, I also pulled out an assorted pack of Mod Podge sealers, spring papers, stickers and fabrics (we have progress).
First up were the spring papers, I used some leftover scraps from a card making project I squirreled away for future use. The paper was difficult to work with and quickly broke down when the Mod Podge was brushed on the outside of the paper to seal it. Using Sparkle Mod Podge helped to give it some shine and hide some of the damage to the outside print; it also created a nice hard seal giving it a bit of bling. In hind site I would have cut the paper into smaller pieces and put it on collage style in order to get a smoother finish. I think I would only put enough Mod Podge on the egg to get the paper to stick, then when the paper was dry, go back and cover the whole egg with the sealer instead of doing it all in one step, less damage to the paper (lesson learned).
Since the paper eggs really did not get the desired effect, I moved onto fabric (leftover scraps from cloth dolls) thinking the light weight texture and flow would do better on the smooth wood surface, boy was I ever right. After learning my lesson on the first two eggs, I cut the fabric into small pieces using my pinking shears on some and leaving others ragged or straight for texture and dimension. The process went really well and it was so much easier, not to mention twice as fast. I used a second coat of Sparkle Mod Podge sealer over the first coat to give it a bit of pop.
For those of you who don’t know, Mod Podge acts as a glue and sealer all in one. I bought my multi pack at Michaels craft store so I could try a variety of different projects.
Here are some tips and tricks for working with this tricky little sealer:
*It gets very sticky the more you handle it and dries pretty quickly; you need to have everything cut and ready to go.
*Use a disposable container you can throw away when you are done. I used small paper plates and some plastic trays from frozen foods and plastic yogurt cups (recycling at its best).
*Make sure your room is well ventilated, it can be smelly.
*I used a small natural bristle paint brush; the foam ones fall apart and get hard pretty quickly. I washed my brush out with warm soapy water the second I was done with it and let it air dry between coats, once the sealer sets it is permanent and won’t come out. Warm soapy water should work the same way for your hands.
*Place your project on a non stick surface, this stuff sticks to everything, I used an upside down foam egg crate, I think foil might work but I haven’t tried it yet, trial and error are the best way to see what works for you.
*Be sure to pick out the right sealer for the kind of project you are working on, there are different kinds of sealers for just about everything. My little pack had sealers with a sparkle finish, high gloss finish, matte finish, as well as one for paper and one for outdoor use.
I still have five unfinished eggs, at this point I don’t think I will be able to finish them in time for Easter so they will have to go back into the craft closet until next year (sigh), oh well, at least I finished three of them this time, better then none at all, there is always next year.
Pom Pom Bunnies
I was going to share my Bunny post with you before Easter but I ran out of time so here it is, you get a double post today.
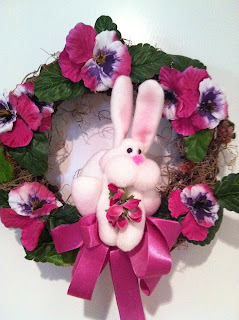
I made all these cute little Bunnies and the Bunny wreath several years ago as Easter decorations for our home, I found them again while going through my holiday decorations and thought I would share them with you this Easter.
I also made the quilted fabric Easter egg sitting in the basket, all the projects were fun to make and fairly simple. While cleaning out my project boxes in January I found the patterns and all the necessary parts and pieces to make more of them, I think I will try my hand at that again next spring, maybe my daughter would like to help me so she can make some for her children.
Thanks for letting me share my creative Easter projects with you; I hope they inspired you to create some of your own for next year or at least to pull out your Easter decorations to bring a touch of spring to your home for this bright, festive holiday.
Have a Happy and Wonderful Easter Day.
See you soon. Laurette


No comments:
Post a Comment