Monday, October 31, 2011

Paisley Pillowcases

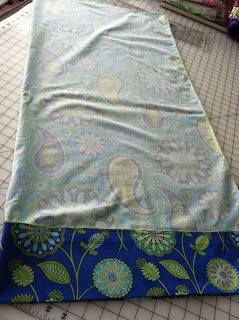
About a month ago I completed a guest room/office makeover using a pretty set of paisley prints.  One of my projects was to make some custom king size pillowcases for two extra king pillows I had laying around.  King size pillowcases are very expensive and never the right colors to match the décor, I decided to make my own.  Even though there are lots of patterns out there; this is my favorite way to make them, quick and easy.  I use this pattern as a class project with my beginning sewers.  I won’t be using a step by step sewing tutorial here just some dimensions, photos and tips to get you started.  You can e-mail me with questions if you need specific instructions and I will be glad to help you with more details.  Always happy to help a fellow seamstress/sewist.


King pillowcase (1): Approximate finished size is 20” x 40”.

 1¼ yards of 45” cotton fabric for the pillowcase body.

¼ yard of 45” contrasting cotton fabric for the cuff.

¼ yard of 45” third contrasting fabric for the flat trim.

Basic sewing supplies and sewing machine.

If you plan to use the pillowcase to sleep on, pre-wash and press all your fabrics.  When I am using them for decorative purposes only, I don’t pre-wash, keeping the sizing intact giving my fabrics a crisp look and feel.

Before cutting any of your fabrics press out all the folds and creases allowing the fabric to lay flat so you don’t end up with jagged edges when you use your scissors or rotary cutter. 

First up is cutting out the body of the pillowcase to measure out to 37” long by 40” deep, making it 20” wide when you fold it in half the long way.  Once folded it should measure, 37” x 20”. 

Open up the body fabric; lay it out flat with the print side facing up at you.

Next grab your contrasting flat trim fabric and cut a 2” x 45” piece of fabric (the width of the fabric).  Fold it in half with right sides facing up and wrong sides together, making a long strip of printed fabric, press.  Pin it to the width of the body of the fabric you laid out flat, lining up the raw edges, work from the center out as you pin, then cut off the excess ends.

Now do the same thing with the cuff fabric cutting it to 9” x 45”, fold it along the length so the print side is up and you have a nice long strip.  Lay it over both fabrics creating a sandwich with the trim between the body and the cuff fabric.  Make sure all the raw edges are even as you pin working from the center out again.  Cut off any excess fabric.

Stitch your seams in 1/4”, no trimming necessary, and now go back and edge stitch using a zigzag stitch, this way the edges won’t unravel when your fabric is washed.   This is a very important step, don’t skip it or you will have a mass of strings and a poorly made pillowcase, not giving you a professionally finished, long lasting product.  * All your seams will be finished in ¼” seams with a zigzag edge stitch.

Press your seams to set the stitches.

Pull up the cuff to reveal the trim and press it flat. (see photo)  Your pillowcase should now measure at approx. 40” long, depending on how accurate your seams are, a little more or less is just fine and will still fit. (It may be a little tight or loose depending on how full the pillow is stuffed.)

Fold your fabric inside out, right sides together, the full length of the fabric, making a long tube.  You will sew across the bottom and up the side to make your pillowcase body.  Be sure to do your edge stitching to finish off the body.

Turn and carefully press, then iron your pillowcase, for a professional look. It should take you one to two hours to complete each pillowcase depending on your skill set.  The more you make the faster it will go.

Stuff your pillowcase and show off your great new sewing techniques.

To make two king pillowcases you will need:

2 ½ yards of 45” cotton fabric for the body of the pillowcases.

½ yard of 45” cotton fabric for the cuffs.

¼ yard of 45” cotton fabric for the flat trims.

If you are thinking you would love to try making pillowcases but you really don’t need any, you can join the One Million Pillowcase Challenge.  The goal is the donation of one million pillowcases to local charities and was issued by American Patchwork & Quilting.  For details see their website at:
You can find places to donate in your area as well as lots of cute pattern ideas.  My local quilt shop holds a pillowcase making day every year, in December, where we make pillowcases for 8 hours then donate to the local women’s shelter.  It is very rewarding and I have been sewing for charity every year since they started doing it.  You can also make them on your own and send them to the suggested charities on the lists. Lots of ways to help and have fun doing it.

I hope you enjoyed my paisley pillowcase project and you can’t wait to make your own.  Look for my next post, Paisley Crazy, where you can see my complete guest room/office makeover and all the projects I did using the same pillowcase fabrics and other matching projects.  See you soon.


Where to buy paisley fabrics:


Homespun Harbor a Quilt Shop
831-630-9438
Hollister, CA


The information in this article is not a complete pattern or tutorial and is provided for information and entertainment purposes in good faith.  No warranty is provided nor results guaranteed.

Wednesday, October 26, 2011

Contain That Clutter Part 3

Recently I shared some of the unusual containers I use to control the clutter in my studio, at least some of it.  Last week while working on several projects in my outside studio, I looked around and noticed some of the containers I was working with and decided to share those as well. I don’t always work inside, sometimes I work in my outside studio when I am doing any wet work like, spray painting, working with foam for flowers or anything which is messy.  All those projects require “stuff” which needs to be contained; here is some of what I use.

This drawer might appear to be a bit untidy but it is in fact organized with several containers, one of which is a plastic style shoe box with a green lid, which is where I keep all my leftover hardware pieces from a variety of projects, you never know when you will need those little bits and pieces.

This little gem holds some of my tools; yes I said “my tools”.  I actually have my own set of hand tools and power tools; I like “more power”.  I am actually very handy with all of them, my husband is so proud.

My mini box contains leftovers from building shelves for my studio.  I found both containers in the jewelry making and embroidery departments of a craft store.  They work well for storing little parts and the removable panels allow for larger items. I could have bought a tool box but I preferred to use the unusual so they would fit in my drawer.


This little drawer came from my upstairs studio, from a set of wheel around drawers, the removable drawers allow me to move my things from one studio to another.
The little blue box my wire and floral ribbon sit in is from a frozen dinner entrée and the mini jars, in the back, holding some small brads, are Jelly sample jars from a past Christmas gift.  Use and re-purpose all those unusual containers, have some fun looking for unique colors and shapes just like I did.


The great old lunch box belonged to my father-in-law; we found it in his storage unit after his passing. My husband didn’t know what to do with it so I suggested I keep it and use it in the outside studio where he would see the box and it would get some real use as storage for my large glue gun and glue sticks.  We are both happy to have it.


 A small peg board sits just above my work bench; it was a scrap from another project and fit just right under my shelves and above the counter top.  The wooden box was re-purposed from a holder for my ink stamp collection which grew out of the box.  It now holds packing tape rolls.


For more storage ideas see;  Studios Magazine.


As you can see storage containers can come in all shapes and sizes and can be used anywhere in your studio, office, home, garage or any place you need to control that clutter.  Don’t be afraid to look at all the items you buy or use, especially those things you might otherwise throw away.  I hope this gave you some good ideas for organizing your special spaces.  Thanks for letting me share with you, see you soon.

Thursday, October 20, 2011

Pumpkin Bling

The bling bug bit me again, only this time it was pumpkin bling instead of black & white bling.  I really love decorating for fall especially decorating with pumpkins of all kinds, shapes and textures.  I have lots of different pumpkins; there are the pretty glass and ceramic ones, and the ones which light up inside and fabric pumpkins too.  When I saw a fun, easy, dazzling copper pumpkin project, created by Michael’s, I just had to make one.  Follow along with me and see how I did it.

I gathered up all the elements I thought I would need; an orange craft pumpkin, metallic copper spray paint, metallic 2 ½” ribbons, leaf/berry picks, hot glue gun/sticks, medium gauge wire, wire cutters and scissors.  Now I was set to get started.  Let the fun begin.

I wanted to be sure my paint would stick to the slick surface of the pumpkin so I gave it a VERY light sanding with a fine grit sanding block, just scratched it up a little then wiped it down. Be sure while you sand you don’t take any of the orange color off.

Since the spray paint is toxic and creates a mess it became an outside studio project.  I put down some brown packing paper on the floor to protect the surface creating a clean place to work.  I grabbed a 2 liter 7Up bottle filled with gravel, which I use for my spray projects, put it in the middle of the paper, then I placed a spray paint cap on the top of the bottle to give the pumpkin a flat surface to rest on. This keeps the pumpkin up off the floor so you can paint the majority of the bottom. Time to paint.

A couple of tips for you first time spray painters;  I usually wear gloves to project my skin from toxic paints and I always wear a mask to keep my nose and lungs clear of fumes and paint particles.  Keep the can at a reasonable distance; too close and the paint will glob up and run, get too far away and the paint won’t make it to the object you are painting, a little practice never hurts, practice on the bottle below the pumpkin if you are not sure.  Now spray it with a light even back and forth motion, keeping the can moving to prevent drips and heavy areas.  Always start to spay just before you hit the pumpkin and just as you get past it to keep the surface nice and even.

Now we’re talking, that pumpkin’s got bling, a dazzling copper bling.  WOW!  I let it completely dry for a couple of hours to make sure I could work with it without scratching off the paint.

Back to my inside studio to begin glamming up my pumpkin, Is glamming a real word? It is now; it must be if I just wrote it.  I heard it on HGTV so it must be real. Giggles.

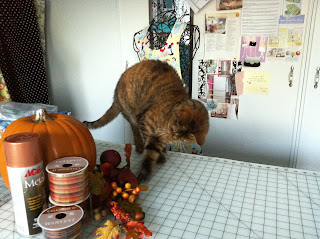
My studio helper, Honey, is getting everything ready so I can get to work right away.
         
“Now where did she say she put those scissors, she said they were right here?” 

 “I still don’t see them; they must be buried in here somewhere!”

Honey finally found my scissors and assembled all my supplies for me, I am ready to bring some bling to my pumpkin.

I begin by wrapping the pumpkin with the 2 ½” ribbon first down one side then back across the other side, using hot glue as I go along.  Tip of the day; don’t overdue the hot glue, to much enthusiasm can cause some very nasty burns; I have the scars to prove it.  The ribbon I used was very sheer so I had to be careful not to burn or melt it, not to mention burning my fingers if it oozed out through the ribbon, ouch!

Time for the bow, I am not sure I can explain how I made the bow, it is more like something I would have to demonstrate, but I will give it a try, if it is too confusing don’t say I did not warn you.  Here we go; first decide how long you want the first streamer/tail to be.  Once you figure it out pinch the ribbon together between your thumb and first finger, from there make a loop, then pinch, make another loop below that one and keep going back and forth, kind like a figure 8, adjusting the loops so you can see the pretty print, I did three loops on the top and three on the bottom, you can do as many loops as you can hold depending on how full you want your bow or how big you want it.  Leave a tail/streamer to match the other one.  Hint:  I tie it off with the wire first then I cut the tail/streamer to match the first one. I cut a little notch to make the ends pretty.


It was finally time to finish my project by hot gluing my bow to the top of my pumpkin, it took a bit of finessing to get it to stay just where I wanted it, I had to hold the bow in place for a little while to make sure the glue was dry before I let go.  It fell off twice, yikes, how embarrassing.  Isn’t she dazzling?  So shiny and full of bling, a very elegant pumpkin.

If you are not into bling and only want a pretty fall pumpkin you could wrap a plain orange craft pumpkin with ribbon, add a bow and some fall leaf picks and end up with a great table centerpiece or a festive hostess gift.

Wasn’t that fun? I bet all you crafty divas can’t wait to make a dazzling fall pumpkin of your own.  I am issuing all my readers a challenge; make your own version of my pretty pumpkin and e-mail a picture (in JPG format) of it to me at: buttonsbowsbling@gmail.com and I will post your pumpkins on my blog so everyone can see your creations.

As a special treat for submitting your Pumpkin Bling photos, they will be placed into a drawing for a special Creative Winter Craft Pack.  Winners will be announced on my blog the day before Thanksgiving.

The last day for submitting your photos is:  November 18, 2011.  After that date I won’t have time to post your photos, I will be in entertaining mode for Thanksgiving.  I can’t wait to see what you all make.  Happy Creating!

Coming soon is part three of Control That Clutter with more unusual containers for storage, some colorful fun projects, more fall decorating ideas and so much more.  See you soon.

Monday, October 17, 2011

Quilt Shop Heaven

Quilt Shop Heaven

For those of you who follow me on a regular basis you already know my studio assistant and myself were suppose to go to the big Quilt Show in Santa Clara this past weekend.  Due to unforeseen circumstances we didn’t make it to the show, we were very disappointed but it couldn’t be helped (heavy sigh).

We were, however, able to do something just as fun, at least we thought so.  We went out quilt shop hunting and came across several wonderful shops with magnificent arrays of beautiful fabrics and all the goodies to go with it.

One shop in particular really caught our attention that day; SEW BEE IT QUILTING, in Morgan Hill, CA.  What a beautiful, friendly shop, they had so many fabrics, patterns and notions to see, we were there for a long time picking and choosing all our fabrics and patterns for our next projects.  I know I just edited my fabrics but I couldn’t resist all my favorite fabrics by designer Amy Butler.  The price was fantastic and the fabrics were going quick so I just had to buy before they were all gone.

 The Amy Butler wall, I was in heaven!  Lots of pictures of this great shop, enjoy!


 This great shop really has it all, there are prints, solids, basics, batiks, patterns, books, classes and so much more, you just have to stop in and see it.

 The whole shop is bright and colorful, a truly happy place.


Rows and rows of colorful fabrics to choose from, they are a feast for the eyes, they make me smile just looking at the pretty colors.


A peak at the great selection of books and patterns and more beautiful fabrics.


The shop was really hopping with classes and lots of happy, friendly shoppers.  We got to see some fantastic quilts made by one of their customers, a mini quilt show right there in the shop. 

It was a lot of fun and the two of us can’t wait to go back and shop again.  I hope you enjoyed the little peak into this darling quilt shop we visited and I trust you will take the time to check it out for yourself if you are ever in that area.  If you are not in the area you can check out their web site listed below.
Happy shopping!

We also shopped in several other delightful quilt/fabric shops, I plan to share those, the fabrics and patterns we purchased, with you in the very near future.  Watch for those, see you soon.

Where it is:
SEW BEE IT QUILTING
94 San Pedro Ave.
Morgan Hill, CA  95037
408-778-5058
Check out their web site at:


Friday, October 14, 2011

My Favorite Things Part 1

Recently I was asked what resources I used to find my inspiration for creative ventures; what do I read, where do I find the things I purchase, who are my favorite fabric and pattern designers, etc..?
Because I have been asked this so often over the years I decided to share just a few of my many, many favorite things with you.  So here we go….

 Some of the magazines I use for sewing and pattern inspiration are; Vogue Patterns, Sew News, Sew Style, Threads, Stitch and Sew Hip, a magazine from the UK.  Vogue Patterns always gives me the current color cues for the coming seasons along with the new styles and lots of technical sewing advice.

 I enjoy looking at interior design and DIY magazines to see current decorating styles and fun projects.  I especially love the elegant rooms in Traditional Home and the warmth of Romantic Homes.  Do It Yourself and Fresh Home both give me a colorful, fun, creative and up to date decorating approach for some of the rooms I recently did. You will be seeing some of those rooms in the near future, watch for them.

Studios by Cloth.Paper.Scissors is my all time favorite studio design magazine, you get to see all kinds of studios with lots of storage and layout ideas which come in every size, shape, style and design. Super fun and very inspiring, I always end up moving things around to make my creative spaces function and look better right after a new issue comes out.  My husband dreads it when I pick up the newest copy, it means he is going to be putting his muscles to work moving my very heavy furniture around, poor guy.  He would hide the magazine if he thought he could get away with it.

Where Women Create is another magazine I enjoy, I read this one because it is based on the stories about creative women and their work spaces. I purchase it because of the featured woman who appears on the cover, if I want to know more about her and her studio I buy it.

This beautiful studio was featured in Where Women Create the Aug/Sept/Oct 2011 issue.  I just couldn’t resist showing it to you; it’s the work space of Jinger Adams, the Creative Director for Provo Crafts.  Pretty in pink and soft blue, love it.

This bright colorful Studio belongs to Heather Bailey, prolific textile and pattern designer; I really love all of her work and have quite a bit of her extensive, incredible line in my studio.  I would purchase it all if I could get away with it.  To read more about her and Jinger and view all the incredible photos of their work spaces, you can order Where Women Create at www.Stampington.com .

Pictured are some of the goodies I purchased from Heather Bailey.  She has some fantastic bamboo felt, which is super soft to the touch and very high quality, unlike the synthetic felts made from recycled bottles which are thin and of poor color quality.  Her patterns are adorable and so are her fabrics.

I adore all things Amy Butler; she is another fantastic textile artist, seamstress, pattern designer and author.  I have three of her four books, several patterns and some of her fabrics.  I would love to have it all but I would need a warehouse to store it (giggles).  I guess I will just have to limit myself to a few yards of fabric from time to time.

My goodness I could go on and on and I will in part 2 of My Favorite Things.  I have so much to share with you I decided to break it up in parts, at this point I am not sure how many parts there will be, at least two installments right now and more to follow off and on.  I hope you enjoyed viewing a few of my favorite things with me and you are looking forward to reading the next one.  See you soon.

To order:
Studios – Cloth.Paper.Scissors
www.interweavestore.com

Where Women Create

Heather Bailey
heatherbailey.typepad.com

Amy Butler

The rest you can find wherever you purchase magazines, I like Barnes & Noble.

Happy Shopping!


Wednesday, October 12, 2011

Fabric Heaven & My Studio Helper

 Once again it’s quilt show season, with a parade of beautiful quilts and fabulous fabrics from around the world, all on display for the avid quilter and seamstress.  Because I am both a quilter and a seamstress, my studio assistant and I will be attending this weekend’s Pacific International Quilt Festival in Santa Clara, California.  This show hosts over 800 quilts, wearable textiles and 300 vendors featuring all kinds of patterns, fabrics, notions and so much more. I can’t wait to go!

Since I am a totally addicted to beautiful fabrics and patterns I will be like a kid in a candy store surrounded by all my favorite goodies wondering what to buy first.  I will have to set a budget and have my assistant hold me back from buying excesses of the fabrics I fall in love with (let’s hope my assistant has been working out, she will need super human strength to drag me away).


 Everyone in the studio has been excitedly planning out our one day trip (it takes several days to see it all), with the exception of my little studio helper, Honey.  She begged and pleaded to go and was told no, due to the fact she is so small, size was a good excuse and the fact she is a cat. (Shh...) Don’t tell her, she will be in a real mood; she doesn’t know she’s a cat.  It’s already bad enough she is giving me the cold shoulder and exhibiting some bad behavior, where did my sweet little studio helper go?
Frankly someone had to stay behind, do the inspections and manage the studio, besides she drew the short straw.

Honey is pouting because she has to stay in the studio while we go to the quilt show.


 “What do you mean you want me to fill orders while you are gone?” “I don’t think so… I am calling in sick the minute you leave.”  Just another day in the life of my much pampered studio helper, looks like I created a little fur diva, what’s a gal to do?

We are really looking forward to going to the show this weekend then coming back to tell you all about the fantastic goodies we found, hopefully we will have lots of pictures to share with you as well.  I am not sure if we are allowed to take photos but we are going to try.  I am looking forward to sharing all our adventures with you next week, be sure to look for them.

In the meantime I have more projects and bling to share with you.  See you soon.

Pacific International Quilt Festival –Santa Clara, CA
Managed by Mancuso Show Management 
www.quiltfest.com

Side note:  I am finally working on my new laptop, a bit slow going trying to get use to the programs, Windows 7 and a new key board.  My retrieved data and photos were safely loaded on to the new computer and are ready to go.  I am one lucky woman.

A big THANK YOU!! To Jolene and Steven for all their patience, time and talent, I would be totally lost without you!  Love you both.


Data and photo retrieval by:

Rx-TEK, Hollister, CA
831-636-9400
Related Posts Plugin for WordPress, Blogger...